
Collections In VBA – The Ultimate Guide
Contents
If you have ever used VBA, you’ve used Collections.
They are an object that can store multiple values.
If you need a crash course on VBA from the ground up – check out our VBA Excel courses!
Starting Off – Collections
Excel VBA Collections have associated methods and properties, which are the best way to get started.
“Worksheets” is a collection that contains all the worksheets in your workbook.
Typing Worksheets.Count, will give you the amount of worksheets in a workbook.
This makes it so you save time, by not counting sheets up manually, and removes any sort of human error from the equation.
Once you learn how to use VBA, you can expand on this to make changes to the Worksheets all at once!
Make Your Own Collection
So, how do we make our own collections?
We will be using VBA, but you can also make a macro to generate the VBA code for you!
Step 1: Press ALT-F11 on your keyboard in order to access the Visual Basic Editor.
Step 2: Go to the Insert Tab and select Module.
Step 3: Enter the following code.
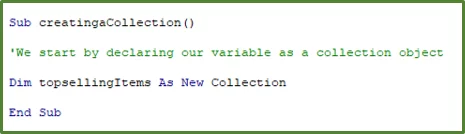
And your collection is made!
Now let’s get some data in there, and start using it!
Adding Items To A Collection
To add the items to our collection, we use the following code.
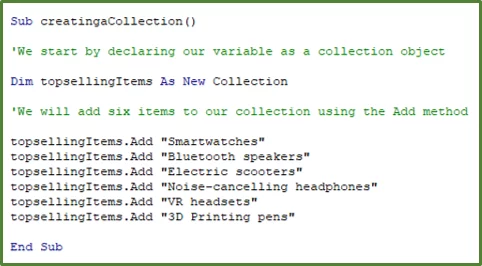
While it seems very simple, this is a very important step to get right!
If you make an error when making your, you’ll have to remove the entire piece of data and re-enter it.
Collections do not have a way to edit a specific entry within them.
Removing Items From A Collection
To remove a specific item from a collection, you should use its Index number.
The following code will remove the item from index number 2 – for us that’s Bluetooth speakers.
topsellingItems.Remove (2)
And just like that, the item is removed from your collection.
Note: When working with VBA collections, it is important to remember that items start indexing at 1 and not 0!
Looping Through the Created Collection
Now we have our own collection, we can make a loop to go through them one by one.
The For Each Loop is perfect for this.
This adjusted code will go through each item one by one, and use Application.Speech to read through them all.
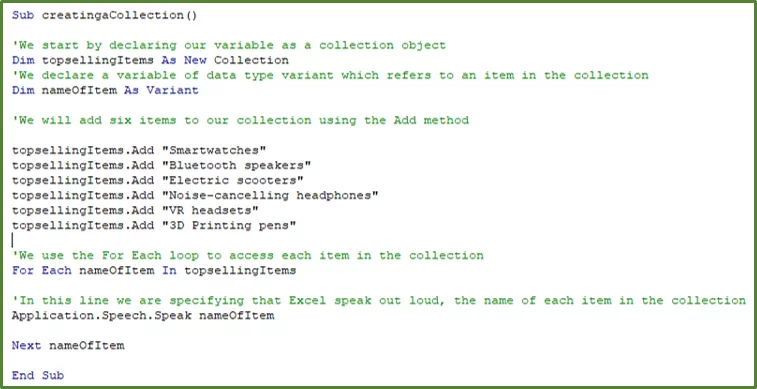
To run the code, hold your cursor in the sub procedure and press the F5 key on your keyboard.
You will hear Excel saying the name of each of the items, in the collection.
Collections Vs Arrays
Collections are very similar to Arrays in Excel.
Arrays even have pre-defined functions like UNIQUE and RANDARRAY that help you work with them.
But they have a few key differences.
When deciding what to use, always keep these characteristics in mind.
Arrays
- Can be one or two-dimensional
- Fixed size
- Can only store variables of the same data type
- Indexing starts at 0
Collections
- Always one dimensional
- The size changes as items are added or removed
- Can store items of different data types
- Indexing starts at 1
It is very simple to create a custom collection and add items.
However, there are some disadvantages.
The most important one is: arrays run faster than collections.
When accessing the values of an Array, Excel will take much less time compared to using collections.
If time is a concern, knowing how to create arrays is a great tool to have.
Conclusion
Excel VBA Collections provide a simple way to work with multiple items.
We strongly recommend you use them when learning to work with VBA!
Special thank you to Taryn Nefdt for collaborating on this article!


- Facebook: https://www.facebook.com/profile.php?id=100066814899655
- X (Twitter): https://twitter.com/AcuityTraining
- LinkedIn: https://www.linkedin.com/company/acuity-training/