
VBA Class Modules: A Step By Step Guide
Contents
VBA Class Modules let you create your own custom objects.
You can then combine this with object-oriented programming tools.
This is one of the most advanced concepts we teach on our Excel classes in London, so take it step-by-step!
What Is A Class Module?
VBA is an object-oriented programming language.
When you write VBA code, you are manipulating objects in some way.
When you insert a class module, you are creating the specifications for a custom object.
This is great when you want to model real-world objects.
A normal module, on the other hand, is a place to store your sub procedures and functions.
A normal module cannot be instantiated as a class.
Excel also has standard built-in objects that are available, for you to work with.
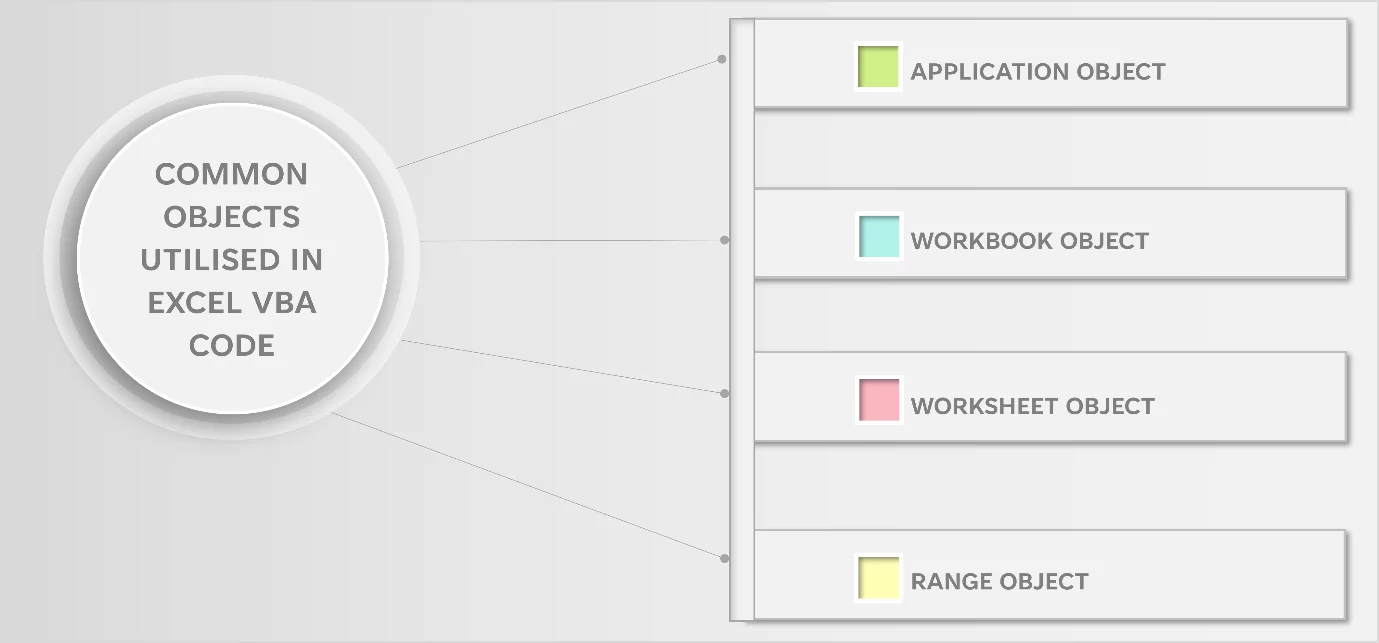
Each of these objects have prebuilt properties and methods.
If this is sounding too complex, check out these articles:
1 – Introduction to Macros will get you up on creating simple macros in Excel.
2 – Introduction to VBA explains the VBA object model in Excel, and what objects, properties and methods are.
3 – Mastering VBA Special Cells covers the Special Cells method, as well as the Activate, Select and Copy methods.
4 –How to Use the COUNTA Function teaches you WorksheetFunction object.
Insert The Class Module
Let’s create a class for a plant, and all of its specific details.
Step 1:
Press ALT-F11 on your keyboard in order to access the Visual Basic Editor.
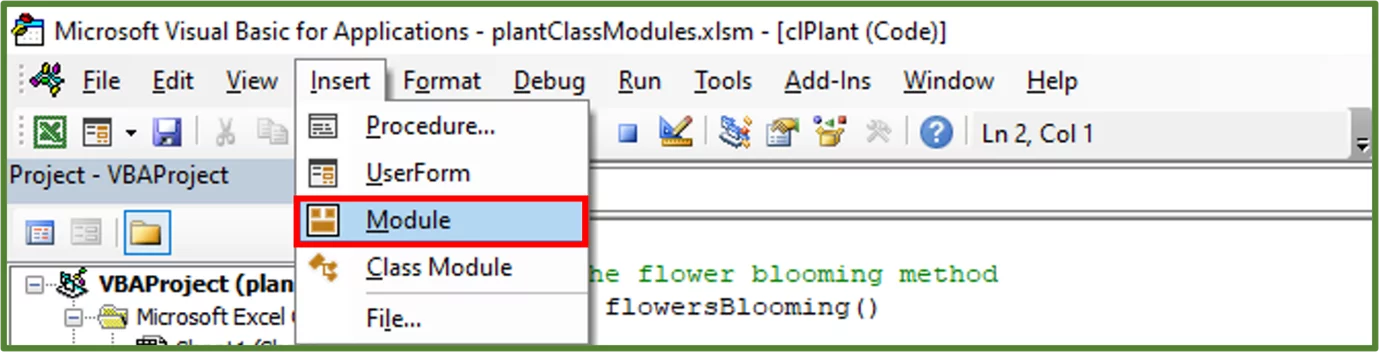
Step 2:
Go to the Insert Tab and select Class Module.
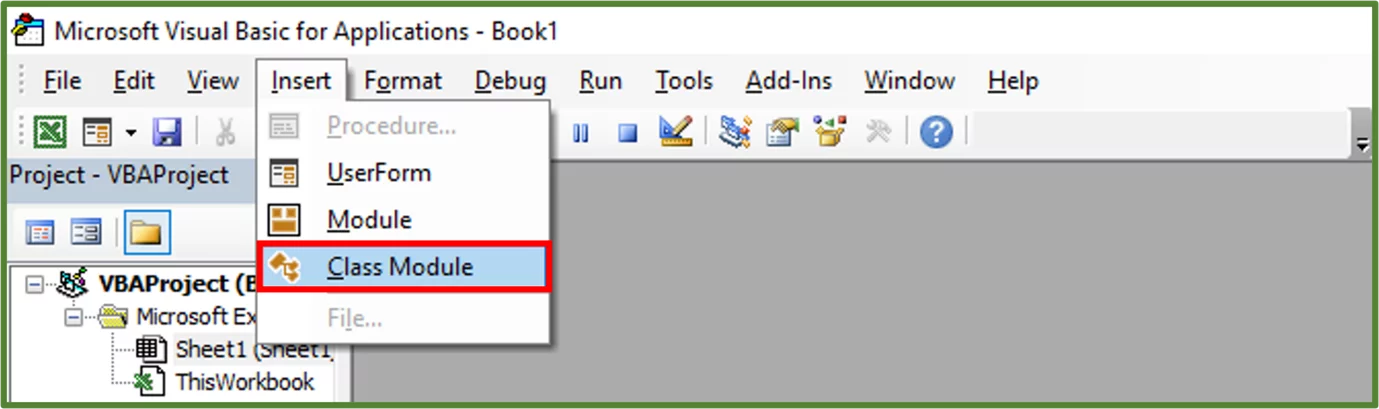
You should see the following.
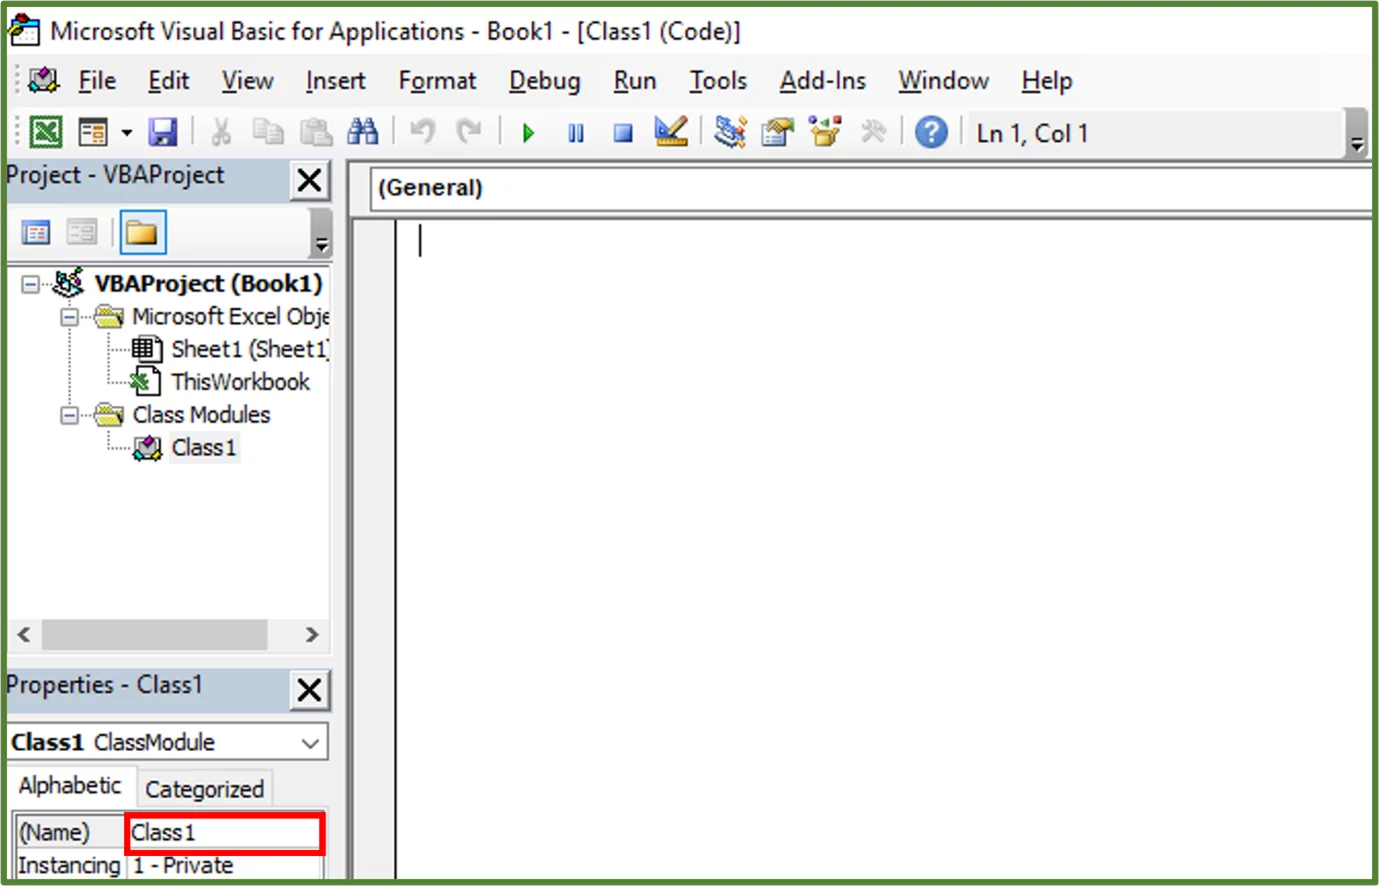
The Object Template
The first thing we are going to do, is choose a name for our Class.
When naming the class don’t give it the name of an existing built-in object or keyword.
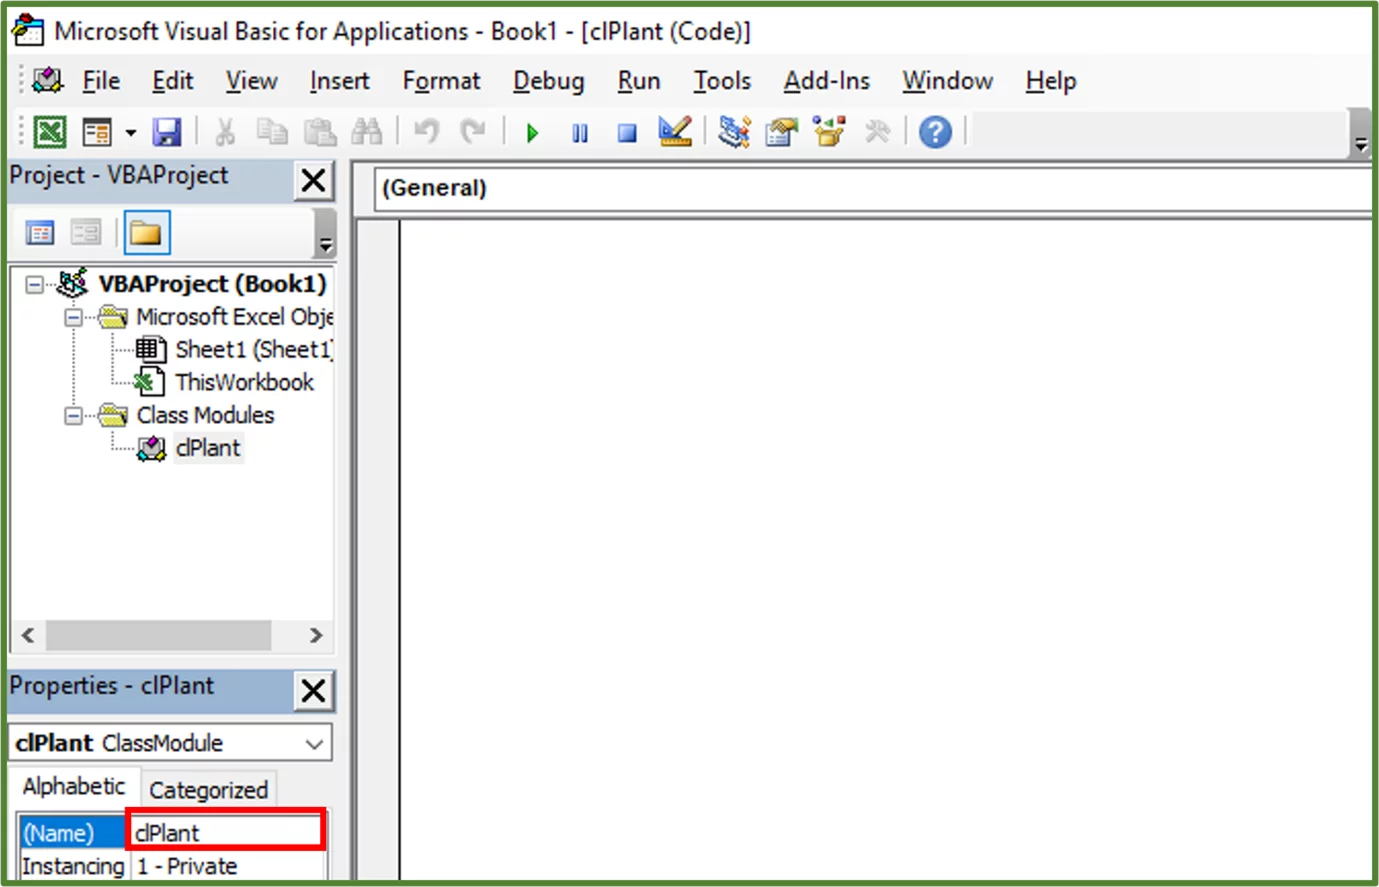
Step 1:
So, in our case we’ll name our class clPlant.
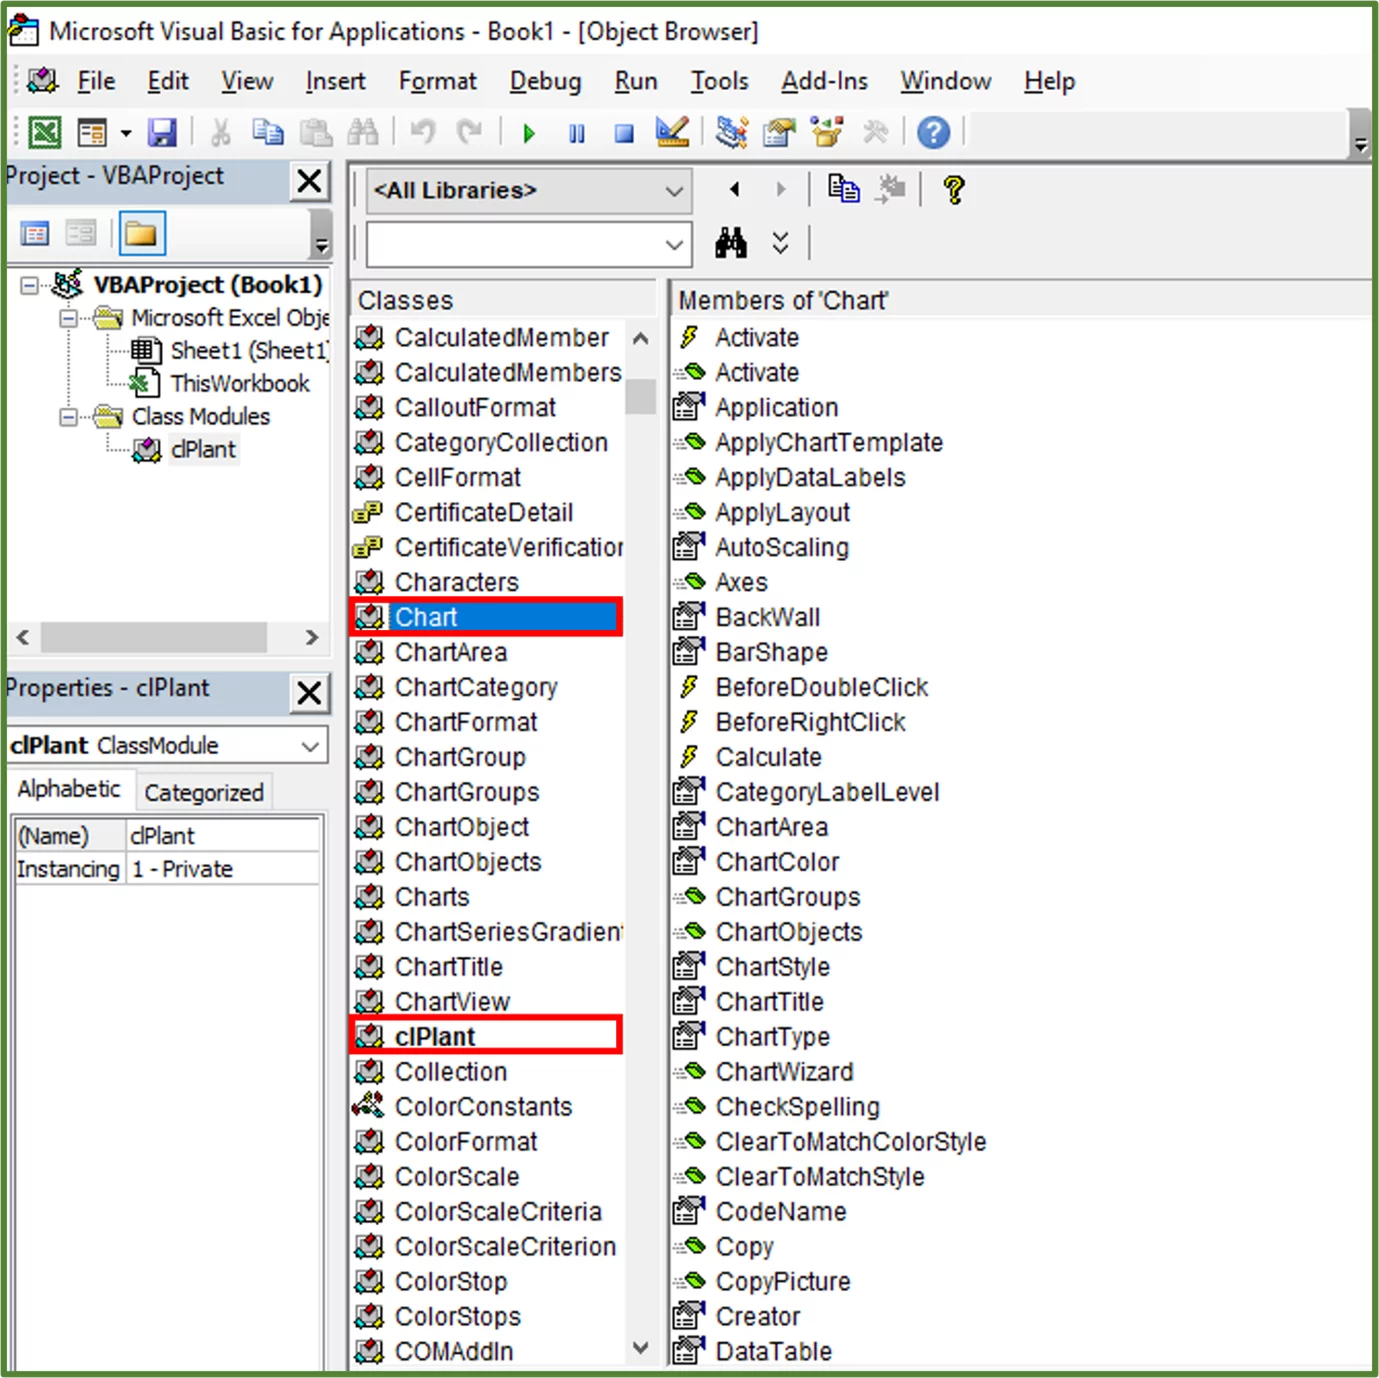
Go to the View Tab and select Object Browser.
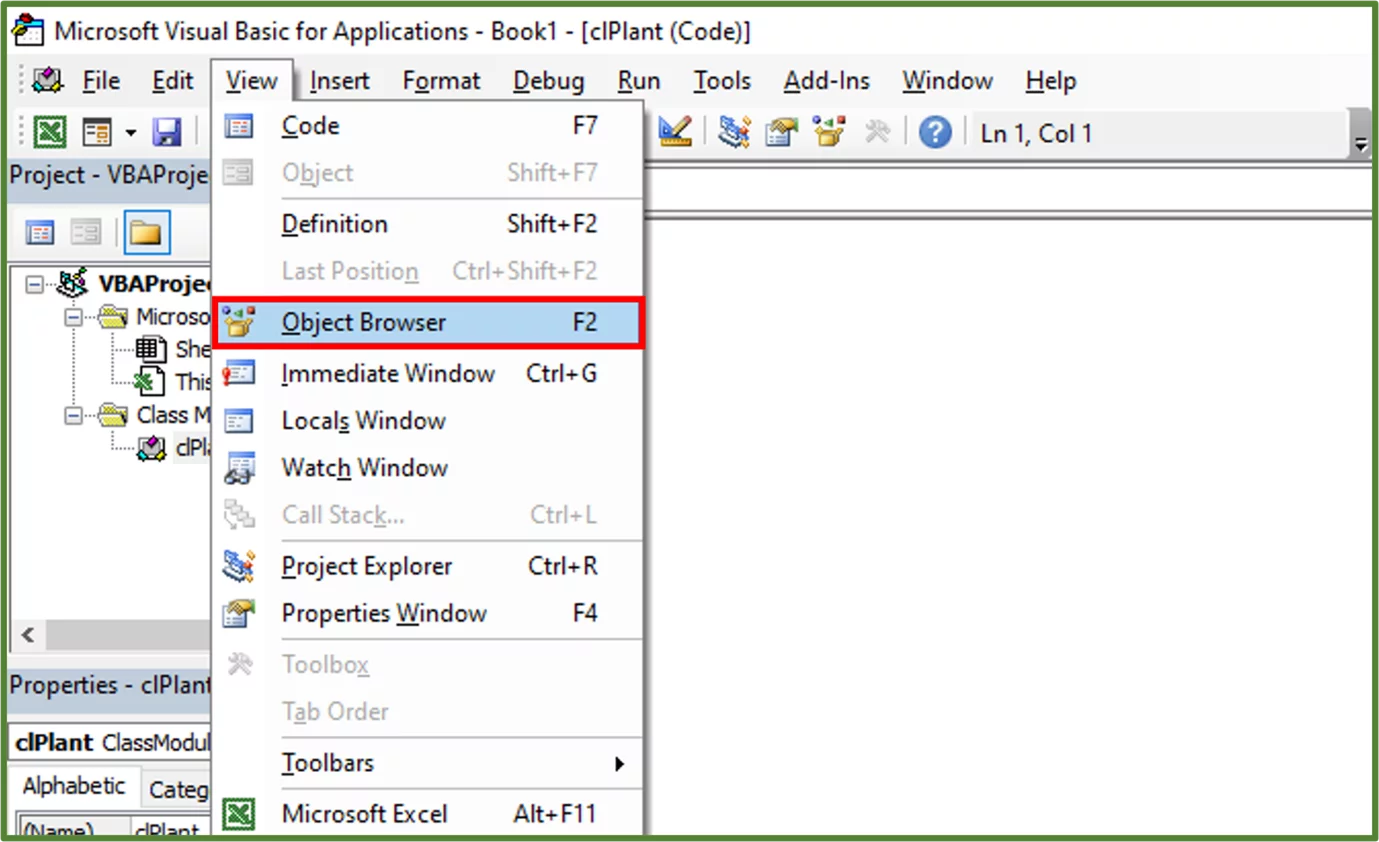
Now you will be able to see all the built-in objects and their associated properties and methods.
You will also be able to see the new class that we just created.
Step 2:
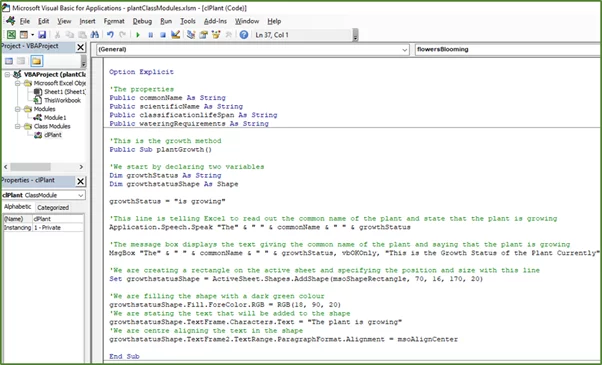
Copy in the following code in the class module we just created.
Option Explicit
‘The properties
Public commonName As String
Public scientificName As String
Public classificationlifeSpan As String
‘Scroll Down This Box For More!
Public wateringRequirements As String
‘This is the growth method
Public Sub plantGrowth()
‘We start by declaring two variables
Dim growthStatus As String
Dim growthstatusShape As ShapegrowthStatus = “is growing”
‘This line is telling Excel to read out the common name of the plant and state that the plant is growing
Application.Speech.Speak “The” & ” ” & commonName & ” ” & growthStatus
‘The message box displays the text giving the common name of the plant and saying that the plant is growing
MsgBox “The” & ” ” & commonName & ” ” & growthStatus, vbOKOnly, “This is the Growth Status of the Plant Currently”
‘We are creating a rectangle on the active sheet and specifying the position and size with this line
Set growthstatusShape = ActiveSheet.Shapes.AddShape(msoShapeRectangle, 70, 16, 170, 20)
‘We are filling the shape with a dark green colour
growthstatusShape.Fill.ForeColor.RGB = RGB(18, 90, 20)
‘We are stating the text that will be added to the shape
growthstatusShape.TextFrame.Characters.Text = “The plant is growing”
‘We are centre aligning the text in the shape
growthstatusShape.TextFrame2.TextRange.ParagraphFormat.Alignment = msoAlignCenterEnd Sub
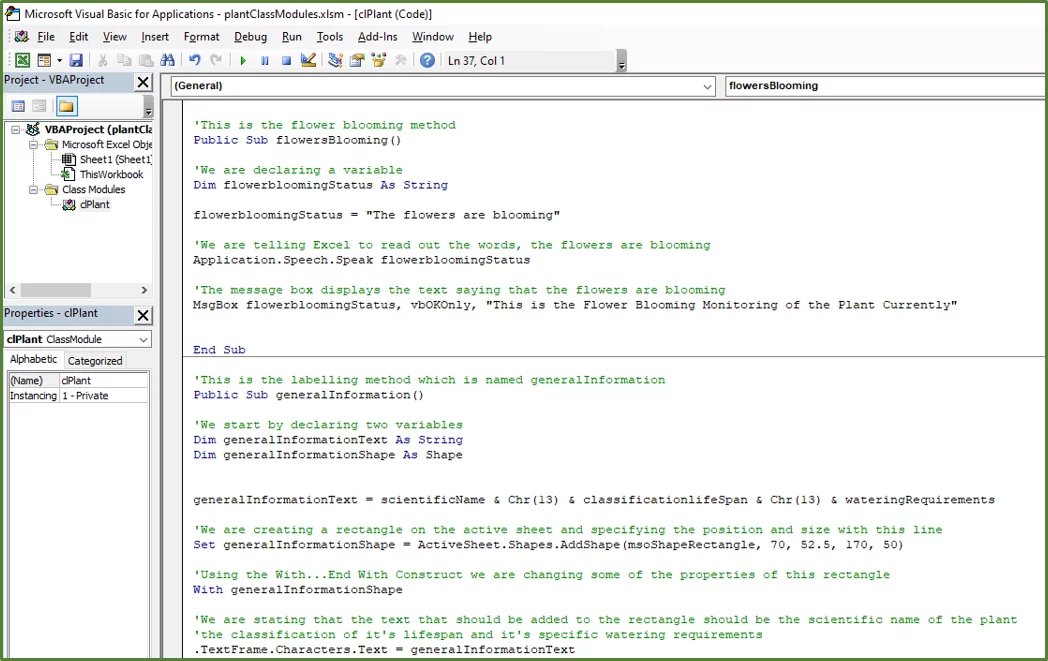
‘This is the flower blooming method
Public Sub flowersBlooming()
‘We are declaring a variable
Dim flowerbloomingStatus As StringflowerbloomingStatus = “The flowers are blooming”
‘We are telling Excel to read out the words, the flowers are blooming
Application.Speech.Speak flowerbloomingStatus
‘The message box displays the text saying that the flowers are blooming
MsgBox flowerbloomingStatus, vbOKOnly, “This is the Flower Blooming Monitoring of the Plant Currently”
End Sub
‘This is the labelling method which is named generalInformation
Public Sub generalInformation()
‘We start by declaring two variables
Dim generalInformationText As String
Dim generalInformationShape As ShapegeneralInformationText = scientificName & Chr(13) & classificationlifeSpan & Chr(13) & wateringRequirements
‘We are creating a rectangle on the active sheet and specifying the position and size with this line
Set generalInformationShape = ActiveSheet.Shapes.AddShape(msoShapeRectangle, 70, 52.5, 170, 50)
‘Using the With…End With Construct we are changing some of the properties of this rectangle
With generalInformationShape
‘We are stating that the text that should be added to the rectangle should be the scientific name of the plant
‘the classification of it’s lifespan and it’s specific watering requirements
.TextFrame.Characters.Text = generalInformationText
‘We are filling the shape with a dark green colour
.Fill.ForeColor.RGB = RGB(18, 90, 20)
‘We are specifying that the font for the text should be in italics
.TextFrame2.TextRange.Font.Italic = msoTrue
End With
End Sub
We start off by making four variable declarations in our class module.
These will be the properties of our object. We use the Public statement.
We then create the methods of our custom object by using sub routines.
In our growth method, we are utilising the speak method of the built-in Speech object.
Use The Object!
We now want to use the custom object in our code.
Step 1:
To do this, go to the Insert Tab and select Module.
Step 2:
In the module, create a sub procedure called mainCode and start by using the object.
Here, we use the Dim keyword in combination with the New keyword.
You will notice that as you type, Intellisense will detect the new class that we just created.
Select clPlant from the menu and press Tab.
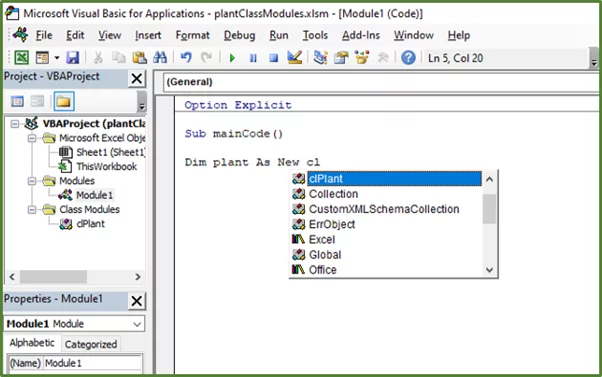
Then copy in the following code:
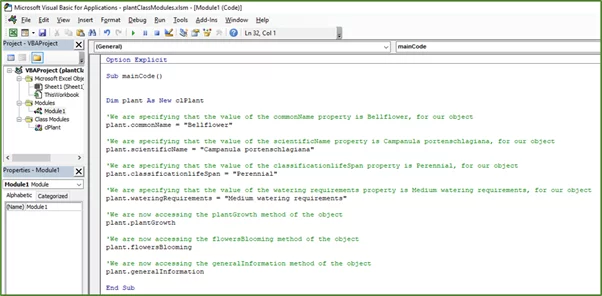
Option Explicit
Sub mainCode()
Dim plant As New clPlant
‘Scroll Down This Box For More!
‘We are specifying that the value of the commonName property is Bellflower, for our object
plant.commonName = “Bellflower”
‘We are specifying that the value of the scientificName property is Campanula portenschlagiana, for our object
plant.scientificName = “Campanula portenschlagiana”
‘We are specifying that the value of the classificationlifeSpan property is Perennial, for our object
plant.classificationlifeSpan = “Perennial”
‘We are specifying that the value of the watering requirements property is Medium watering requirements, for our object
plant.wateringRequirements = “Medium watering requirements”
‘We are now accessing the plantGrowth method of the object
plant.plantGrowth
‘We are now accessing the flowersBlooming method of the object
plant.flowersBlooming
‘We are now accessing the generalInformation method of the object
plant.generalInformation
End Sub
Now if we wanted to create another object based on our class, we can use this template.
Any object would have all the properties and be able to access all the methods specified.
Step 3:
Now we want to assign the mainCode macro to a shape.
So, when the user clicks on the shape, the code will run.
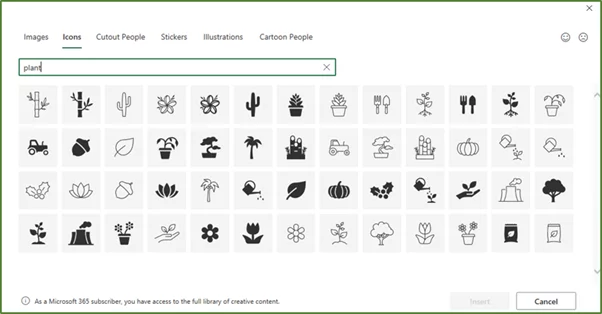
On a blank sheet in the workbook, go to the Insert Tab and in the Illustrations Group, select the Icons option.
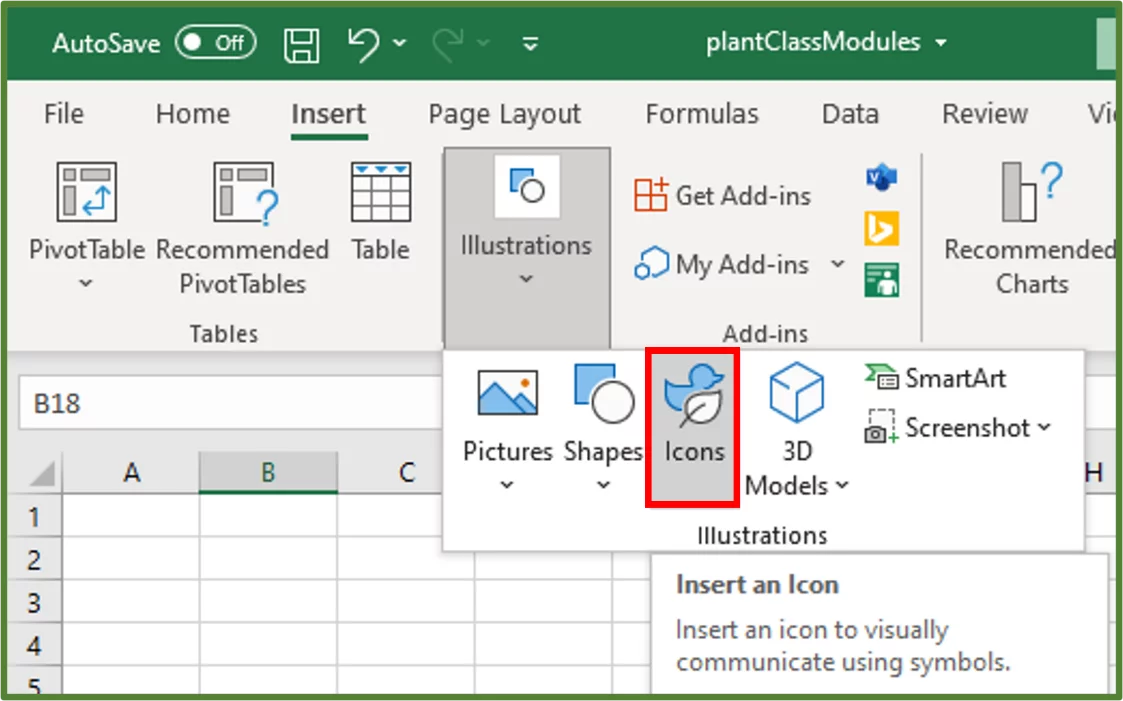
Type plant in the Search box to see all the icons that are related to plants.
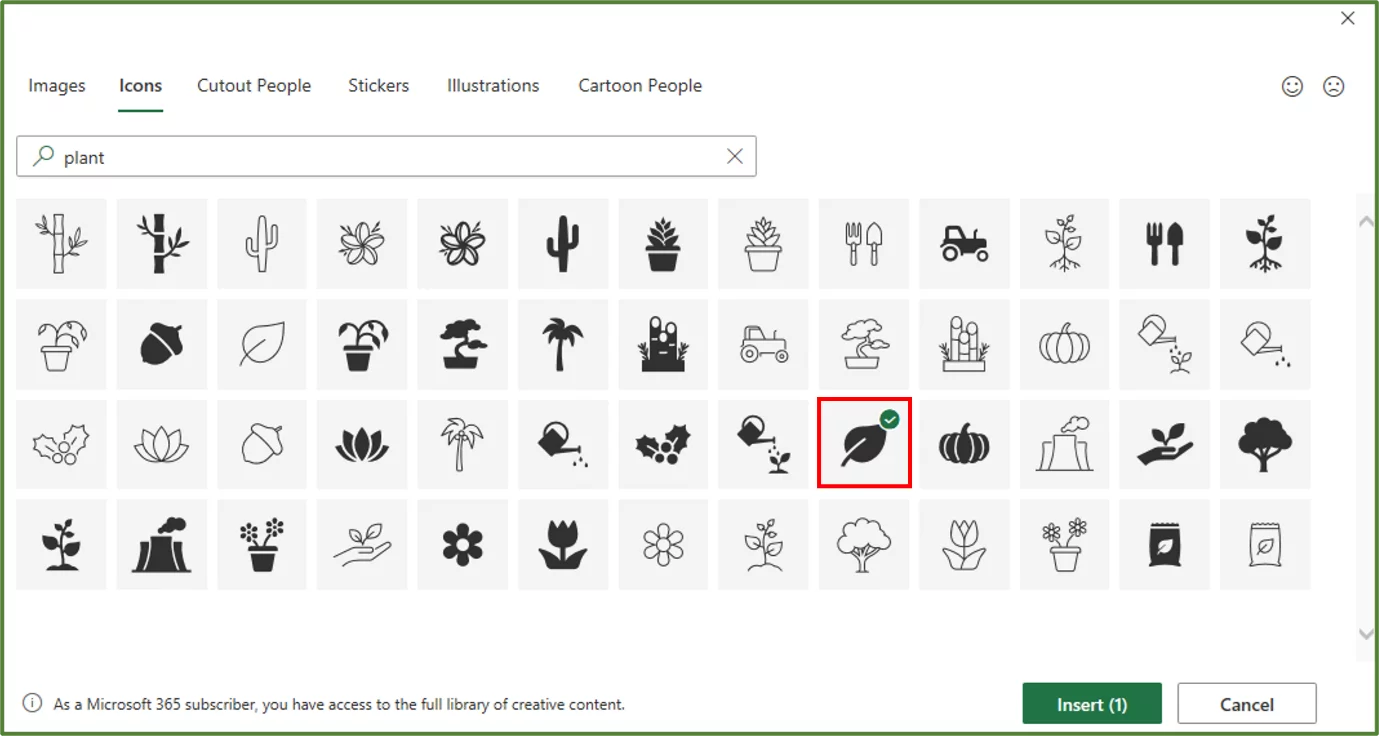
Select the filled leaf icon and click the Insert button.
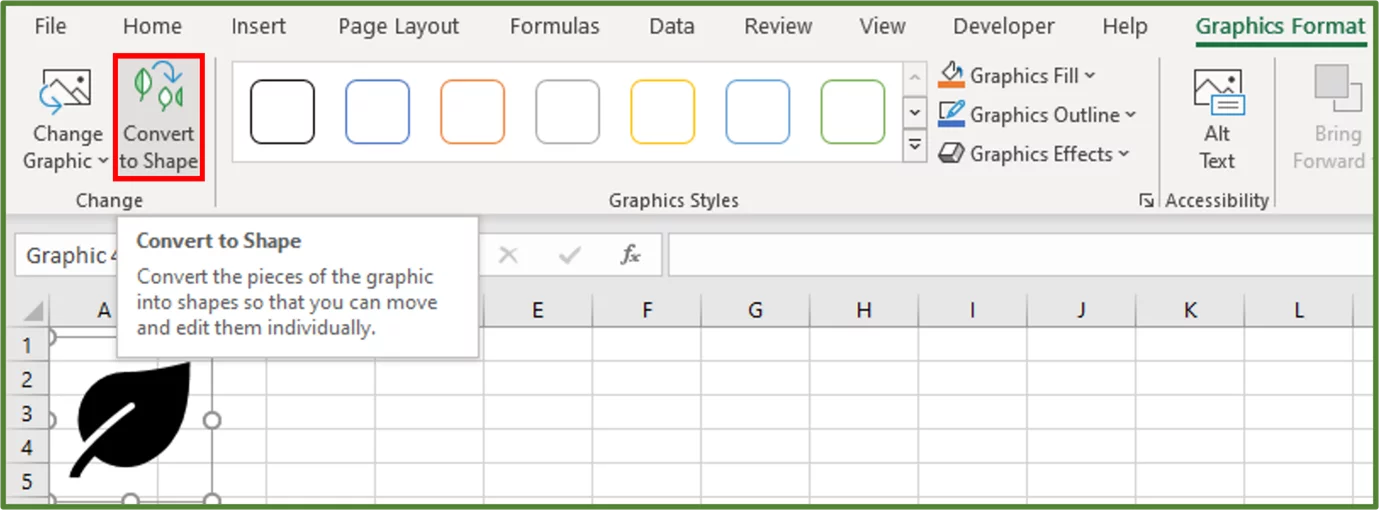
With the icon selected, go to the Graphics Format Tab and in the Change Group, select the Convert to Shape option.
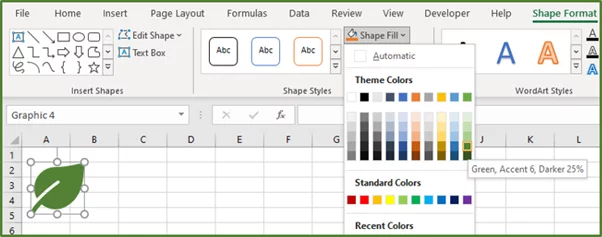
Now with the shape selected. Go to the Shape Format Tab, and in the Shape Styles Group, select Shape Fill.
Select the Green, Accent 6, Darker 25% fill.
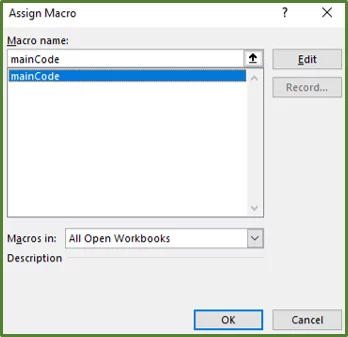
Now right-click the shape and select Assign Macro…
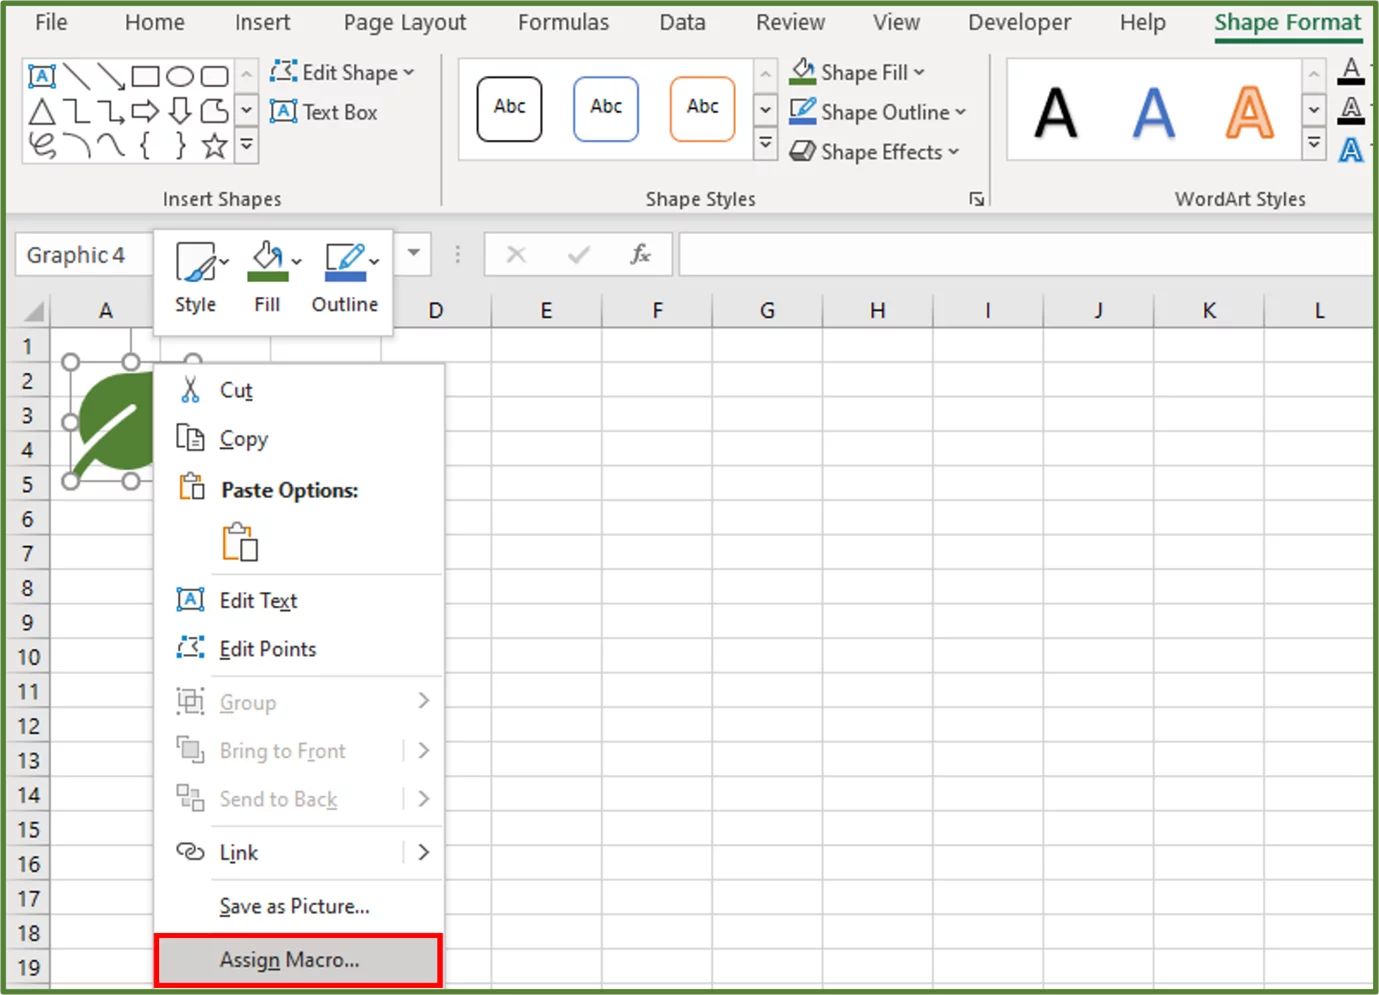
Using the Assign Macro Dialog Box, select the mainCode macro and then click Ok.
Step 4:
Now make sure the shape is not selected.
Then go to the View Tab and, in the Show Group, uncheck the Gridlines option.
If you hover over the shape, the cursor should change.
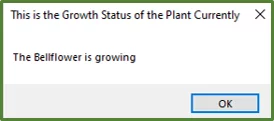
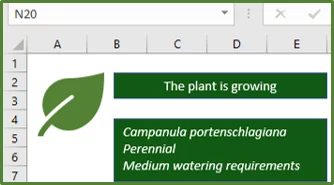
If you press the shape. You should hear the words the Bellflower is growing, then see a text box.
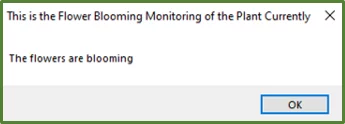
Then you’ll hear “the flowers are blooming” spoken, and see another text box.
Excel will then create two rectangles on the worksheet.
One just states that the plant is growing.
The other contains all this information from the class!
Learning Objectives
You now know how to:
- Use a Class Module to create a custom object
- Specify the Properties and Methods of this custom object
- Call methods
- Make use of the Speech.Speak method to make Excel read text out loud
- Insert an Icon, convert it to a shape and assign a macro to the shape
Additionally, you have an understanding of:
- What the difference between a Class Module and a Normal module is
Conclusion:
Class modules are amazing for creating your own custom objects.
This is a great tool to have, and you can expand on it by using them for add-ins.
Special thank you to Taryn Nefdt for collaborating on this article!


- Facebook: https://www.facebook.com/profile.php?id=100066814899655
- X (Twitter): https://twitter.com/AcuityTraining
- LinkedIn: https://www.linkedin.com/company/acuity-training/