Using The Gradient Mesh Tool In Adobe Illustrator
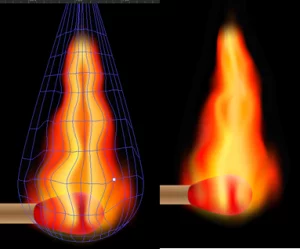
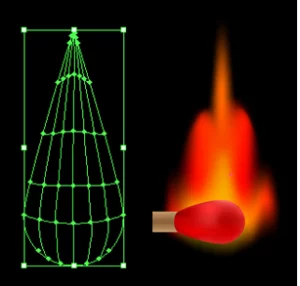
Want to make a realistic looking flame effect like this?
Use the Gradient Mesh Tool!
What Does The Tool Do?
The Gradient Mesh Tool in Adobe Illustrator breaks up a shape into a grid of rows and columns.
Inside this grid, any of the mesh points can be assigned to any colour you would like!
You can even set the number of rows and columns created to your needs.
This creates realistic-looking images with smooth blends between colours, the limit of which is up to the user.
You could use this tool for anything from creating backgrounds to mimicking realistic paintings.
You can even turn your real-life drawings into vector images with this guide, then use the Mesh Tool on them!
Step By Step Guide
1 – Creating The Building Blocks
Before you use the gradient mesh tool, we need a starting point.
To do this, we are going to create a match.
The first thing to do is to create your background, just a black box on your page.

Next, you are going to want to create a rectangle.
This will be the body of your match, so don’t make it too thick or too long.
2 – Adding The Gradient Mesh Tool
Now we will start to use the Gradient Mesh Tool as well as the direct selection tool.
Go to the Object tab and down to the Create Gradient Mesh tool.
After you click on that, you will get a dialog box pop up .
Pick 4 rows, 4 columns and an appearance of flat.
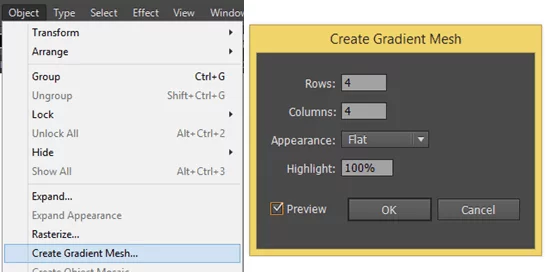
Once you click ok, it will make you rectangle like this.
The grid that appears on the rectangle is the gradient mesh.
We are now going to want to add some colour to it with the direct selection tool.
Click the direct selection tool and go to the centre anchor point in your gradient mesh.
Double click it to select it and then you can add a colour to it.
The Gradient Mesh Tool lets you set colours to anchor points within the mesh.
And it will use that colour until it hits another anchoring point or colour.
This means when you use the mesh tool you get realistic colouring on objects.

We suggest colouring it in stages by colouring the middle then move out to wards the sides.
For the middle line pick a darker shade of brown and add it to the middle row of points.

Next, you are going to want to select a brown colour that is a shade lighter.
Add it to the row above and below the middle row.

After that you will need to select a colour another shade lighter.
Again go up and down and colour the edges light brown.
You should have something which looks like this.

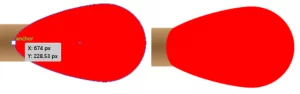
3 – Making The Match Head
Now we need to start making the head to our match.
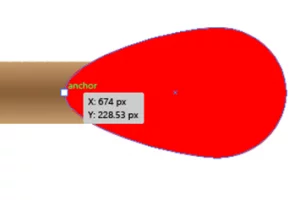
Draw a circle using the eclipse tool, make sure it’s only slightly bigger than the match stick.
Then use the direct selection tool to pull out one of the mesh points just like below.
When you have pulled out the mesh points, add some anchor points to make it look like the head of the match.
To do this you need to go to where the pen tool is and then click and hold it.
A menu should pop up after doing that where it will have a couple of different options.
Select the add anchor point tool.
You are going to want to add mesh points and you need to add them to where the match head meets the match stick.
Once you have the two new anchor points you will want to delete the one you pulled out.
To do this go back to the pen tool and click and hold again and select delete anchor point tool and delete it.
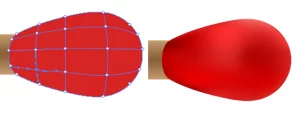
Now you have the shape you are going to want to colour it, we are going to use a gradient mesh again.
It does not matter how many rows or columns you have but the more you have the more control you have!
So all you want to do is colour with different shades of red to make it look like an actual match head.
This is just one of many fantastic tools we also study on our Adobe Illustrator courses!
4 – Creating The Flame Outline
Now we have our match we are going to need to make a flame to go with it.
First thing you want to do is to make an ellipse and use the direct selection tool to bring the top point out.
Then click it on the top point which will make it into this water drop shape.
This layer should be set behind the match layer.
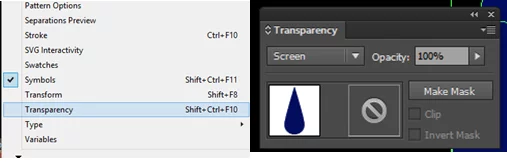
First of all we need to make it transparent when the colour is black.
Select your shape and then go to the window tab then down to Transparency.
In the pop-up window there will be a dropdown menu from the list big screen.
This will make blacks seem transparent, so you will need to colour the shape black.
You also need to do this for the other shapes we made earlier.
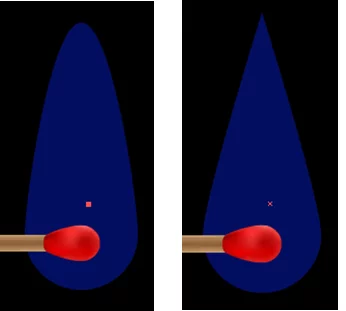
5 – Making The Flame
When you have done that you can use the Gradient Mesh Tool and start to colour it.
This is only the first part of the flame so don’t go to crazy on the colouring.
Don’t use the outside edge columns otherwise you will get a hard edge on the flame.
For this part all you have to do is to make a basic shape of how you want the flame to look.
After that you will need some more detail so create the same shape as the stage before.
You also want this layer to sit above the match so it makes it look like it is lit.
For this part you are going to want to move the anchor points in the mesh so the flame looks more dynamic.
Then you are ready to colour it – use light and dark colours in the appropriate places!
And your flame is done!
You could technically use this to create some low poly images, but you can make them more easily with our guide to creating geometric low poly images.
Final Thoughts
The Gradient Mesh Tool is one of the best that Adobe Illustrator has to offer.
The applications for this tool are almost limitless, as it allows you to colour each and every object in detail.
If you want to learn more Illustrator tips, follow this guide to making 3D letters without the 3D Tool.