
The Ultimate Guide To Using Send Email In Power Automate
Contents
- 1 The Process for Sending an Email in Power Automate
- 1.1 Simple Example: Sending an Email using Power Automate manually
- 1.2 Step 1: Creating a flow
- 1.3 Step 2: Configuring Send an email (V2) action
- 1.4 Step 3: Testing the flow
- 1.5 Making Our Flow It a Bit More Complex
- 1.6 Power Automate send email HTML – Formatting the body as HTML
- 1.7 Power Automate: Send an email with image
- 1.8 Power Automate: Sending an email with attachment
- 1.9 Power Automate send email from shared mailbox
- 1.10 Power Automate send email with options
- 1.11 Troubleshooting
- 1.12 Conclusion
Power Automate allows you to automatically send emails when certain things take place.
Although not all emails can be automated, day-to-day scenarios such as reminders, notification when an event occurs, regular updates on products etc., can be automated which reduces cost and saves time.
This article focuses on the Power Automate send email feature using Power Automate Cloud.
The Process for Sending an Email in Power Automate
Let’s start by understanding the three different components that make up an automation solution for sending emails using Power Automate.
1. Trigger
Sending an email may be the only purpose of a flow or it could be one of the many actions a flow performs.
In both cases, we need to identify which triggers the flow will run. This is the first step to creating any flow.
It could be, for example:
-
- When an event occurs or something changes in a cloud-based system.
- A specific day or a specific time.
- Manually starting the flow from any device.
For a detailed look at triggers see our article that covers All About Power Automate Triggers.
2. Connector
The next step is to make use of a built-in connector to send the email using an email application.
Connectors in Power Automate establish a connection between Power Automate and other services.
There are hundreds of standard connectors built into Power Automate which are available for use across all licensing plans of Power Automate.
Premium connectors are similar except that they require additional licensing.
Some of the standard connectors available for sending emails are Mail, Office 365 Outlook, Outlook.com etc.
3. Email Content
You will need to provide the content for any email that Power Automate will be sending.
The content for an email is usually stored in a cloud-based data source but you can also build emails completely from scratch (including formatting) within the flow.
Automated emails can include images and attachments as well.
Power Automate flows are covered extensively during our Power Automate training courses.
Simple Example: Sending an Email using Power Automate manually
Let’s now see how to send an email using a very simple example.
Let’s assume that we have the email IDs of 5 users who attended a training course. If you think you may have delivery issues you can always put them through a verifying tool to check the emails of the users.
We would like to send them an email for successfully completing the course.
Step 1: Creating a flow
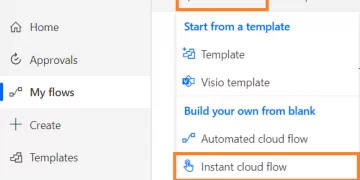
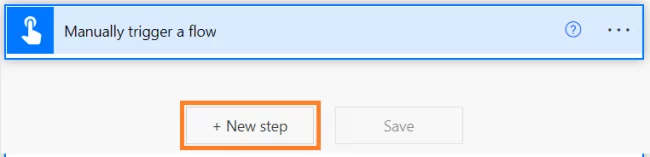
- Create an Instant Cloud Flow – Click on Instant Cloud Flow under New Flow.

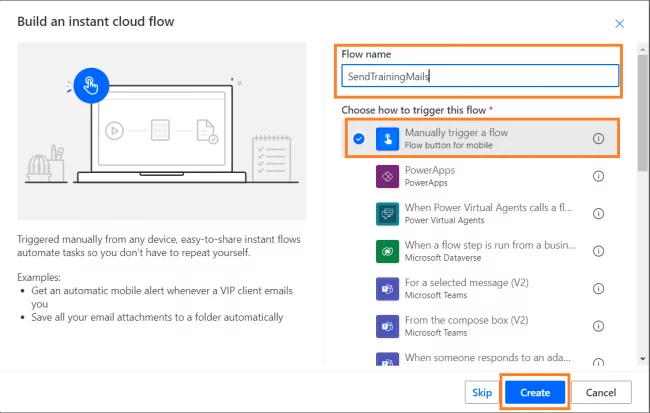
- Enter the Flow Name, select Manually Trigger a Flow, click on Create.

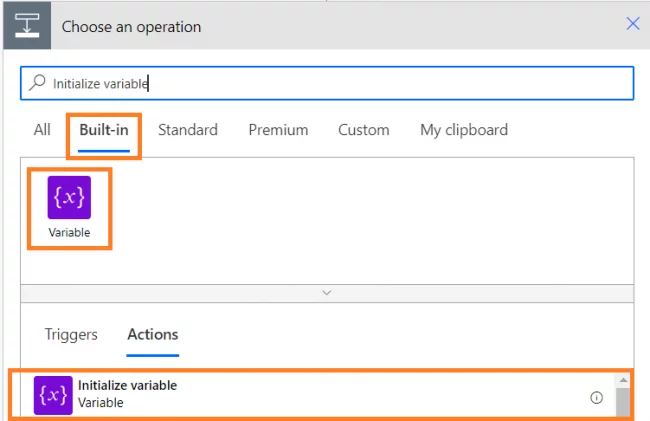
- Click on New step.

- Click on Variable under Built-In tab. Select Initialize Variable

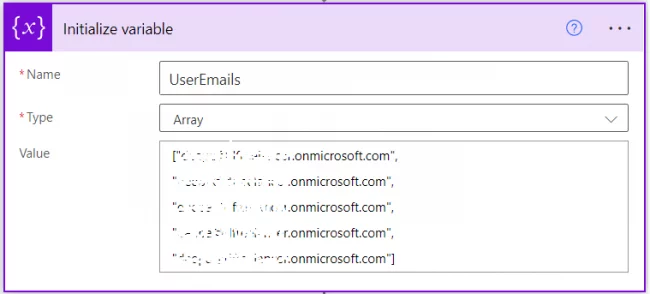
- Enter Name as “UserEmails”, select Type as “Array”, enter list of 5 emails IDs using comma as separator. Each email ID has to be entered within double quotes and the entire array is enclosed in square brackets.
Example:
[
“abc@contoso.com”,
“def@contoso.com”,
“ghi@contoso.com”,
“jkl@contoso.com”,
“mno@contoso.com”
]

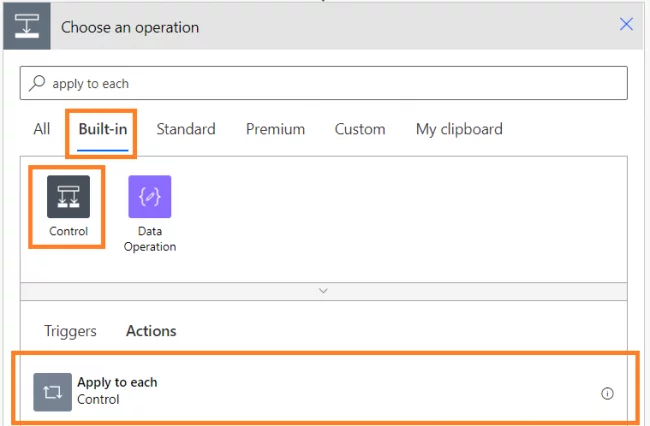
- Click on New step.

- Click on Control under Built-in tab and select Apply to each

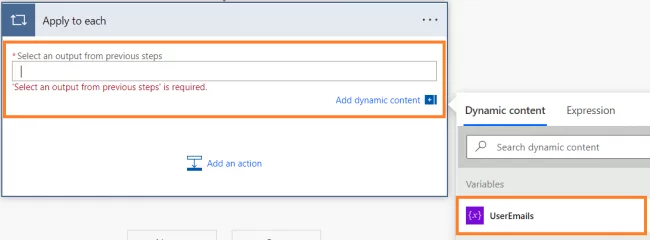
- Inside the Apply to each action, select UserEmails variable from Dynamic Content.

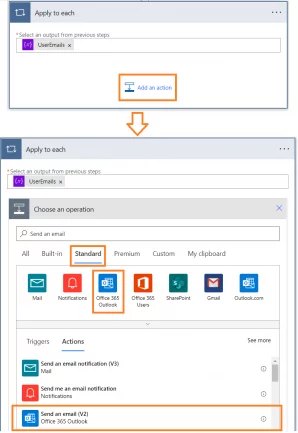
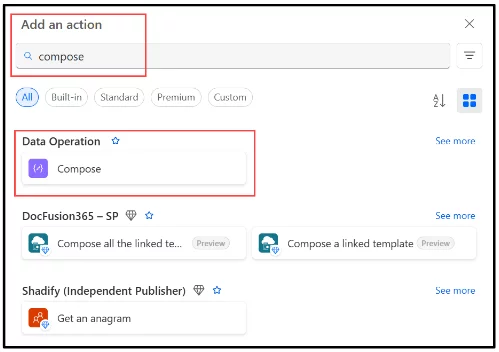
- Inside the Apply to each action, click on Add an action. Click on Office 365 Outlook under the Standard tab and select Send an email (V2).

Step 2: Configuring Send an email (V2) action
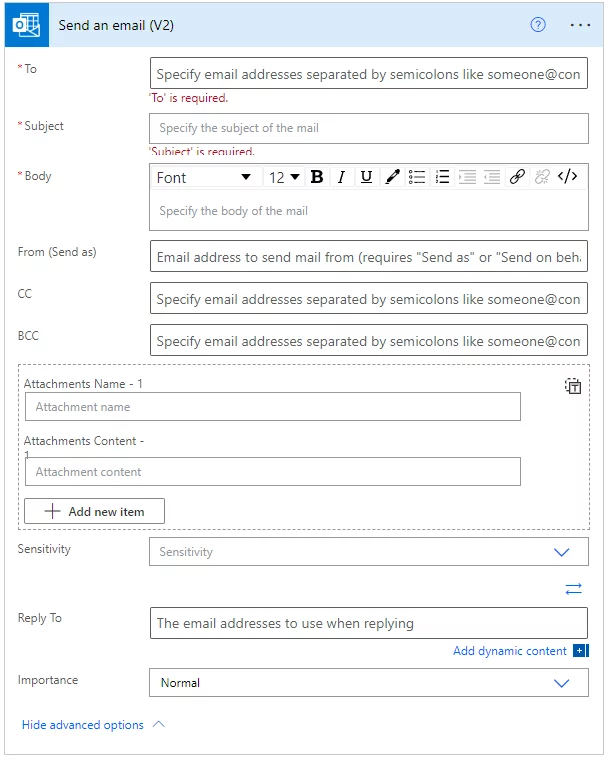
After adding the Send an email (V2) action, click on Show Advanced Options to see all the configuration options.
You can see that apart from the basic fields required for an email like To, CC, BCC, subject and body, there are a few other parameters that we can configure:
1. From (Send as)
Here, you enter the email address of the email sender. The user running the flow will need to have Send on behalf permission for the email address entered.
2. Attachments
This is the section that allows you to include attachments.
3. Sensitivity
This sets the sensitivity of the email and only accepts a string value.
4. Reply To
This is the email adress which any emails sent by ‘Reply’ or ‘Reply To All’ will be sent to.
5. Importance
You can set the importance of the email as Normal, Low or High.

Let’s enter values into the fields.
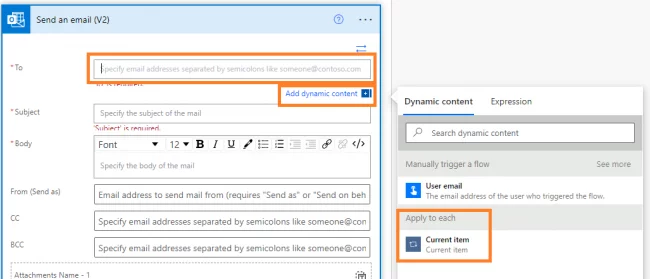
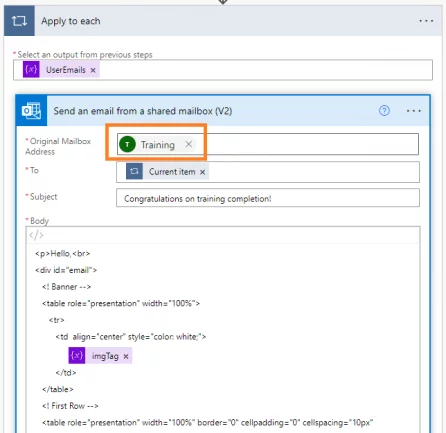
- Click inside To field, click on Add dynamic content and select Current item under Apply to each. With every iteration, the loop picks one email address from UserEmails array variable as the Current item.

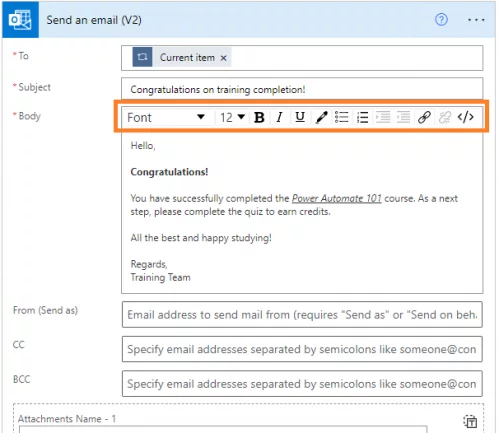
- Let’s add the Subject and As you can notice, there is tool pane available in the Body section where we can do some basic formatting to the email body.

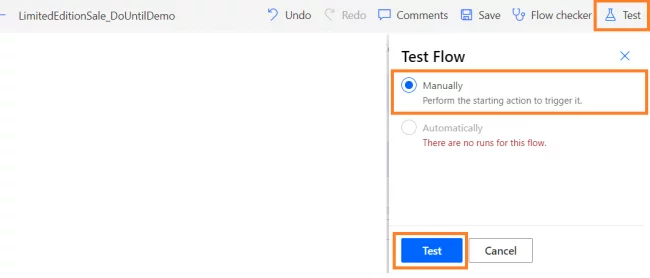
Step 3: Testing the flow
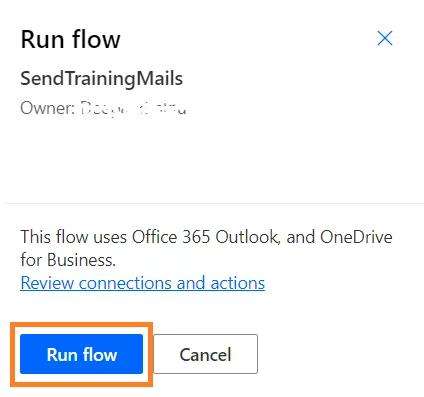
- Click on Test. Select Manually and click on Test

- Click on Run Flow.

- Click on Done.

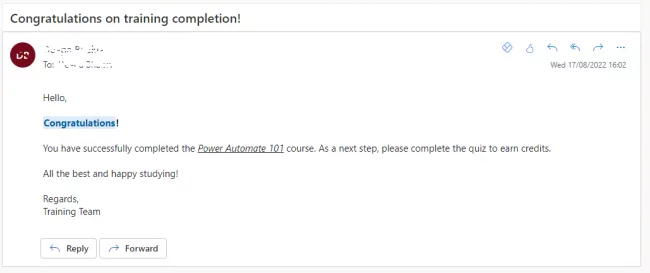
- After the test run completes, we can check the inbox of the recipient. The mail received by all the recipients as viewed in Outlook for the Web is shown below.

Making Our Flow It a Bit More Complex
Now that we are able to send an email, let us modify the body to make it look nice and also add an image and an attachment.
Power Automate send email HTML – Formatting the body as HTML
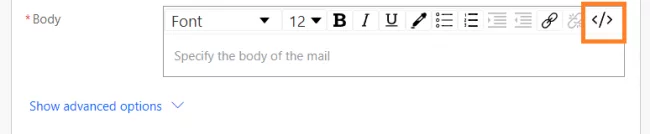
- Click on the </> button in the tool pane. We can see that the body of the email is within HTML tags. We can add any HTML content in this editor.


- Copy and paste the below HTML. As you can see, the HTML snippet contains <table>, <div>, <p> and few other basic HTML tags.
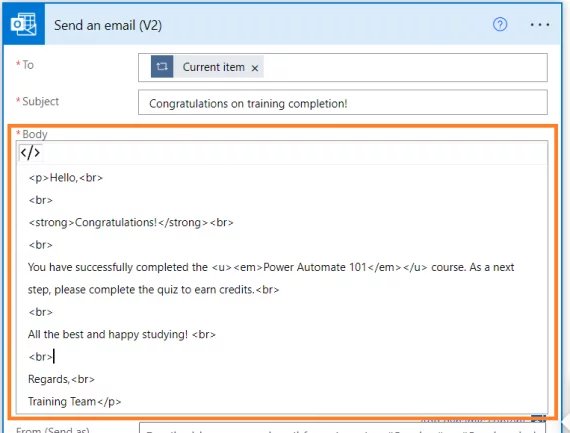
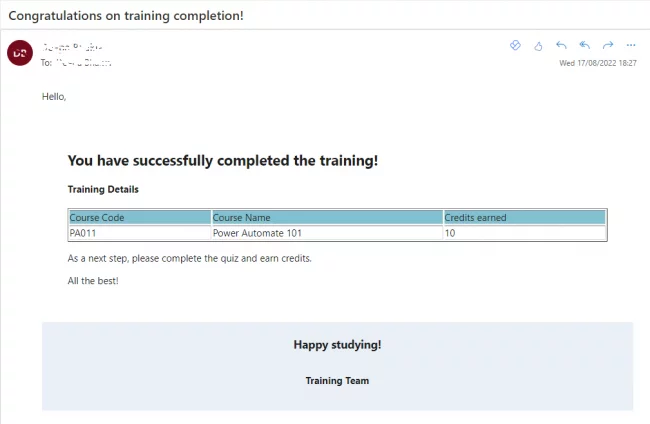
<p>Hello,<br>
<div id=”email”>
<! First Row –>
<table role=”presentation” width=”100%” border=”0″ cellpadding=”0″ cellspacing=”10px” style=”padding: 30px 30px 30px 30px;”>
<tr>
<td>
<h2> You have successfully completed the training!</h2>
<h4> Training Details </h4>
<table role=”presentation” width=”100%” border=”1″ cellpadding=”0″ >
<tr style=”border: 1px solid #d9d9d9;background-color:#82c1d1″>
<td align=”left” style=”border-left:1px”>Course Code</td>
<td align=”left” style=”border-left:1px”>Course Name</td>
<td align=”left” style=”border-left:1px”>Credits earned </td>
</tr>
<tr style=”border: 1px solid #d9d9d9;”>
<td align=”left” style=”border-left:1px”>PA011</td>
<td align=”left” style=”border-left:1px”>Power Automate 101</td>
<td align=”left” style=”border-left:1px”>10</td>
</tr>
</table>
<p>
As a next step, please complete the quiz and earn credits.
<br>
</p>
<p>
All the best!
</p>
</td>
</tr>
</table>
<! Banner Row –>
<table role=”presentation” bgcolor=”#EAF0F6″ width=”100%”>
<tr>
<td align=”center” style=”padding: 20px 20px;”>
<h3> Happy studying! </h3>
<p>
<br><strong>
Training Team </strong>
</p>
</td>
</tr>
</table>
</div>
</p>
- Save and test run the flow again. The email received by the recipient looks like this.

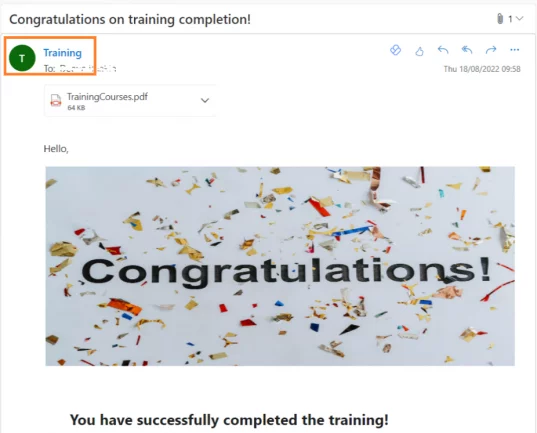
Power Automate: Send an email with image
Now let us add an image inside the email body. There are 2 ways to add images.
- Method 1 – Add the URL of the image in the src attribute of HTML img tag directly. This is suitable when the image is hosted publicly so that all users can access the image.
Let us modify the HTML body to include a <table> tag which has an <img> inside it as highlighted below.
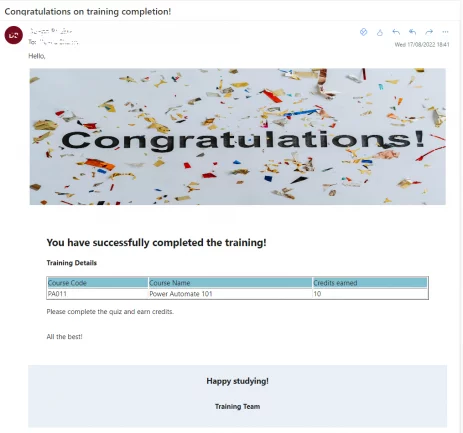
<p>Hello,<br>
<div id=”email”>
<! Banner –>
<table role=”presentation” width=”100%”>
<tr>
<td align=”center” style=”color: white;”>
<img alt=”congratsImg” src=”https://images.pexels.com/photos/8127309/pexels-photo-8127309.jpeg” height=”300px” width=”100%” align=”middle”>
</td>
</table>
<! First Row –>
<table role=”presentation” width=”100%” border=”0″ cellpadding=”0″ cellspacing=”10px” style=”padding: 30px 30px 30px 30px;”>
<tr>
<td>
<h2> You have successfully completed the training!</h2>
<h4> Training Details </h4>
<table role=”presentation” width=”100%” border=”1″ cellpadding=”0″ >
<tr style=”border: 1px solid #d9d9d9;background-color:#82c1d1″>
<td align=”left” style=”border-left:1px”>Course Code</td>
<td align=”left” style=”border-left:1px”>Course Name</td>
<td align=”left” style=”border-left:1px”>Credits earned </td>
</tr>
<tr style=”border: 1px solid #d9d9d9;”>
<td align=”left” style=”border-left:1px”>PA011</td>
<td align=”left” style=”border-left:1px”>Power Automate 101</td>
<td align=”left” style=”border-left:1px”>10</td>
</tr>
</table>
<p>
Please complete the quiz and earn credits.
<br>
</p>
<p>
All the best!
</p>
</td>
</tr>
</table>
<! Banner Row –>
<table role=”presentation” bgcolor=”#EAF0F6″ width=”100%”>
<tr>
<td align=”center” style=”padding: 20px 20px;”>
<h3> Happy studying! </h3>
<p>
<br><strong>
Training Team </strong>
</p>
</td>
</tr>
</table>
</div>
</p>
Save and test the flow again. The email received by the recipient looks like this.

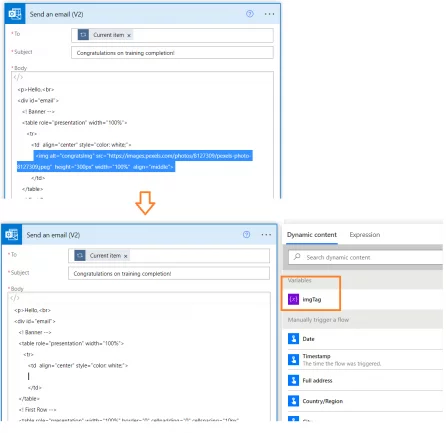
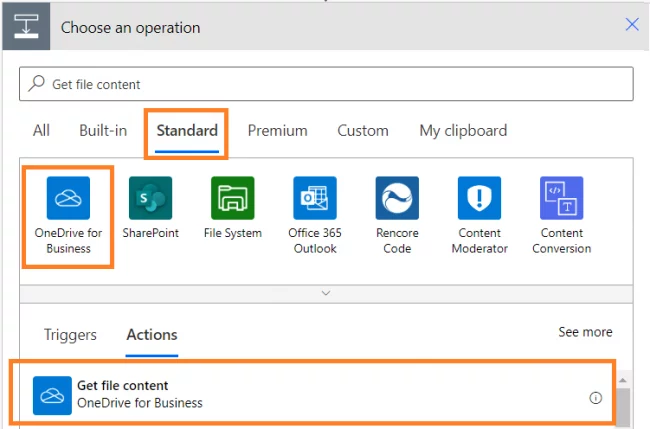
- Method 2 – Upload the image to cloud storage like OneDrive and embed the image using the file content.
- Click on Insert a new step icon before the Apply to each loop.

- Click on OneDrive for Business under Standard tab and click on Get file content.

- For the file, click on the folder icon and browse to the location of the image file.

- Next, add a new step, click on Variable under Built-In tab. Select Initialize Variable
- Enter Name as “imgTag”, select Type as “String” and enter the value as
<img src=”data:image/jpeg;base64, ” alt=”CongratsImg” height=”300px” width=”100%” align=”middle”/>
- Now we need to include the file content got from step b after base64, as shown below.
<img src=”data:image/jpeg;base64,*insert file content here*” alt=”CongratsImg” height=”300px” width=”100%” align=”middle”/>
To do this, place the cursor after base64, and then click on Expressions. Enter “.$content”. Now place the cursor at the start, select Dynamic Content and select File Content. Click on OK.

- Now in the email body, select the HTML img tag and replace it with the imgTag variable.

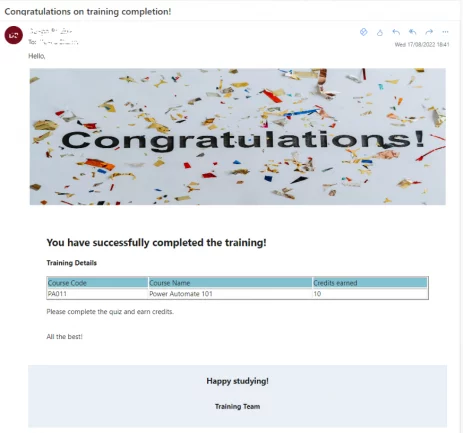
- Now save and test run the flow. The recipient will receive an email with the embedded image as shown below.
Power Automate: Sending an email with attachment
Now let us add a pdf document from OneDrive as attachment to the email. For this, first we need to get the file from OneDrive. If you want to send multiple PDFs it’s going to be easiest to combine them first using a pdf merger tool.
- Click on Insert a new step icon before the Apply to each loop.
- Click on OneDrive for Business under Standard tab and click on Get file content.
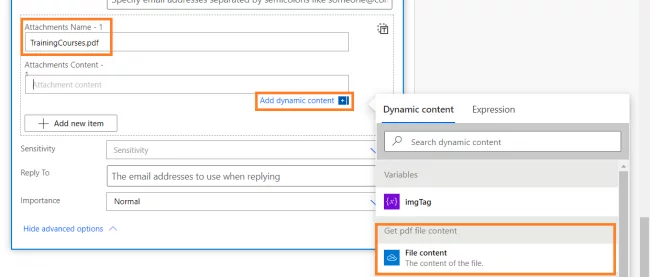
- Rename this newly added action to Get pdf file content by clicking on ellipsis icon and then clicking on Rename.

- For the File, click on folder icon and browse to the location of the pdf file.

- Now in the Send an email (V2) action, in the attachment section, enter Attachment Name as “pdf”. For Attachment Content, click on Dynamic Content and select File Content of Get pdf file content action.

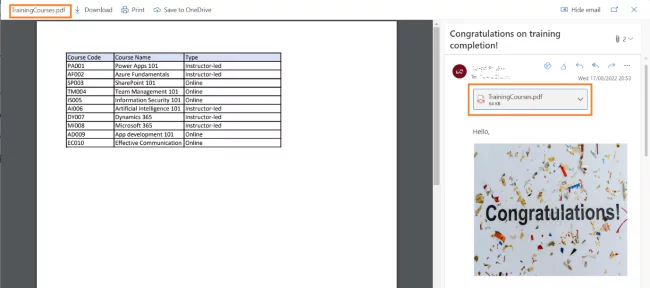
- Save and test the flow. The email received by the recipient will now have the attachment in the email.

You can notice that the From address of the email is the user who created the flow, which may not be suitable in all cases. Let us see an alternative for this in the next section.
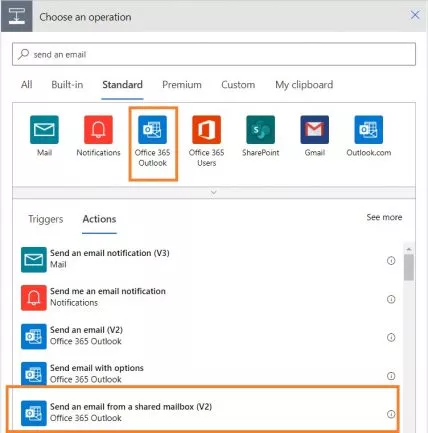
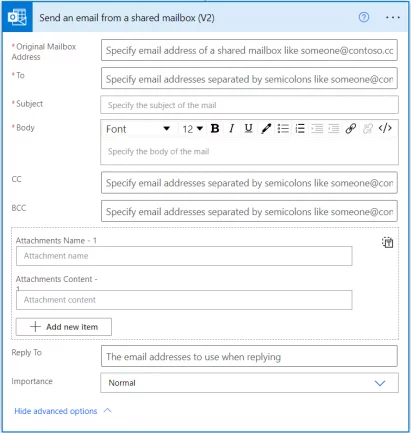
The Office 365 Outlook connector has another action called Send an email from shared mailbox (V2) which is similar to Send an email (V2) except that we have to select the address of the mailbox that the email is sent from.
Let’s replace the existing Send an email (v2) action with this new action in our example.
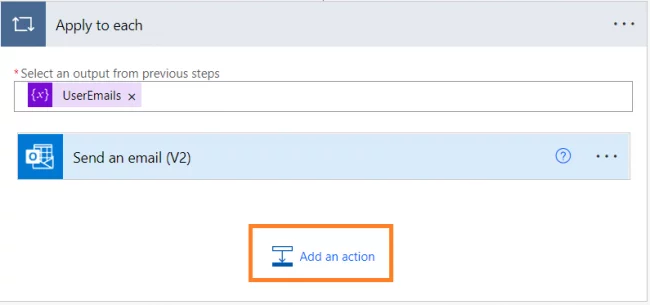
- Click on Add an action inside the Apply to each

- Select Office 365 Outlook under Standard tab and select Send an email from a shared mailbox (V2).

- As you can see, this action looks very similar to Send an email (V2).
Let’s enter a shared mailbox address but all other fields such as subject, email body and attachments will be configured in the exact same way as we did with Send an email (V2) action in previous section.

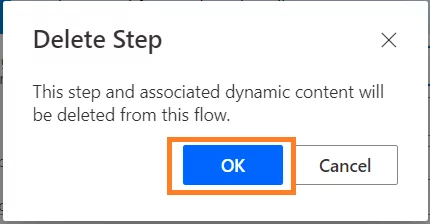
- Now that this is configured, we can delete the Send an email (V2) Click on the ellipsis icon and click on Delete. Click on OK in the confirmation box.


- Save and test the flow. The email received will be sent from the Shared Mailbox.

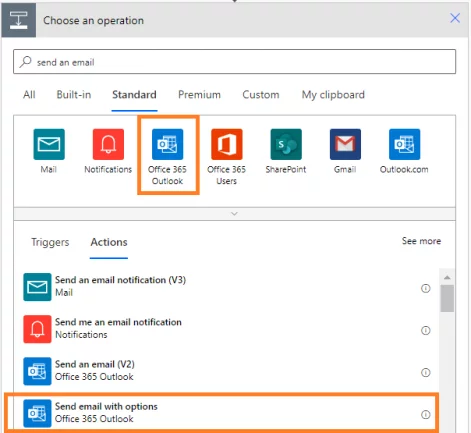
Power Automate send email with options
Send email with options in Power Automate is an action in the Office 365 Outlook connector which allows you to send a list of options in the email and record the response received from the user.
It is a form of polling functionality.
The flow proceeds to the next action only after receiving response from the recipient.
Let us see this in action by creating a new instant flow.
- To create the flow, follow steps 1, 2 and 3 from Step 1: Creating a flow section above.
- Select Office 365 Outlook under Standard tab, select Send email with options.

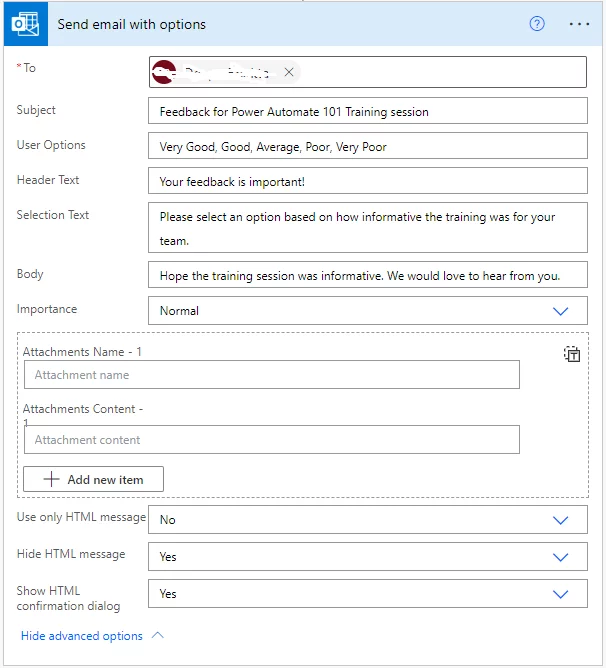
- For our example, let’s assume we are sending this email to get a team manager’s feedback on behalf of his team regarding the training session.
Accordingly, let’s enter values in the fields as shown below.
-
- To: Email address of the user whose response is required.
- Subject: subject of the email.
- User Options: The different options for the user to choose from. These values are comma separated.
- Header Text: the header for the email body.
- Selection Text: header text for the options.
- Body: Email body.
- Importance: Can be set to Low, Normal or High.
- Attachments: Can also be included.
- Use only HTML message, Hide HTML message: The combination of both is used to display/ hide the 2 sections used for displaying the options in the email.
- Show HTML confirmation dialogue: If set to Yes, a confirmation is requested from the user to confirm selection.

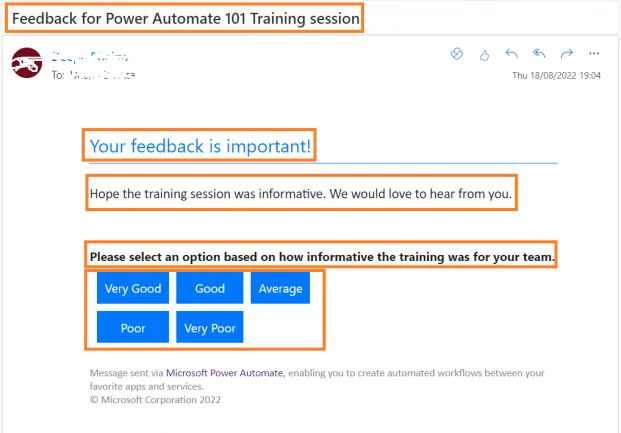
- Save and test run the flow. The recipient receives an email as shown below. The different values entered in the above action can be observed in the email with options as clickable buttons.

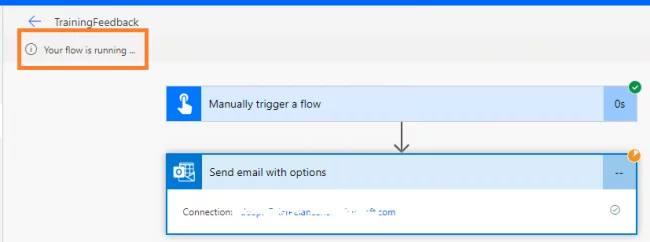
- Also, notice that the flow is waiting for response.

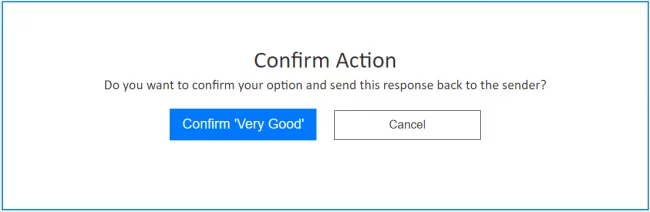
- Let’s select an option from the email. As we have set “Show HTML confirmation dialog” to true, the below confirmation is asked. Click on Confirm

- The below message is displayed.

- Now let us check the flow run. We can see that the flow has run successfully. If we expand the action, we can see that the user response is available.

Troubleshooting
Below are some of the commonly faced errors.
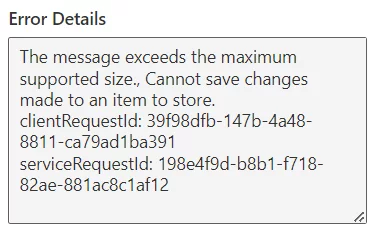
- Email size:
The maximum limit on the combined email size including attachments is 50 MB. If this limit exceeds then the flow throws an error as shown below.

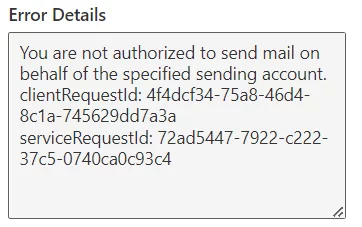
- Send on behalf permissions:
When sending email from a shared mailbox, you need to ensure that the user running the flow has Send on behalf permissions otherwise the flow will throw an error.

Conclusion
From formal business communications to newsletters and marketing, email plays a key role in business.
Automating these emails using the Power automate send email feature can help save huge amounts of time.
Hopefully, this article has clearly shown you how to send emails automatically using Power Automate and the different options available within Power Automate’s send email functionality.


- Facebook: https://www.facebook.com/profile.php?id=100066814899655
- X (Twitter): https://twitter.com/AcuityTraining
- LinkedIn: https://www.linkedin.com/company/acuity-training/