Microsoft Outlook: What is the To Do Bar?
The To do Bar is the panel on the right of the Outlook screen. By default, it is not turned on – so let’s find out how to enable it.
This guide will explain how you can enable the To Do Bar, how it can increase your productivity and how to customise it to your personal use.
If you want to learn more about Outlook, then attend one of our Outlook Training Courses.
Enabling The To Do Bar
To turn it on you need to go to the View tab in the ribbon. From here select the To do Bar button in the layout group.

Click all of the fields you want in your To Do Bar (for this example I have enabled all three). Now you should see the To Do Bar on the far right of your Outlook window!
The To Do Bar will help you organise your Outlook, for similar tips read this article on creating a folder in Outlook.
Using The To Do Bar
You will notice the To Do Bar has three areas:
Favorites
The top area of the To Do Bar is comprised of your Favorite contacts. You can assign this by Right-Clicking a contact and pressing add to favorites. From the favorites section you can quickly find and email these contacts.
Calendar
The Calendar now shows up below Favorites too. This Calendar will show you upcoming scheduled events and anything you have on your Calendar. This feature is particularly useful to keep up to speed with everything going on at at your company!
Tasks
Finally it will show you any Tasks you have set yourself (more on this later). This is great way to try and keep up to date with all the small Tasks you can assign yourself in Outlook. Managing Tasks with the To Do Bar is an excellent way to keep busy throughout your day and break up your work into manageable chunks.

The To Do Bar can be minimised by hitting the cross on the top right.
Creating And Arranging Tasks
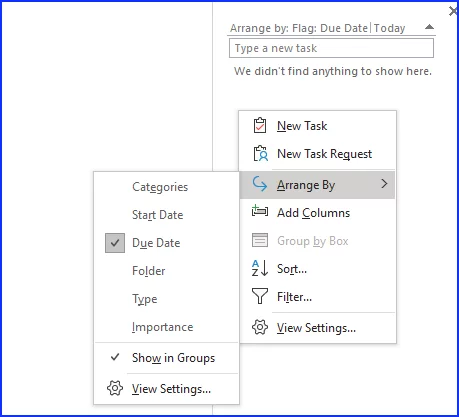
You can Add New Tasks by right clicking in the Task area to get this drop down menu.
From here you can assign your New Tasks, change the order they are arranged by and sort them. These customisation features help you to organise your Tasks whichever way you like and make your Outlook your own.

For more information on Outlook, read our article on creating group emails in Outlook.