
How Do Date Formats Work In Power BI?
Contents
- 1 Modifying Regional/Locale Settings
- 2 Formatting Dates in Power BI Reports View
- 3 Formatting Dates In Power BI Reports View:
- 4 Formatting Dates in Power Query Editor
- 5 Extracting The Year from A Date
- 6 Extracting Day from a Date
- 7 Dealing With Inconsistent Date Formats
- 8 Conclusion
- 9 Articles On Power BI Visuals
In this article, you will see how the Power BI Date format works and how you can format dates in the Power BI reports view as well as in the Power Query editor.
You will also use the different methods to extract information from the date data type in Power BI.
Finally, you will also see how to work with inconsistent date formats in Power BI.
Dates in Power BI are covered in detail during our beginners and advanced Power BI classes.
Dates are often used to test your level of technical knowledge in intermediate Power BI job interviews.
Modifying Regional/Locale Settings
By default, your Power BI format date settings depend upon the regional settings of the local system.
Before you format dates in Power BI, you should ensure that Power BI Desktop is using the correct regional settings.
Select File – > Options and Settings – Options from the Power BI dashboard to view and modify your regional settings.
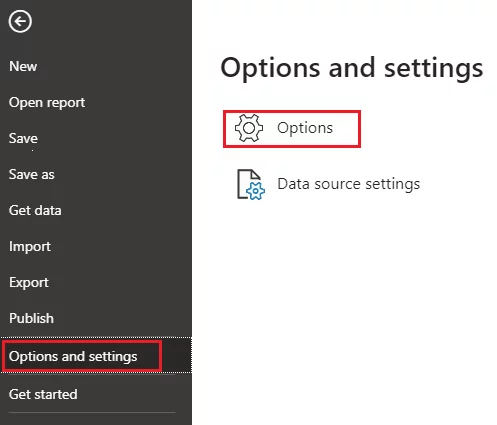
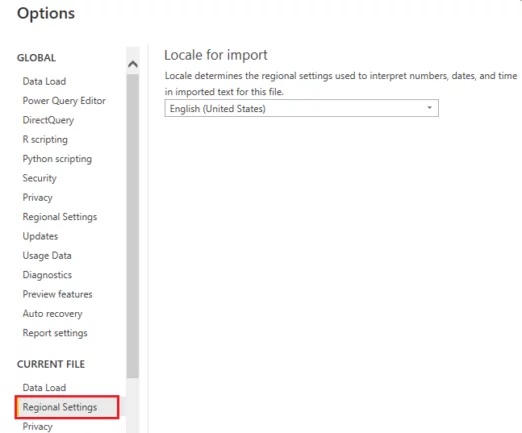
Select Regional Settings.
On the right-hand side of the screen, you will see the default locale used for formatting dates in Power BI. This is taken from your system.
If you want to you can modify the locale for your import using the drop down menu.
Formatting Dates in Power BI Reports View
There are two main ways you can format dates in Power BI:
- Power BI reports view, or
- Power Query editor.
First, let’s see how to change date formats in the Power BI Reports view.
Formatting Dates In Power BI Reports View:
For example, you will be using the following CSV file to format dates.
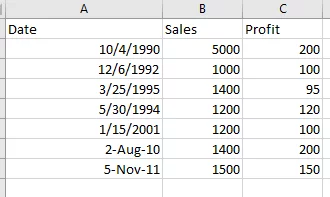
The last two rows contain dates in a different format to the rest.
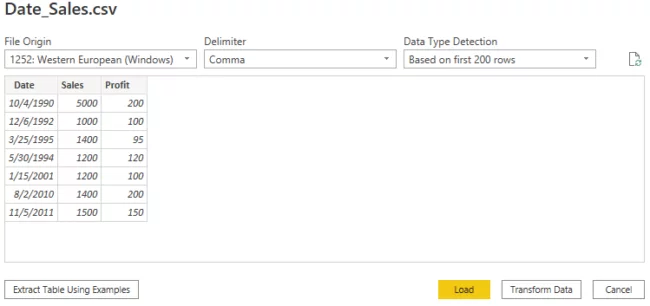
If you import the above CSV file into Power BI you will see (as shown in the image below) that Power BI will change the date format in the input file to the default date format specified by your regional settings (the United States in this article).
However, what if you want to format dates in the Power BI manually reports view.
Select the date column from your table, as shown below.
Firstly, make sure that the date type of your date column is actually Date and not Text.
A calendar icon next to the column name shows that the column is of the Date type, this is shown below.
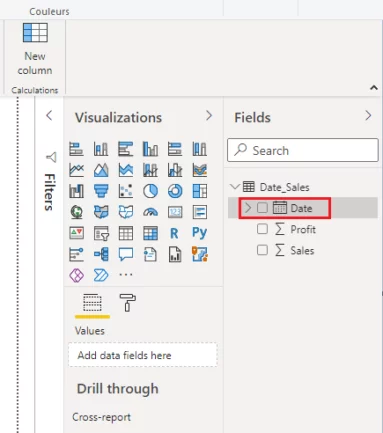
Once you select the date column, several date-related options will appear under the Column Tools option in the top menu ribbon (see below).
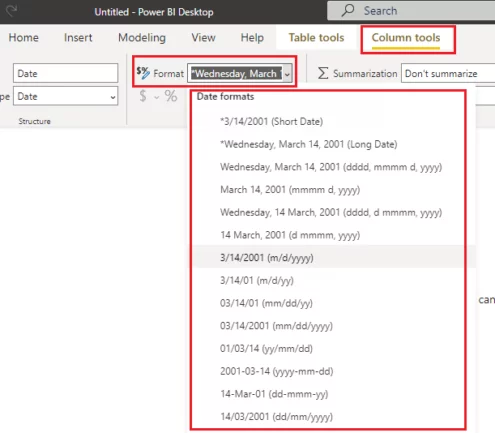
To change the format of your dates, you can select any format from the Format dropdown list as shown in the screenshot below:
Formatting Dates in Power Query Editor
Power BI query editor provides more advanced date formatting options than the reports view.
This is particularly useful when you have data containing inconsistent date formats. Something that frequently happens when importing multiple files into Power BI.
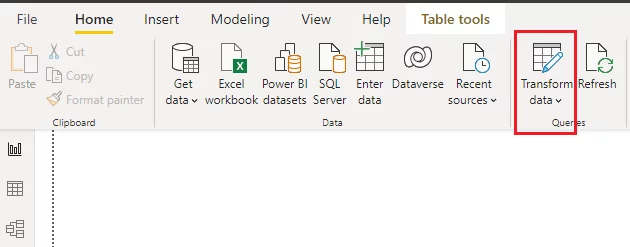
Select the Transform data option from the top menu ribbon to open the Power BI query editor.
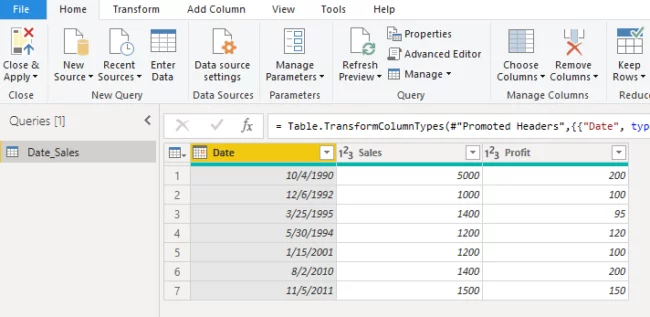
You will now see your data in the Power BI query editor.
By default, the type of the Date column is the date as shown by the calendar icon in the header of the Date column. ????
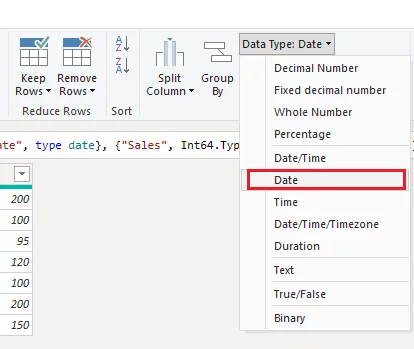
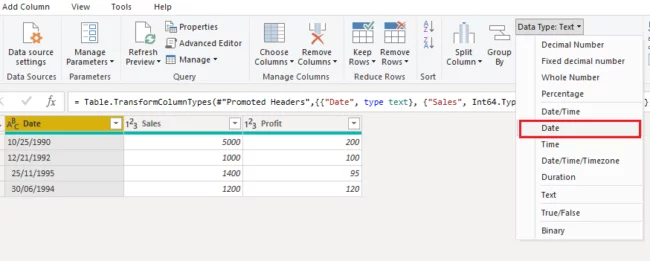
If the Date column is in the form of text, select the column and then click Date Type: Date from the top menu ribbon.
From the dropdown list, select Date to change the type of your column from text to date.
Let’s see how you can extract information from the Date column.
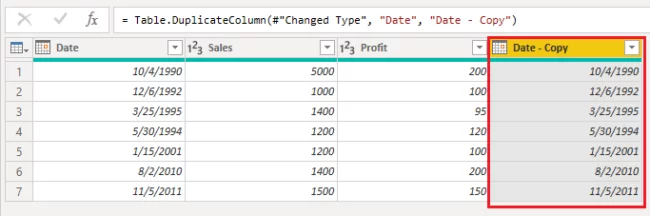
However, you want to create a duplicate column for your Date column before you do.
Select the Date column, right-click, and select the option Duplicate column from the dropdown list.

A duplicate column called Date – Copy will be generated.
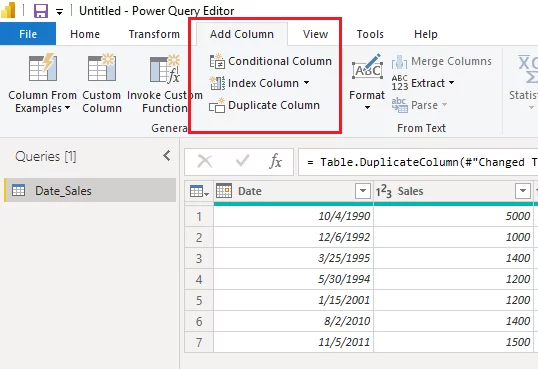
The other way to duplicate a column is to select the column, click the Add Column option from the top menu ribbon, and click the Duplicate Column option.
Let’s now see how you can extract various information such as the year, month, name of the month, quarter, week, day, etc. from a date type column.
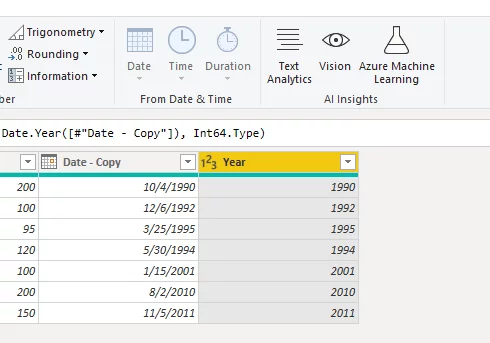
Extracting The Year from A Date
Click the Date column in your Power Query editor.
Click the Date option, which appears in Transform Column or Add Column in the top menu ribbon.
Click Year -> Year option from the dropdown list.
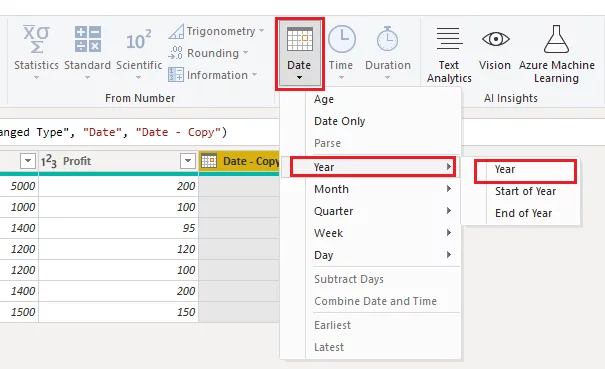
You will see a new column containing the year only from your original date column.
Selecting Start of Year or End of Year options will return the first and last dates of the year from your date, respectively.
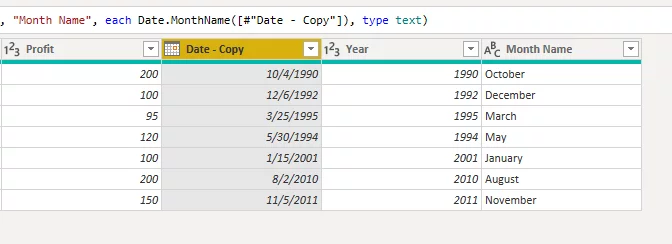
Selecting Quarter, Month or Week allows you to extract the quarter, month (example below) and day from your dates in the same way.
Let’s now look at a couple of slightly more complicated examples.
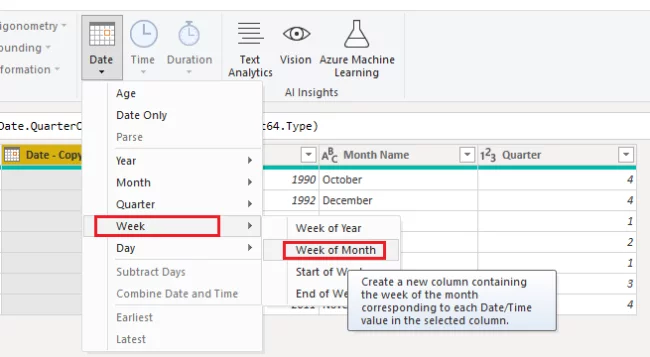
Extracting Week of Month from a Date
A very useful function in Power BI can be Week of Month.
This function tells you whether a set date is in the first, second, third, fourth or fifth week of a month.
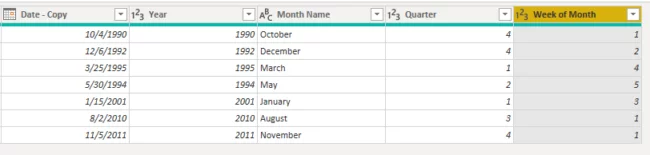
You find this by clicking the Week -> Week of Month option from the dropdown list.
As usual, the information about the Week of Month is added in a new column.
Extracting Day from a Date
As the last example in this section, let’s see how to extract the day information from a date.
Click the Day -> Name of Day from the Date dropdown list.
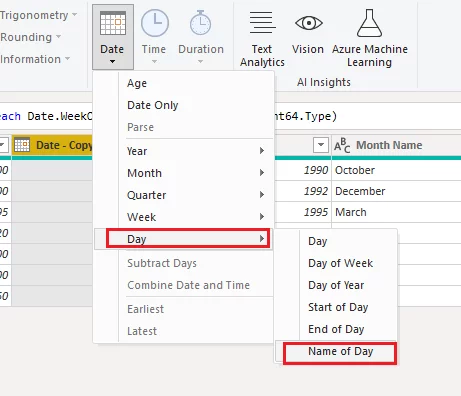
In the Power Query editor, you can see that a new column containing the day’s name has been added.

?????
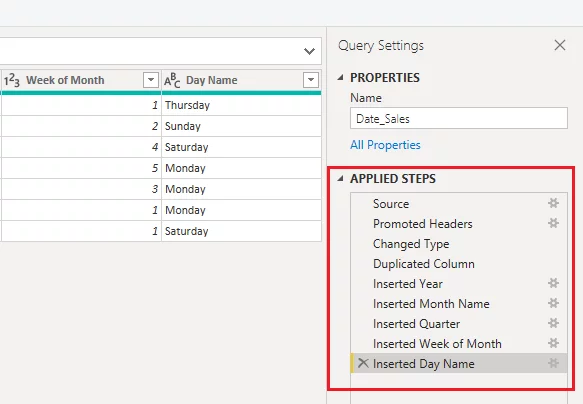
The steps you apply for formatting column data in the Power Query editor are saved and will appear in the Applied Steps window on the right side of your screen.
Here you can click the cross “X” next to an applied step to revert the step.
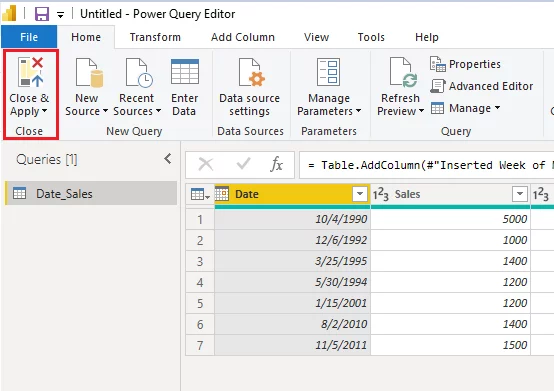
If you are okay with all the modifications, click the Close & Apply button from the top menu ribbon.
Dealing With Inconsistent Date Formats
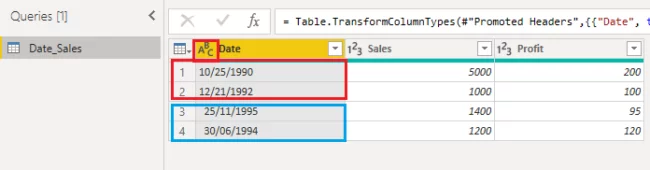
In many cases, the date column in your dataset will contain dates in inconsistent formats.
In our simple example below, you can see that the first two dates (highlighted in the red rectangle) are in US date format, i.e. mm/dd//yyyy.
However, the last two dates are in the UK format (highlighted in the blue rectangle), i.e. dd/mm/yyyy.
By default, the Power BI treats the column containing inconsistent dates as a text column, as depending on your locale, some of the dates will not be able to be parsed as dates.
You can see this from the ABC icon in the Date column header.
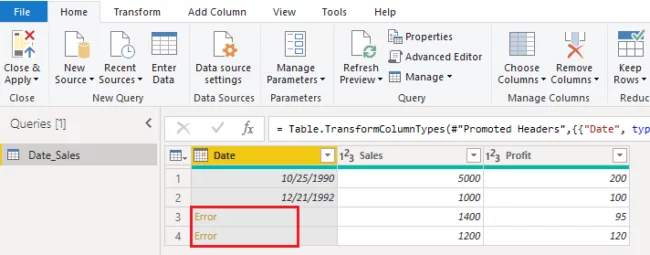
Let’s manually convert the type of our Date column from text to Date.
Click the Date column and select the Date option from the Date Type dropdown list.
You will see that the first two dates have been successfully converted, but the last two rows show errors.
This error is because of the default locale, in this case, the US.
Power BI successfully converted the dates in the first two rows but could not understand the dates in the third and fourth rows as the month value (the first value in date) is greater than 12.
Fixing these problems with inconsistent dates requires a few manual steps.
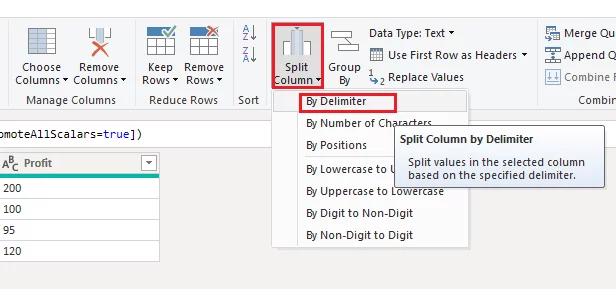
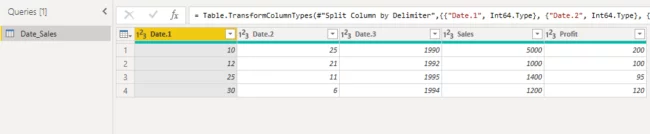
STEP 1: Split the date into three parts using the forward-slash “/” as a delimiter.
To do this, select the column and then Split Column -> By Delimiter.
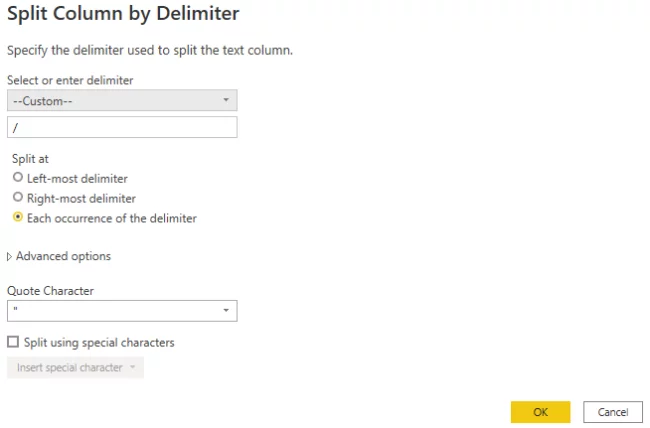
Select the custom delimiter option from the list of delimiters, enter forward-slash “/” as the delimiter value and click the OK button.
You can now see three new columns created due to splitting the original date column.
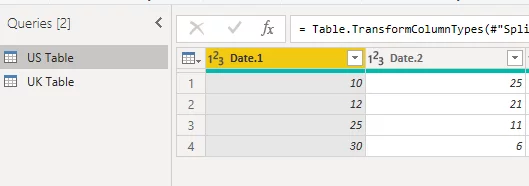
STEP 2: You need to create two tables.
The first table will only contain the dates in the US format, while the second table will contain the dates in the UK format.
Click on the Date_Sales table and create a duplicate.
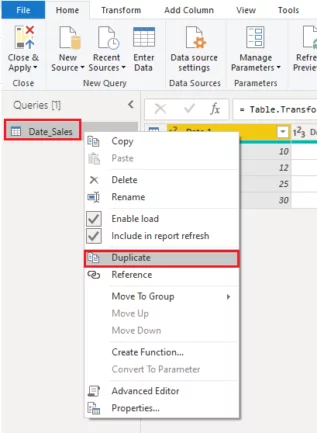
Rename your original table as the US Table and the duplicate table as the UK Table.
STEP 3: IN the US Table, you need to remove all the dates that are in UK format.
You can do this by removing all the rows where the first split column (the column for months in US format) contains values greater than 12.
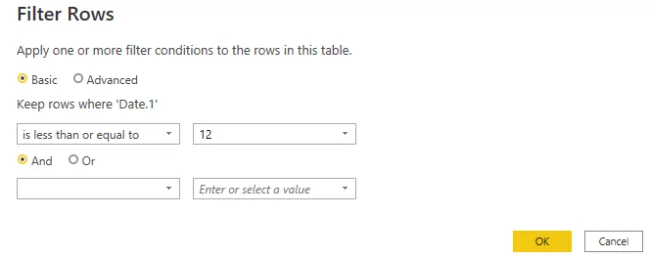
Click the inverted triangle icon in the header of the Date.1 column.
From the drop-down list, select the option Number Filters -> Less Than or Equal To.
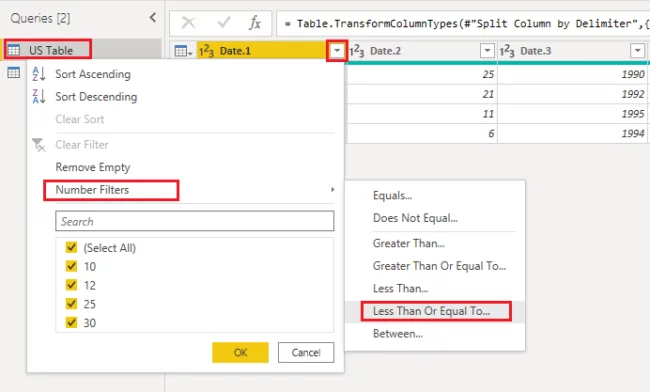
Enter 12 as the value for the text field next to Keep rows where Date.1 is less than or equal to the option.
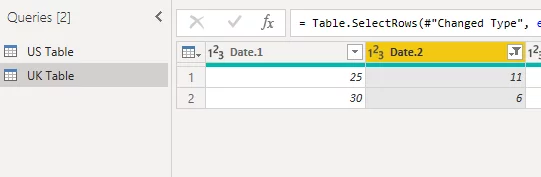
You will now see that all the rows in the UK date format are removed from the US Table.

In the same way, remove the dates in the US format from the UK Table, remove all the rows where the Date.2 column contains a value greater than 12, as shown in the following screenshot.
Having done that, the UK Table will now only contain dates in the UK date format.
STEP 4: Now you have two options:
- You can convert the dates in the UK Table to US format and append it to the US Table.
- You can do the opposite and convert the dates in the US Table into the UK format and append them to the UK Table.
Let’s look at the first option.
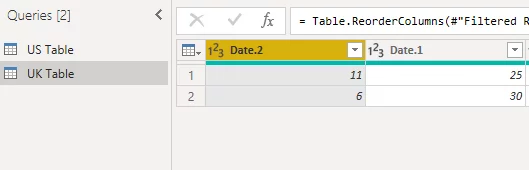
Click the second split column, i.e. Date.2, which contains months, and drag and drop it to the position of the first split column, i.e. Date.1.
In other words, swap the indexes of columns Date.2 and Date.1 in the UK Table.
STEP 5: Now, you simply append the modified UK Table at the end of the US Table and merge the three originally split columns to create consistent dates in US date format.
Click the US Table as shown below:
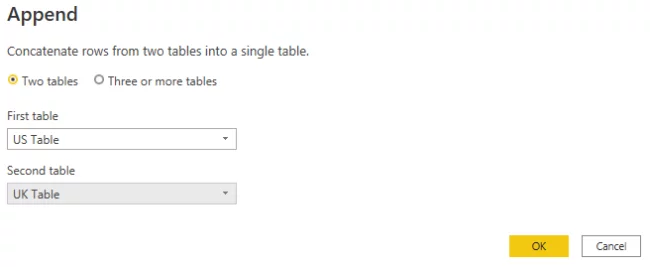
From the top menu ribbon, select the Append Queries -> Append Queries as New option.
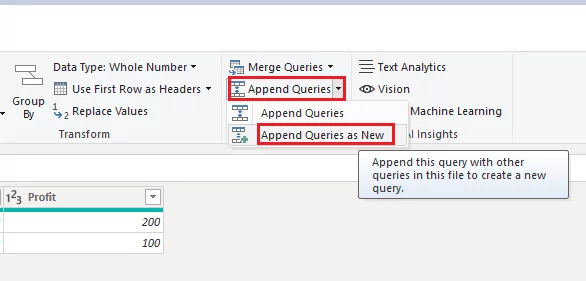
The US Table will be selected by default as the first table.
Select the UK Table as the second table and click OK.
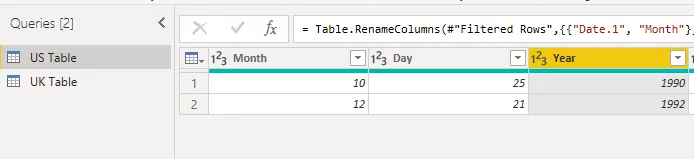
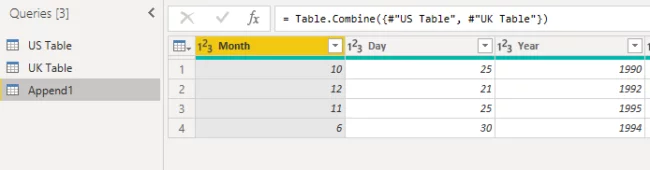
A new table Append1 will be created, containing data from the US Table and the UK Table.
We have also renamed the column headers for the originally split columns to Month, Day, and Year in this process.
STEP 6: Finally, you need to create a date using these three columns.
Select the three columns using Ctrl + Click, and then select the Merge Columns option from the dropdown list.
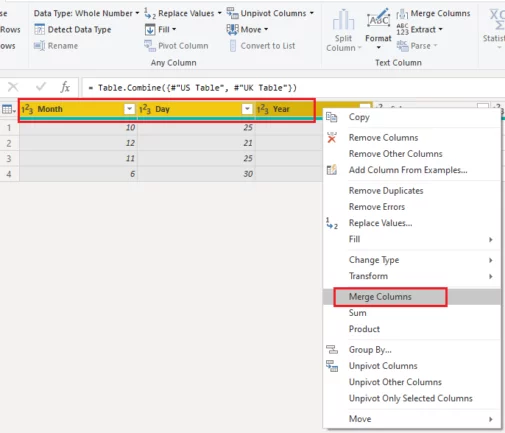
You can use any delimiter, but in this example, we will use the forward slash, which was initially used by the Date column.
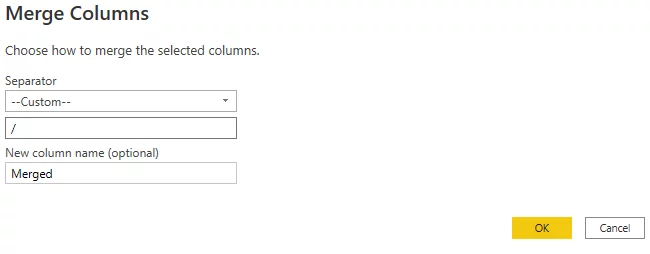
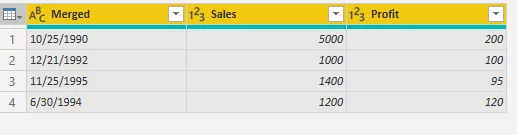
You can now see that a new column named Merged is created.
It contains dates in the US format (mm/dd/yyyy).
Note: The type of the date column is still text though.
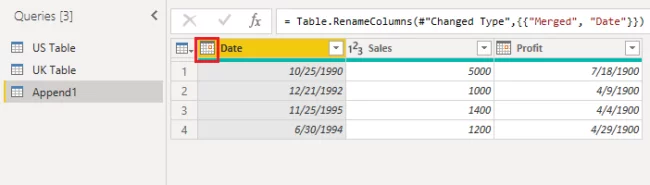
STEP 7: The last step is to rename the Merged column as Date and change its data type from text to date.
You will see that the data type for the column has been successfully changed to date as there are no inconsistent dates in the Date column now.
Your final dataset looks like this:
Conclusion
The Power BI contains a number of powerful date data tools.
The vast majority of data presented in Power BI dashboards contains a time-related component and so learning to manage dates is vital to developing your data science skills.
These date format options allow you to format dates in different formats using the reports view and the Power Query editor.
While formatting dates, the first step is to ensure that you are using the desired locale for your date settings.
If your problem is not solved by modifying the regional locale settings, you can use the Power BI reports view to format dates.
Finally, if you want to extract parts of dates or you have inconsistent date formats, you can use the Power BI Query editor to have more fine-grained control over date formats.
Articles On Power BI Visuals


- Facebook: https://www.facebook.com/profile.php?id=100066814899655
- X (Twitter): https://twitter.com/AcuityTraining
- LinkedIn: https://www.linkedin.com/company/acuity-training/