News & Tips

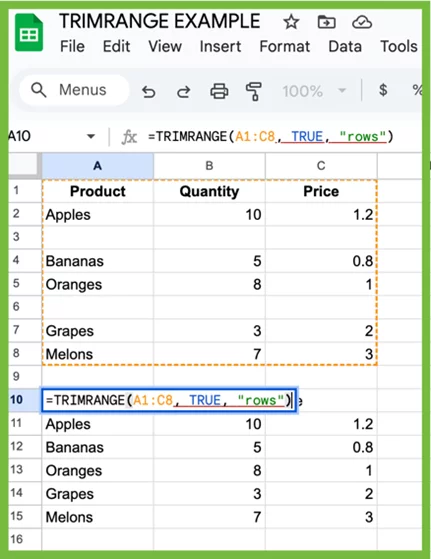
TRIMRANGE Function In Excel
The TRIMRANGE function in Excel is used to automatically remove blank rows, columns, or both from a specified range. It’s especially useful for cleaning up data before feeding it into formulas, charts, pivot tables, or dropdown lists. TRIMRANGE helps ensure…

Your Voice Is an Instrument – Are You Tuning It?
In the world of public speaking, your voice isn’t just a tool, it’s your primary instrument. Just as a musician wouldn’t perform with an untuned instrument, a speaker shouldn’t step in front of an audience without tuning their voice. Understanding…

The Confidence Loop: How Small Wins Lead to Bigger Stages
Confidence in public speaking isn’t born, it’s built. And it’s built through a process known as the confidence loop. Whether you’re giving your first team update or speaking on a main stage, every speaker starts the same way: by taking…

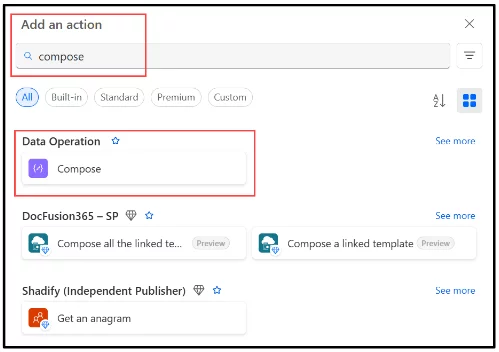
Mastering Data Operations in Power Automate
Power Automate is an incredibly powerful tool for automating workflows: Especially when it comes to managing and transforming data. Whether you’re integrating data from Excel, SharePoint, or third-party APIs, understanding the core data operations is essential for building efficient, scalable…

The Neuroscience Of Stage Fright
You’re standing in front of a crowd, heart pounding, palms sweaty, words stuck. You’re not alone. Stage fright, or performance anxiety, is a deeply human experience. Neuroscience sheds light on why this happens and, more importantly, how you can manage…

What To Do If You Blank Out On Stage
Even the most seasoned speakers occasionally face the dreaded blank moment on stage. One second, you’re delivering your points with precision. The next? Silence. Your mind is a fog, your audience expectant. It’s a universally human experience, but how you…

Practice Like It’s Live
If you’re aiming to become a confident speaker, there’s a truth worth confronting early: No amount of theory can replicate the intensity of standing in front of a live audience. To truly grow, you need to simulate that stress. I’ve…

Structuring A Talk To Command Attention
Grabbing and holding an audience’s attention isn’t just about flashy visuals or dramatic stories. It’s about structure. A well-structured talk provides clarity, builds suspense, and drives your message home. In my experience delivering talks to rooms full of time-strapped professionals,…

Visuals That Stick: How To Design Slides
IfA great presentation doesn’t just live in your words, it lives in the visuals too. Slides that are clear, compelling, and intentional help your message land, and more importantly, stick. From years of presenting and coaching, I’ve learned that less…

Stories That Sell – How To Use Storytelling
Behind every memorable presentation is a story well told. Storytelling is how humans have passed down knowledge, inspired change, and influenced action for generations. In business presentations, a well-placed story doesn’t just inform, it persuades, connects, and sells. Over the…

Handling Q&As with Poise and Precision
Even the most polished presentation can unravel with a single tough question, unless you’re ready for it. Mastering the Q&A is more than just fielding questions. It’s about maintaining your composure, reinforcing your message, and turning potential tension into credibility.…

Mastering Body Language & Eye Contact
Powerful communication goes far beyond spoken words. Your body language and eye contact speak volumes, often louder than your actual voice. These non-verbal signals can build trust, command respect, and elevate your presence on stage or in the boardroom. I’ve…