
Keep Yourself Safe With Row-Level Security in Power BI
Contents
In this article, we will look at static row-level security in Power BI.
We look at what it is, how to implement it and areas to take care when using it.
We find delegates on our Power BI Courses always find this topic useful!
What is Row-Level Security In Power BI?
Row-Level Security (RLS) is a feature of Power BI that allows you to restrict data or report access to specific users within your organisation.
As your Power BI knowledge grows you will need to understand more about security in Power BI.
To implement RLS you first define roles and rules in Power BI Desktop.
Next, you define filters within roles that limit data access at the row level.
When you publish the data or report to the Power BI Service, the role definitions are also published.
This allows you to assign a specific role to specific users.
Check out this article to learn the difference between Power BI desktop and Power BI service.
If that sounds confusing, let’s walk through a simple example step-by-step.
1) In Power BI Desktop, define roles and rules.
I’d like to assign Ben to only view the report from Canada in this Power BI Desktop report.
To do this, we create a Rule that says, “store equals Canada,” and then assign Ben Richardson to that Role.
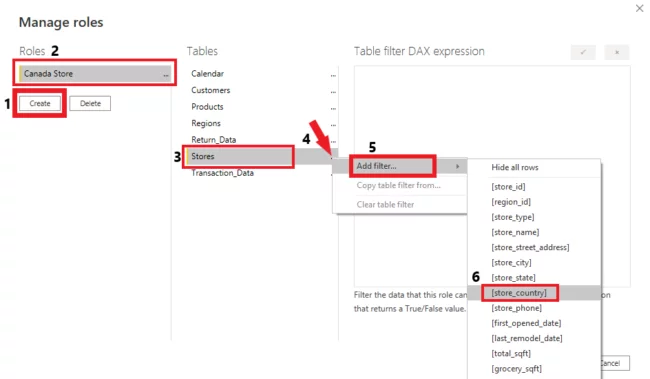
To create a Role.
Click on the Modeling tab on the Ribbon Bar, Manage roles.

- Click on Create
- Assign a name to the Role.
- Find the Table and click on it.
- Select the Ellipses beside the table with your mouse.
- Apply a Filter
- Choose the name of the Column you want to use.
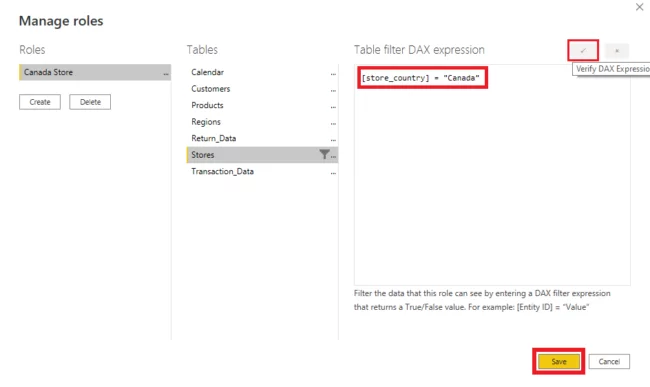
Now you simply need to replace the default that Power BI offers you – [store country] = “value” with your preferred rule writing as a DAX expression.
In this case, [store country] = “Canada”.
Verify the DAX Expression for errors, then Save to apply the role, as shown below.
2) In Power BI Desktop, validate and verify the role
Now that you’ve created a role, let’s quickly check it to see that it is working correctly.
Click “View As” on the Modelling tab to see if the role is active.

Check the Role that you want to test before clicking OK.

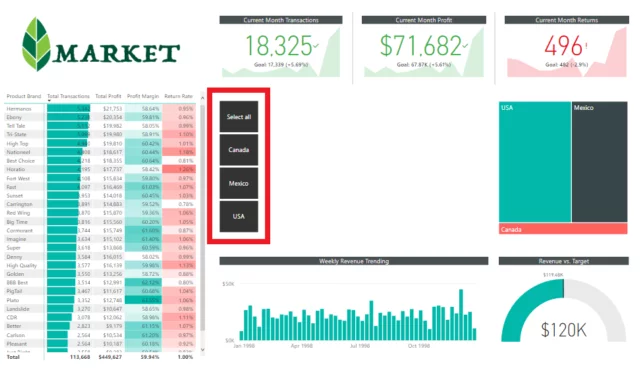
As you can see in the screenshot below, Power BI has filtered the Report down to the store in Canada.

3) In Power BI Service, assign users to a role.
Now that you have created a role, let’s look at how you assign a user to it.
You cannot assign users to roles in Power BI Desktop.
You have to wait until after you’ve published your report to do this. You assign roles in Power BI service.
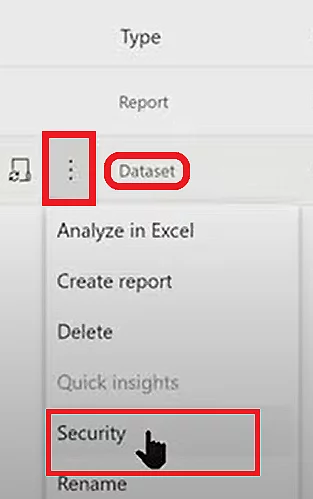
In Power BI service, navigate to the workspace where the Report is published.
Select Security by hovering over Dataset and clicking the Ellipses.
You can now add members to the role you created in Power BI Desktop on the Row-Level Security page.
It’s worth noting that roles can only be created or modified within Power BI Desktop.

4) In Power BI Service, validate and verify the role.
Let’s now look at validating settings in Power BI Service.
On the Ellipsis next to the role name in Power BI Service, click “Test as role” to see if the role is active.

You’ll now be able to see the reports that have been created specifically for this role.

Limitations Of Row-Level Security in Power BI
- Only datasets created in Power BI Desktop can have row-level security defined. An Excel file must be converted into a Power BI file to enable row-level security on datasets created in Microsoft Excel.
- Roles can only be created or changed in Power BI Desktop.
- Currently, only ETL and Direct Query (Eg connecting to SQL with Power BI) connections are supported.
- Row-level security is inflexible, and dynamic row-level security offers greater flexibility and scalability.
Dynamic Row-Level Security in Power BI.
We assigned only one user (Ben) to a single role in the role-level security above, so he can only see data from that location.
What if you need to assign a single user to multiple locations or a group of users to different roles? Then it’s time to get dynamic.
This article explains how to use a fixed value in the DAX filter for row-level security, also known as static role level security.
The DAX filter for dynamic role level security, on the other hand, will use a DAX function.
Final Thoughts
Row Level Security is a powerful tool for limiting access to sensitive datasets, dashboards, and reports for different users in your organisation using a role and filters.


- Facebook: https://www.facebook.com/profile.php?id=100066814899655
- X (Twitter): https://twitter.com/AcuityTraining
- LinkedIn: https://www.linkedin.com/company/acuity-training/