Microsoft Project For Beginners: 13 Steps To Perfectly Planned Projects
Introduction
Who hasn’t had a project delayed because of an unforeseen dependency or delay?
This then ripples out to the delivery of all of the related parts of the project causing chaos, if you’re not on top of things.
As the old saying goes, “Hope for the best, plan for the worst, prepare to be surprised.“.
Microsoft Project is the most widely used project management software in the world.
It’s very quick and simple to use and lets you plan and control all aspects of your project – whether that’s time, budget or resources.
If your project is delayed it will show their impact on project delivery, and finally, it makes it very easy to communicate your project plan to others.
As you can probably tell we’re big fans!
This guide will take a complete beginner and get them up and running in 13 easy steps.
Contents
Chapter 1 Project Data
Chapter 2 Task Data
Chapter 3 Project Critical Path
Chapter 4 Resources 1: Resource Pooling, Assignment and Resource Driven Scheduling
Chapter 5 Resources 2: Cost Changes and Resource Overallocation
About Acuity Training
Who are Acuity Training?
We provide classroom-based IT and professional development training. Looking for assertiveness training, powerpoint courses or to learn SQL, we’re here to help. We’ve also started providing AutoDesk Inventor courses and Revit training in London and Guildford.
Oh and we offer Microsoft Project training courses in London and Guildford as you’d probably expect.
If you’d prefer we’re very happy to come to your offices. Call us to find out more – 01483 688488.
Useful General Project Management Reading
UK Project Management Association
International Project Management Association
UK Government Project Management Careers Resource
Project Manager Today Magazine
NEXT - Project Data - File Properties & Project Start And Finish Dates
Data about the project as a whole comprises:
- Project file properties
- The project start and finish dates
- The project calendar
Project File Properties
This is a standard MS Office feature, and is simply descriptive text (sometimes called meta-data) about the project.
Select File>Info>Project Information>Advanced Properties
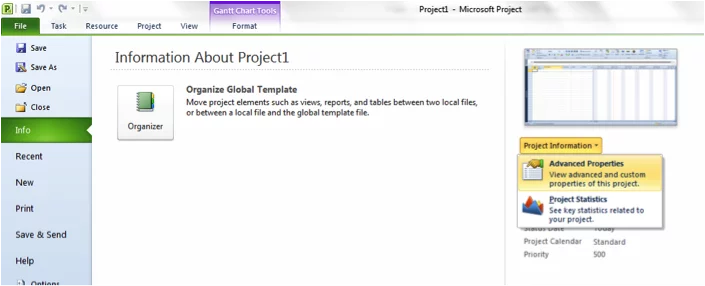
This displays the following dialog box, into which appropriate text may be entered:
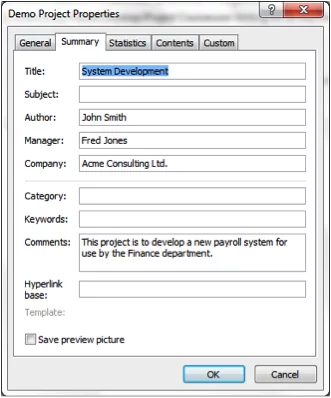
Project start and finish dates
There are two main aspects to project-level timings; the expected start or finish date of the project and the working times.
Select Project>Project Information to display the following dialog box:
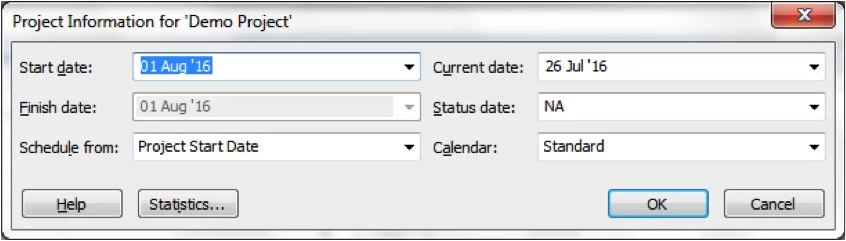
You can choose either to work forwards from a specified start date (and Project will calculate the expected finish date) or, by choosing the option Schedule From: Project Finish Date, to specify the required project end date. Microsoft Project will then work backwards from this and calculate the expected start date.
NB. If the project has a deadline, then this may seem a useful option. However, if, say, a finish date of 23rd December is entered and a start date of September 5th calculated, then this means in practice that if the project starts on this date and everything goes exactly according to plan, then it will finish just in time! This is unlikely to be the case, and it would make sense to treat the calculated start date as the latest possible date when the project should commence. In any case, even if you use this feature throughout the whole of the planning stage, when the project starts you should change to scheduling from the start date. This is because during the tracking stage the project start date is an actual date that has already happened and should be known exactly, whereas the expected finish date is unknown, and hence should be calculated by Project.
Project Calendars
The other aspect of project timing is the project calendar, which specifies the working and non-working days. For each working day, the working times, and hence total working hours, are specified. Project comes with three built-in calendars; Standard, 24 hours and Night Shift. The Standard calendar is used by default.
The Standard calendar covers dates from 1st January 1984 to 31st December 2149 for version 2013, 31st December 2049 for earlier versions. All weekdays are assumed to be working, and all weekends non-working. There is no facility for entering public holidays for a particular country, as in Outlook; these must be entered by the user. A custom calendar may easily be made, typically by copying one of the built-in calendars and editing the copy. Such a calendar is an integral part of the Project file within which it is created, thus allowing the flexibility of having different calendars for different projects; a quite feasible scenario. It is possible to customise the built-in calendars, but this is not recommended; better to keep the built-in calendars unchanged to facilitate making further copies of them.
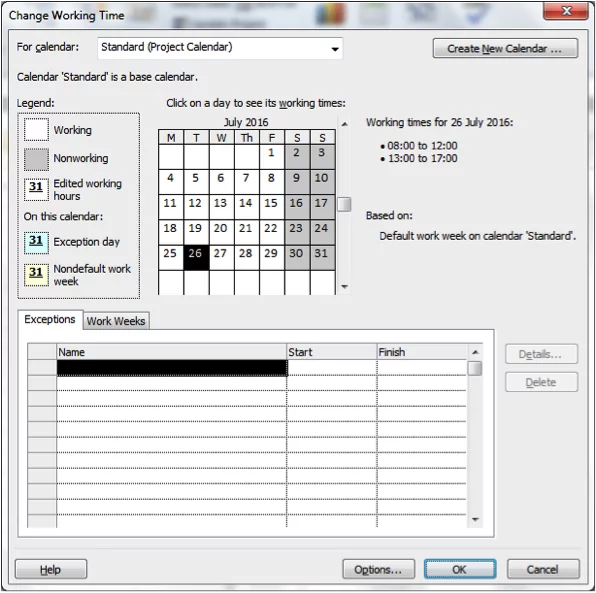
To make a copy of the Standard calendar (the one most commonly used) select Project>Change Working Time to display the following box:
Click Create New Calendar, and enter a suitable name:
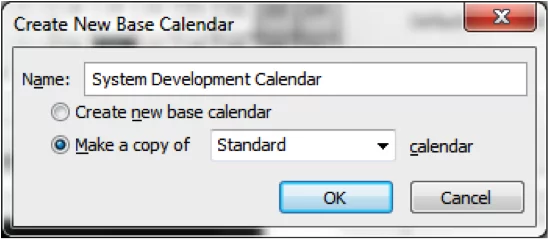
On clicking OK the calendar is created and you will be able to edit it:
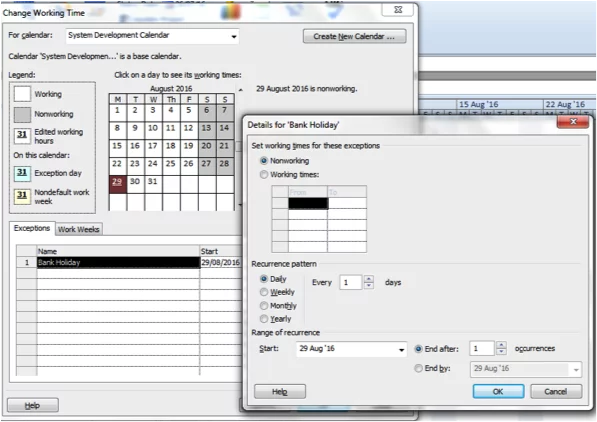
You may enter one or more exceptions. An exception may be one day in length or many. If more than one day in length, it may extend over a number of consecutive dates or over non-adjacent dates that are separated by equal periods of time (e.g. every Saturday during the last quarter of the year). An exception may either be non-working (which is assumed by default) or working (in which case the working times may be set).
In the example above, 29th August 2016 (a public holiday) is selected. On clicking Details the exception type (working/non-working) may be set:
There is no need to make any changes here, as it is a non-working day.
To enter an exception covering a number of consecutive days (e.g. the Christmas break), click and drag to select the days and enter a suitable name. If the exception extends over more than one month, then you can edit the start or finish dates (in the example below, the end date of 2nd January 2017 has been directly entered:
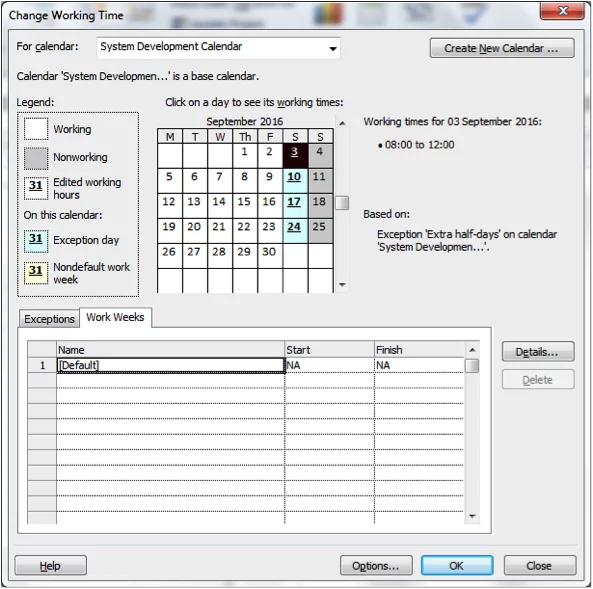
Suppose it has been decided to work a half-day for each Saturday in September. Select the first Saturday (September 3rd) enter a suitable name and click Details:
Select “Working times” to make these exceptions working and enter suitable times (default is 8am to 12pm and 1pm to 5pm, giving 8 working hours). In the example above, the afternoon slot has been deleted. The recurrence pattern and range of recurrence may then be set (this dialog is identical to Outlook’s calendar feature for entering recurring meetings or appointments).
Note: If your standard working times are different to the default, then it is possible to change the default times used for non-exception working days. To do this, select the Work Weeks tab from the Change Working Time dialog:
Click Details. To select all weekdays, click on Monday, keeping Shift pressed and select Friday. Choose the option Set day(s) to these specific working times and enter the required start and finish times:
In the example above a 7-hour day has been specified for any non-exception working day.
NB. If you do this, then you must update the timing options to match the new default times. Select File>Options>Schedule and edit the Calendar options for the project:
If you do not do this then it is likely that you will get inaccurate start and finish dates for your tasks. This is because when the duration is entered for a task, unless the duration units are in hours or minutes, Project will convert the duration to an hours figure using the options above. So, for example, if a 10-day task is entered in the above project, the duration would be converted to 70 working hours. Project will then take this hours duration and match it up, on a day-by-day basis to the calendar. It will check the working times for each day and calculate the number of working hours. The working hours figure for each day is then subtracted from the hours duration for the task until no hours are left. This then gives the finish date.
Suppose that a 7-hour calendar has been set up, but, mistakenly, the options are still set to an 8-hour day and 40-hour week. A task of 10 days duration is entered. The user means 10 7-hour days, but Project calculates the duration to be 80, rather than 70, hours. It then matches it to each of the 7-hour days in turn, but needs about 11.5, rather than 10, of these days. The Gantt bar is too long and the finish date about 1.5 days later than it should be:
It is suggested that, for the sake of simplicity, it would be best to keep the options and default working times unchanged and simply concentrate on adding suitable exceptions.
FURTHER READING & OTHER USEFUL RESOURCES
Setting up a project in MS Project 2013
Importing Excel into Project
Task Mode
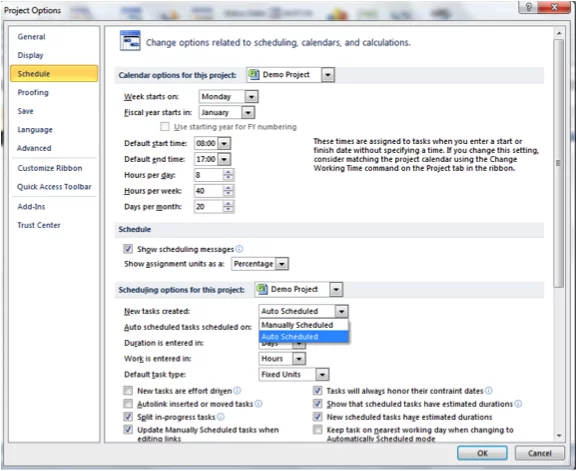
A task’s mode may be either manually or auto-scheduled. The default is manually-scheduled, but may be changed (possibly before any tasks are actually entered) via File>Options>Schedule>Scheduling options for this project:
For any task, there are three pieces of interconnected data; the start and finish dates and the duration. If a task is manually scheduled then the user needs to enter any two of these; Project will calculate the third. A manually–scheduled task is particularly useful if both the start and end dates of the task need to be specified.
A manually-scheduled task cannot have any date constraints set, nor does resource-driven scheduling apply to it. These topics are described later (see below Task Date Constraints and Resource-Driven Scheduling in the next chapter).
If a task’s mode is auto-scheduled, then Project will carry out a lot more of the scheduling, but any data value so calculated can be changed by the user.
Task Duration
The duration (in minutes, hours, days, weeks or months) may either be entered directly by the user or (for auto-scheduled tasks) calculated by Project. It may be influenced by the working calendar (see Project Calendars in previous chapter) or by changes in resource assignment or work times (see Resources chapter). It may be working (i.e. during working time, this is the default) or elapsed.
This essentially ignores the non-working times in the calendar. For example, if the project calendar has non-working weekends, then a task of eight working days, starting first thing on a Monday, would finish at close of business on Wednesday of the following week.
If the duration is eight elapsed days then it would finish at close of business the following Monday. One use for elapsed duration is for tasks not requiring any human involvement, for example allowing paint to dry or concrete to set.
The duration (in minutes, hours, days, weeks or months) may either be entered directly by the user or (for auto-scheduled tasks) calculated by Project. It may be influenced by the working calendar (see 2.3 Project Calendars) or by changes in resource assignment or work times (see 5 Resources). It may be working (i.e. during working time, this is the default) or elapsed. This essentially ignores the non-working times in the calendar.
For example, if the project calendar has non-working weekends, then a task of eight working days, starting first thing on a Monday, would finish at
For example, if the project calendar has non-working weekends, then a task of eight working days, starting first thing on a Monday, would finish at close of business on Wednesday of the following week. If the duration is eight elapsed days then it would finish at close of business the following Monday. One use for elapsed duration is for tasks not requiring any human involvement, for example allowing paint to dry or concrete to set.
Task Dependencies
A task may be linked to another task with any of the following four dependency types. In each example, A is the predecessor and B is the successor.
Finish-to-start
The most common type. This may be used either because the nature of the two tasks requires it (e.g. finish laying the foundations before building the walls) or for two otherwise unrelated tasks that require the same resource. To avoid the resource becoming overallocated due to the tasks overlapping, a finish-to-start dependency may be used (see 5.5 Resource Overallocation).
Start-to-start
The two tasks start at the same time, run in parallel, but finish at different times unless of the same duration. This used to be used to maximise the amount of concurrent work, and hence minimise the overall project duration. It is not really needed now as Project by default schedules all tasks to start as soon as possible, unless they are manually scheduled.
This dependency may be useful for two tasks that feed in to one another whilst underway. For example, during the development of a computer program, coding and testing may be run in this manner, with a short delay on the commencement of testing; first do some coding, then test what has been coded, then carry out further coding to remedy any bugs found in the testing and extend the scope of the program, then test further… etc.
Finish-to-finish
The two tasks start at different times unless of the same duration, run in parallel and finish at the same time. This may be applicable to tasks in the final stage of the project, when a number of things may need to get “wrapped up”.
For example, a new computer system would need to be installed on the computers on which it is to run, and the end-users would need to be trained in its use. It would make sense for these two tasks to finish at the same time so that as soon as the system is installed it can be used, while, conversely as soon as the users have finished their training they can start using it; if they have to wait before using the system, they may forget some of what they learned.
Start-to-finish
If set between Tasks A and B, this has the effect of pushing B backwards so that its finish date is the same as the start date of A. This dependency is rarely used, but one possible application is for pre-project tasks. If the planner wishes to include one or more tasks to be completed before the official project start date, then these tasks may be linked using this dependency to the first task in the project.
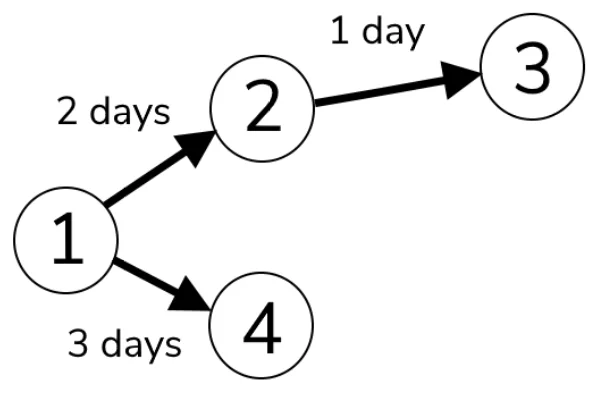
Lag and lead times
All four dependency types may be further qualified by lag or lead times. Lag is an extra delay to the start of the successor task. Suppose that Task A must be completed before Task B can be started. This suggests a finish-to-start relationship. However, it does not necessarily mean that B can be started as soon as A has been completed; there may be a further delay. This may have many causes; perhaps allowing time for the client to read and approve the specification produced in A before moving on to the next stage in B.
Lead is the opposite of lag; the successor task is brought forward. With a finish-to-start dependency that would mean the two tasks would overlap by a period equal to the lead time. Both leads and lags may be expressed as durations (same units as tasks, either working or elapsed) or percentages. The latter applies if (say) B can be started when A is 75% completed; the lead time would then be 25%. Examples of lag and lead are shown below.
Lag
Lead
There are a variety of ways to set and edit task dependencies. A full listing is beyond the scope of this document, but a convenient method is via the Task Information dialog box. Select the successor task, and choose Task>Properties>Information (alternatively double-click the task name).
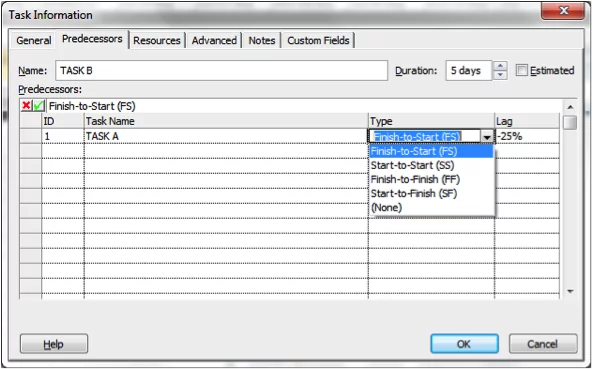
Select the Predecessors tab and enter the required data. Both task name and dependency type may be selected from drop-down lists.
Task Date Constraints
A further piece of task data is the date constraint. This is only applicable to auto-scheduled tasks. Unless specified otherwise, Project will schedule each such task to start as soon as possible. Date constraints can also be set via the Task Information box (Advanced tab):
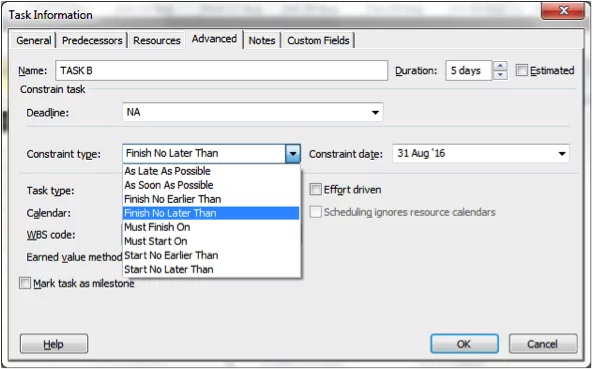
Other date constraints include:
As Late As Possible
The task is delayed by the longest time possible without delaying the project end date. This time period is the Total Slack (see 4 Critical Path).
Start No Earlier Than <specified date>
This is useful where, for example, some materials have been ordered for a task, and a delivery date specified. The task should clearly not start earlier than the delivery date.
Finish No Later Than <specified date>
This effectively puts a deadline on the task. Applied to the last task in the project (or to a milestone marking this) it is one way of encoding a deadline into the project plan.
NB. If a task has this constraint set and also is linked to another task then a scheduling conflict may occur. For example, suppose that Task B has Finish No Later than 31st August applied, but is also linked in a Finish To Start dependency with Task A. If A’s end date is (say) September 9, then a scheduling conflict would occur with two incompatible requirements. The Planning Wizard would give warning of this:
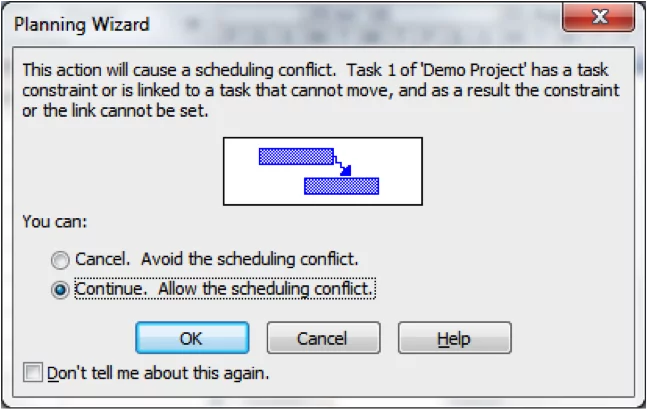
If the scheduling conflict is allowed, then, by default, the demands of the date constraint (a so-called “hard” constraint) would override those of the dependency, giving a rather odd look to the Gantt chart:
This can be changed so that the dependency overrides the date constraint by selecting File>Options>Schedule and switching off “Tasks will always honor their constraint dates”:
This changes any such constraint from “hard” to “soft”:
An alternative to a soft constraint is to apply a deadline date. This is also set in the Advanced tab of the Task Information dialog box:
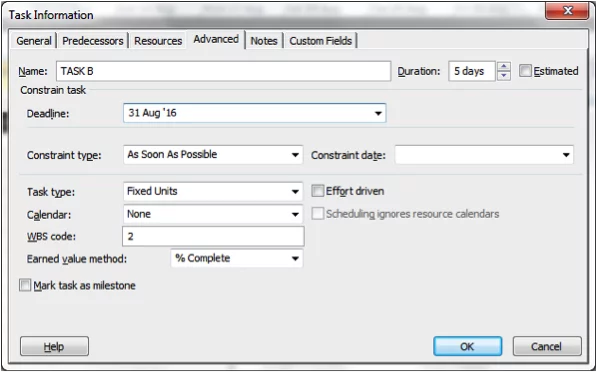
If the task end date goes beyond the deadline, a distinctive red marker is displayed in the Indicators column.
NB. For autoscheduled tasks, a date constraint will be set by Project if either the start or finish date for the task is edited by the user. If, for example, the user enters a start date of 3rd August for Task B, then Project will assign a date constraint of Start No Earlier Than 3rd August to the task.:
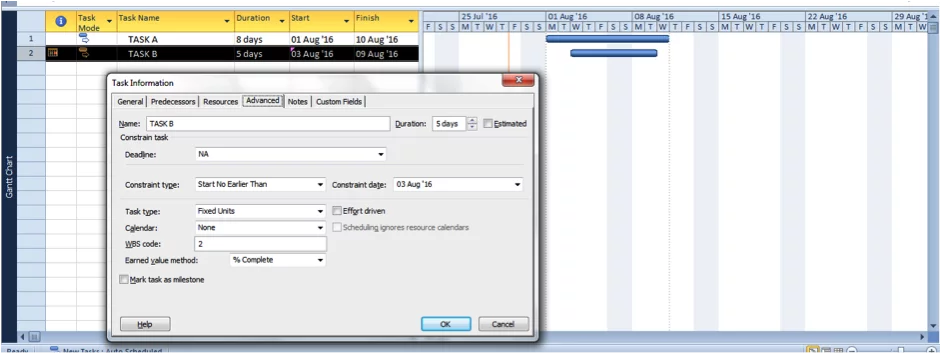
This would also apply if the user moves the Gantt bar for the task by clicking and dragging it; this is just another method of setting a task’s start date.
If a finish date is entered, then a Finish No Earlier Than constraint would be set. This is a major difference between autoscheduled and manually scheduled tasks.
Because of this, it is advisable to add a note to a constrained task explain why the constraint is being set. This may be done via the Notes tab on the Task Information box:
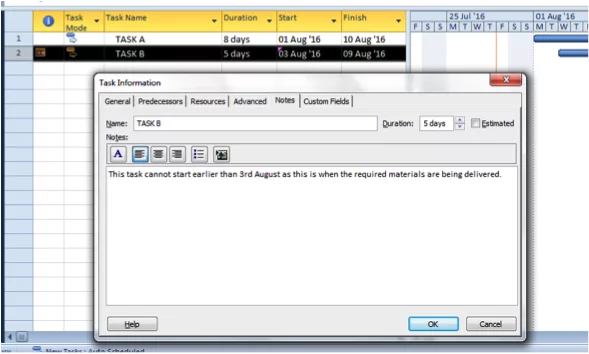
This helps distinguish between genuine constraints and those that may have been set accidentally.
To view tasks with date constraints use the Tasks With Fixed Dates filter. Select View>Data>Filter drop-down>More Filters>Tasks With Fixed dates>Apply.
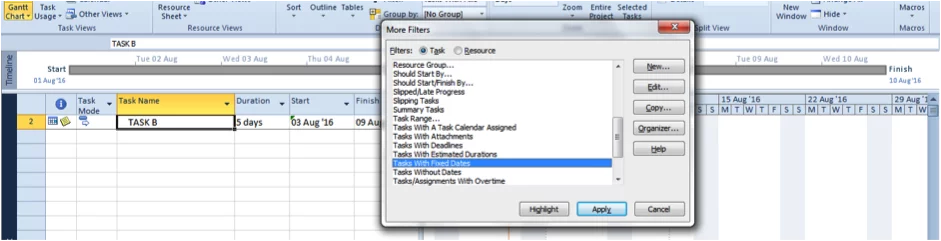
To clear a filter and display all tasks, press F3.
FURTHER READING & OTHER USEFUL RESOURCES
Mastering The Basics Of Tasks
Defining Task Relationships
Customising Task Dependencies
Working with deadlines and constraints
Critical Path
The critical path for a project is the set of critical tasks. A critical task is a task which, if its end date is delayed, will automatically delay the project end date. Conversely, if a critical task finishes early, then usually the project end date is brought forward as well.
Associated with any task is the Total Slack. This is the amount of time that the task can be delayed by without delaying the project end date. If the total slack is greater than zero then the task is non-critical; otherwise it is critical.
Critical Path Analysis (CPA) is a technique enabling the calculation of the critical path and, for each task, the total slack. Project automatically executes this every time the project is modified. The critical path can be displayed by applying the Critical filter (View>Data>Filter drop down>Critical)
The critical path can also be displayed by selecting Format>Bar styles>Critical tasks. This causes the Gantt bars for critical tasks to turn red, while those for non-critical tasks remain blue:
The value of the total slack (together with the Free Slack, which is the amount of time that the task can be delayed without delaying other tasks) can be displayed using the Schedule table. Select View>Data>Tables drop-down>Schedule:
The Late Start and Late Finish dates are simply the latest dates the task should start or finish on without delaying the project end date (basically the current start/finish dates plus the total slack).
Understanding critical paths is one of the key features of Microsoft Project. This is covered as part of our Introduction to Microsoft Project course.
FURTHER READING & OTHER USEFUL RESOURCES
Creating A Critical Path Indicator
Microsoft Project Add-On – Displaying Your Critical Path
NEXT - Resources (1) - Resource Pooling, Resource Assignment and Resource Driven Scheduling
Resource Pool
Project also allows detailed resource assignment which may also be used to calculate project costs. It is necessary first to set up the resource pool in the Resource Sheet view. Select View>Resource View>Resource Sheet and enter the available resources:
The resource type may be Work, Material or Cost. Human resources (which may be either individuals or a group, such as the Implementors shown above) would be work resources. A material resource is just that; it could be fuel, cement, paint or whatever you wish. Having set the type to be Material, you also need to enter the material label (for example litres) and the price per unit. So in the example above, we have entered fuel, with material label litres and the price per litre as £1.25.
A Cost resource is designed to be used for some type of overhead (for example accommodation or travel) that may be incurred by a number of different tasks but may take a different value for each task. Little information is required in the Resource Sheet view apart from the name and type. Instead, the value is entered directly in the Cost field in the Task Information box.
The basic resource costing, for a work resource may be entered in the Standard Rate and Overtime Rate fields. The Cost/Use is a call-out charge; a single charge incurred every time the resource is assigned to a task, taking the same value regardless of the task’s duration. The Accrue At field would affect the cash flow; if it is set to Prorated it means, for example, that when a particular task is 50% complete then for cashflow purposes 50% of the resource’s cost has been paid. Alternatively, it may be set to Start or End, if the full cost due is paid at the task’s start or end.
The Max Units field is used to indicate the resource’s overall availability as a proportion of its working times, as given by the resource calendar. A calendar is automatically created by Project for each work resource, and may be edited in the same way as a project calendar. If, for example, a resource works part-time (say four hours per day, five days per week) then it would be incorrect also to set the Max Units to be 50%; this would indicate to Project that the resource is only available to work two hours per day.
If, on one or more days, a resource is found to be working more hours than its Max Units would indicate, then it would be flagged as being overallocated. If you have entered the name of a group of people (e.g. Implementors) then the Max Units commonly represents the number of people in the group 9in this case four).
As aforementioned, each work resource has its own calendar which is automatically created when the resource is entered. This calendar has a base calendar which gives the default working times for the resource. This is set to be the project’s calendar, but may be changed.
If the project’s calendar is edited, then this would have a cascading effect, modifying all resource calendars that have this calendar as a base. To access a resource’s calendar, either to view or edit, select Project>Properties>Change Working Time, then choose the resource’s calendar from the drop-down list:
The resource’s calendar can then be edited, for example to add holidays, using the same method as described for editing a project calendar (see 2.3 Project Calendars).
Resource Assignment
To assign resources to a task, display the Task Information dialog box for the task, select the Resources tab and assign the resources from the drop-down list:
For work resources, the units assignment figure should be entered. Project will use this, combined with the task’s duration to calculate a total work figure for the resource based on:
Work per resource=Duration(hrs)*Units assignment(%)
Project will then match this work figure to the resource’s, rather than the project, calendar, using the same technique as described in the section on Project Calendars. For each such resource, it will calculate the start and finish date for the resource’s work on the task. Since a resource may have a very different calendar to that of the project overall, this may result in a change in the task’s duration, start and finish dates.
Suppose, in the example above, that Laura takes a holiday from August 22nd to 26th. During this time, she is scheduled to be working on development along with Fred and Sarah. This task is currently scheduled to start on August 18th and end on October 20th.
Laura’s calendar is edited to add this holiday:
This results in the end date for Development changing to 27th October, and the duration becoming 2.22 months:
Laura has now become the “leading” or “driving” resource; she is the last one to finish work on this task. The latest finish date for the resources becomes the finish date for the task overall.
To view this, select View>Split View>Details. This makes the view a combination, or dual-pane, view, with the Gantt Chart on top and the Task Form below:
The Task Form displays further information about the task selected in the Gantt Chart pane. To change what data is so displayed, click on the Task Pane (this making it the current pane), then select the Format tab in the ribbon and choose the required option. For example, to see the start and finish dates for each task choose the Schedule option:
As shown, Laura’s finish date, 27th October, is later than that for the other resource dates, making her the leading resource.
The Task Form may also be used to edit individual work figures, add overtime and delay when a resource starts work on a task (through the Delay field shown above). Suppose it is wished to get the task back on track. Firstly, Laura’s work figure may be reduced to 300 hours and that for Fred and Sarah each increased to 330 hours:
This results in Development finishing on 24th October. To bring it forward further, Laura may do overtime. To set this, the Work format option for the Task Pane is selected, and 20 hours overtime entered:
This results in the end date changing to 21st October; an acceptable figure.
NB. Whereas Project will recalculate the end dates for work resources it will not do so for Material or Cost resources. This can result in the end date being later than it should be. Using the example above, suppose the total work figures for the work resources are further reduced to 200 hours for Fred and Sarah, and 180 hours for Laura:
This results in the end dates for the work resources changing to 26th September. However, the end dates for Fuel and Travel remain at 20th October, resulting in this date becoming the end date for Development. These dates need to be set manually (using the Task Form) to match the end dates for the work resources:
A useful filter, available from task views such as the Gantt Chart, is the Using Resource filter. It will display the tasks assigned to the resource selected by the user:
In this case, for Laura, this displays the following:
NB. In all versions of Project except 2010 the assigned resources’ names are displayed on the Gantt bars, as show above. In Project 2010 red bars do not display any data. To change this, select Format>Bar Styles>Format drop-down>Bar Styles. This will display all bars available to the view. Scroll down and select the red (critical) Gantt bars. Click on the Text tab at the base, click into the Right field and select Resource Names from the drop-down list of available task data values:
Resource Driven Scheduling
Resource-driven scheduling refers to the MS Project feature whereby if, once resources have been assigned to a task, the resource assignment is changed, then the task’s duration will be recalculated. This applies only to auto-scheduled tasks. Two pieces of task data, notably the Task Type and whether the task is effort-driven or not, are relevant to this. Both can be set via the Advanced tab on the Task Information box:
Consider the following simple project:

Preparation currently has two resources assigned to it, Fred and Laura. It is of 6 days duration. Fred and Laura have been assigned to work full-time on it. Project would have calculated that each have 48 hours of work to complete. Project also calculates the total effort, which is simply the total work. So here, the total effort for Preparation is 96 hours.
Suppose that a further resource is assigned. If the task is effort-driven, then Project will assume that the total effort is still 96 hours, but is now shared between three resources. Hence the work per resource drops to 32 hours and the task’s duration is reduced to four days. Conversely, if either resource is removed, the duration would double to 12 days, as now a single resource has to do all the work! If not effort-driven, then the duration would remain at 6 days, and the total effort would be recalculated.
Resource assignment may also be changed by changing the Units assignment for a particular task, rather than adding or removing resources. Note that Implementation, a three-week task, has four implementors assigned to it (a total of 3 weeks*40h per week *400% = 360h work).
Suppose that two of these were required elsewhere, and the assignment was changed to 200%. If the task type is Fixed Units, then it would be assumed that the remaining two still have the same amount of work to do, thus resulting in the task’s duration increasing to 6 weeks. Similarly, an increase in the Units assignment would result in a proportionate decrease in the duration.
The Task Type field may be accessed in the same way as the effort-driven option, via the Advanced tab of the Task Information dialogue box:
To switch this off, and hence ensure that the duration remains the same and the resource’s work is recalculated instead, set the task type to Fixed Duration.
Default values, applicable to new tasks, for each of these settings, may be set via File>Options>Scheduling options for this project:
By default, in Project versions 2010 and 2013, new tasks are not effort-driven, but are fixed units. A Project may have a mixture of tasks with different settings. Whether resource-driven scheduling is appropriate or not for a particular task will depend on the task itself and the extra resources being assigned.
FURTHER READING & OTHER USEFUL RESOURCES
Missing Resources In MS Project Resource Pools
Setting Up Work Resources In MS Project
Constraints In MS Project
NEXT - Resources 2 - Cost Changes and Resource Overallocation
Resource Cost Changes
A resource’s costs may change over the project’s duration. For example, a resource may receive one or more salary increases during the project. In addition, a resource assigned to multiple tasks may not charge the same rate for each task; this is more likely to be the case for contractors, rather than permanent staff members.
The Gantt chart for the sample project used here is shown above. The project starts on 1st August 2016 and ends on 14th November 2016. Let us suppose that Laura Smith, a permanent employee, receives a 10% pay rise on 3rd October. If we were simply to change her standard rate in the Resource Sheet view then we might well get inaccurate costing data. This is because Project would apply this increased rate to all the tasks to which Laura is assigned, not just those from 3rd October onwards. In addition, let us suppose that Fred Parker, an external resource, has two rates for this project; his standard rate of £200/day and an alternative rate of £250/day. For a particular task he may charge either of these.
Both of these cost variations may be set via the Resource Information dialogue box. Firstly, to set Laura’s pay rise, select her in the Resource Sheet view then select Resource > Properties > Information to display the Resource Information box.
Click the Costs tab:
Use the second row to enter firstly the date of the pay rise, then enter either the new standard rate itself or simply type +10%. If necessary, similarly edit the overtime and cost/use figures. Further such rows may be added at any time to take account of more changes to the pay rates.
To include Fred’s alternative rate of £250/d, display the Resource Information box for him, select the Costs tab, but this time select tab B. This, together with tabs C, D and E allows you to set up alternative costings. Each tab can include multiple rows to handle rate changes with time.
Simply enter the new rate in the usual way.
To apply a cost rate other than the default one (A) you will need the Task Usage view. We will say that Fred is charging £250/d for Development.
Select View > Task Views > Task Usage, go to the details for Development, and right-click Fred underneath Development. Choose Information from the shortcut menu displayed. This will display the dialogue box for Fred’s assignment for this task. Simply choose table B from the drop-down list labelled “Cost Rate Table”.
To view costs for the whole project, select Project>Project Information>Statistics:
To view detailed costs per task, from the Gantt chart view select View > Data > Tables drop-down > Cost:
Note the Fixed Cost field. This may be used to enter any extra costs incurred by the task over and above that resulting from the resource assignments.
To view detailed resource costings for a particular task, display the Information box for the task and select the Resources tab:
Resource Overallocation
Overallocation occurs, for a particular resource, if, for one or more days of the project, the resource is found to be working more hours than its Max Units figure (Resource Sheet view) would indicate.
For example, suppose that an extra task, Documentation, is introduced into the project above, and Laura is assigned to it. As this overlaps with Planning for 4 days, this causes her to become overallocated:
This first indication of a resource overallocation problem is generally the red figures in the Indicators column. If displayed next to a task, this simply means that one or more of the resources assigned to the task is overallocated on one or more days. It does not necessarily indicate a serious problem, as this could be due simply to the resource having to work one extra hour on one day!
The first step in resolving this is to find out which resources are overallocated. The Resource Sheet view shows them in red. There is also the Overallocated Resources filter:
Next is to find out by how many hours is the resource overallocated. This can be done via the Resource Usage view. Select View>Resource Views>Resource Usage:
This view shows a breakdown of the resource names by the tasks to which they are assigned, together with both total and day-by-day figures for the number of hours worked. To assist further in the overallocation, select Resource>Level>Next overallocation. When clicked this will scan forwards highlighting areas of overallocation. In the example above, Laura is seriously overallocated, so something needs to be done.
When resolving overallocation problems, the choice is generally either to delay one or more tasks so as to prevent the overlapping which is a common cause of overallocation or to replace the overallocated resource with another. There may be implications for the project as a whole for either of these solutions.
If a task is delayed by more than its total slack, then that will delay the project end date; however, if this is still within the deadline, then this may be acceptable. If the substituted resource costs more than the overallocated resource that it replaces then the project costs will increase; if they are still within the budget then this too may be an acceptable solution.
One way of delaying tasks is to use the automatic leveller. Project will scan the tasks and delay one or more of them to prevent tasks with the same resource overlapping. There are a variety of options affecting which tasks are delayed.
Select Resource>Level>Levelling Options. This displays the following box:
The most likely options to be changed before levelling are:
- Leveling Calculations: This should always be set to Manual otherwise the leveller will automatically kick in whenever an overallocation problem occurs. You might assign a resource and suddenly find some of your tasks being delayed.
- Leveling Order: This controls which tasks are selected for levelling, i.e. being delayed. The default is Standard, meaning that Project will try to minimise the overall delay to the project’s end date. So for example non-critical tasks will be delayed in preference to critical ones, shorter tasks delayed in preference to longer ones etc. If this is changed to Priority, Standard then Project will look first at a task’s priority when deciding whether it should be delayed or not, before considering the other aforementioned factors. A task’s priority is set via the General tab on the Task Information box:
It is a number between 0 and 1000 with a default value of 500. Use of the leveller in this way is the only circumstance where changed task priorities will affect the project scheduling.
Applied to the project above, using normal default settings (i.e. Standard), gives the following effect:
There is a two-day lag between Planning and Preparation. The leveller has delayed the start of Documentation to the beginning of this lag, then split the task so that Laura works for two days on Documentation then does the remaining three days after Development (to which she is also assigned, together with Preparation) finishes.
Although this has resolved the overallocation, it is not an ideal solution. If the duration of Planning increases, even by just one day, then the overallocation returns for the one day when this task overlaps with Documentation (Project does not automatically increase the levelling delay):
A better solution, if it is wished to delay Documentation, is to link it in a Finish-To-Start dependency with, in this case, Development (since Laura is also assigned to Preparation and Development). To remove the levelling delay for the project, select Resource>Levelling>Clear Levelling:
If Development and Documentation are linked in this way, then the overallocation is removed:
The project end date is not affected. If any of the tasks to which Laura is assigned change duration, then the delay is automatically adjusted:
This is a useful alternative use for this dependency type (see 3.3 Task Dependencies). Unless the successor task has a Finish No Later Than (or similar) constraint set (see 3.4 Task Date Constraints) this ensures that the two tasks will not overlap.
To resolve the overallocation by replacing the overallocation resource by another, it is first necessary to find out which resources are available on the overallocated days. The Resource Usage view can display this:
Here is can easily be seen that Fred is available during this time slot, as he has no assigned hours. To replace Laura with Fred, return to the Gantt Chart view, display Task Information for Documentation and, from the Resources tab, click on Laura, and select Fred from the drop-down list of resource names:
This also resolves the problem, but that project cost is increased since Fred, as a contractor, costs more than Laura.
Hopefully this guide to Microsoft Project has been useful. Please let us know if you think we’ve missed anything.
FURTHER READING & OTHER USEFUL RESOURCES
Avoiding Resource Overallocation
Project Add On “One Pager”: Highlights Overallocated Resources
Disable change highlighter