
[Complete Guide] Tables In Adobe InDesign
Contents
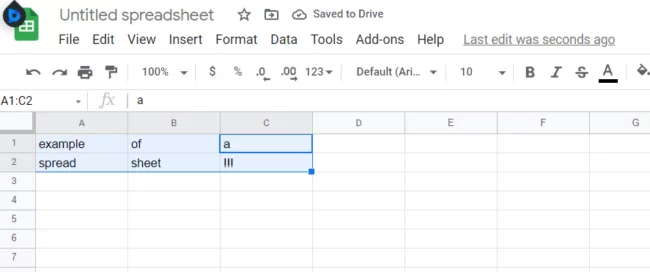
We are all familiar with Tables from common applications such as Microsoft Word or Excel.
Those of us who are involved in printing or in publishing need to know how to create and manage tables in InDesign.
This guide will show you how to create and edit tables in a number of ways both in the body of your document and in the header / footer.
Tables are one of the many available panels in Adobe InDesign.
For more on tables in InDesign we cover them during our InDesign training courses.
Creating a Table in InDesign
There are three main ways to create a Table in InDesign.
These are:
-
- Create Table
- Insert Table
- Convert Text to Table.
Let’s start with the simplest option.
The “Create Table” Option
The Create Table Option creates a text frame in your InDesign Document and places a new table into that frame.
Clicking Table on the top Toolbar of InDesign and then clicking Create Table in the drop-down menu will open up the Create Table dialogue, which comes with 4 quantitative options and a style option:
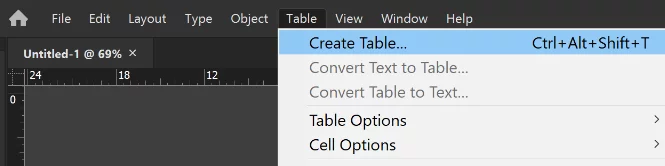
– Body Rows
– Columns
– Header Rows
– Footer Rows
– Table Style
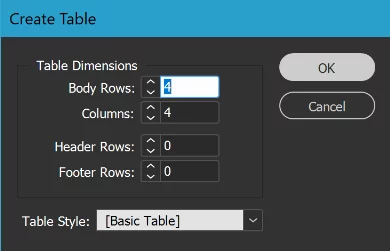
Select your desired quantities. Once you have clicked “OK”, click anywhere on your document and the Table will appear.
To summarise,
-
- Click Table at the top of your InDesign workspace.
- In the drop-down Menu, click Create Table.
- Select as many Body Rows, Columns, Header Rows, and Footer Rows as you want your Table to have.
- If you would like to, select a Table Style. By default, there is only one Table Style. Additional Table Styles is something that would have to be created.
- Click OK. Then, click anywhere on your Document.
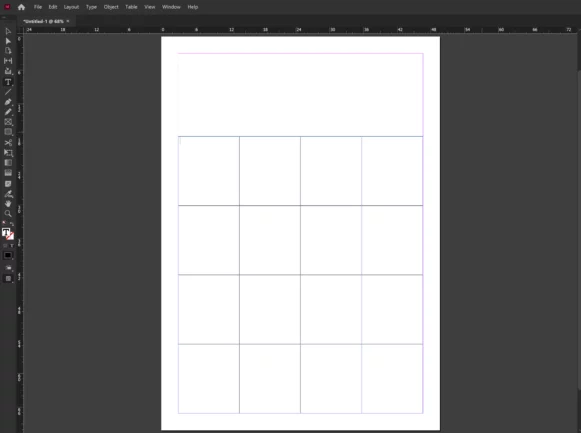
Notice how the table takes up the length of the document? What if we want our Table limited to a specific part of your document? This is our second option.
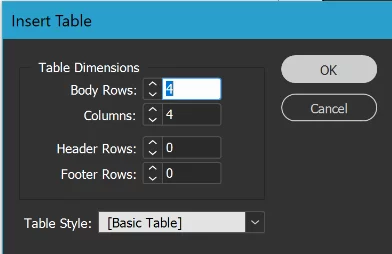
The “Insert Table” Option
The Insert Table option is used to place a new table into a pre-existing text frame.
This allows for much more precision than the Create Table option.
Before we can use the Insert Table option, we need a frame that the table can be inserted into.
We create a frame and click inside it.
Then, as before, we click on Table in the Toolbar at the top of our window.
This time we see “Insert Table“, instead of “Create Table”. The “Insert Table” dialogue shows the same options as the Create Table one.
Put simply,
-
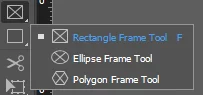
- Press F or Click the Rectangular Frame Tool on the Side Toolbar. Alternatively, you can use the Type Tool. Create a Frame in the Document.
- Click inside the newly created frame until you see your cursor blinking inside the frame.

-
- Go to the Toolbar at the top of the screen, click Table, and then in the drop-down menu, select Insert Table.

-
- Choose all your options, and click OK when done.

The “Convert Text to Table” Option
The final option for creating a Table in InDesign is to create it from pre-existing text.
If done correctly, you will be able to select the text you have typed and transform it into a table.
This can be done as follows:
-
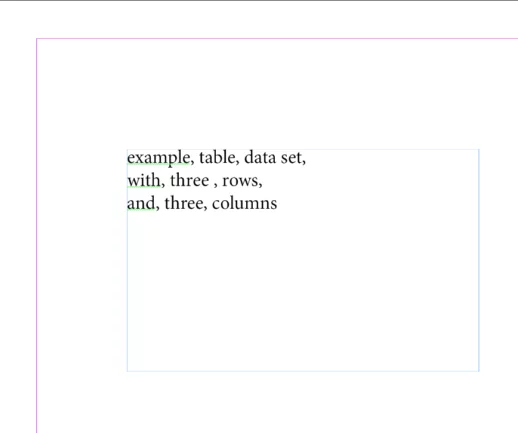
- Type a string of data that will be the first row of your table. In between each piece of data, add a comma, or alternatively, hit TAB on your keyboard. The Tab hits or commas will end up being your column separators.

-
- When you are done with the row, press Enter, and continue in a similar manner, adding rows as needed.
-
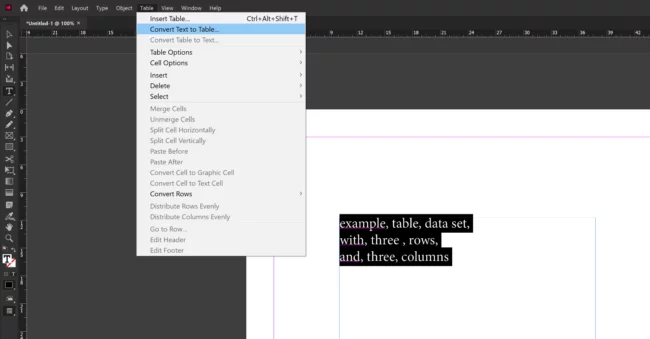
- When all the text is complete and ready to become a table, select all the text you want to become a table, and then click Table in the Toolbar at the top of the screen.
- Click Convert Text to Table…
-
- The Convert Text to Table… dialogue will appear. In it, there are options to distinguish what constitutes a Column or Row, as well as to choose a Table Style. (I’ve chosen to make my columns separated by commas and my rows separated by Paragraph Breaks.)

-
- Click OK to continue to your new Table.
PRO TIP: A useful trick is to click “Type” at the top of the screen and make sure “Show Hidden Characters” is selected. This will allow you to see visual indicators of the Paragraph Breaks and Tabs.
If you run into problems getting Convert Text to Table… to appear, it is possible that there is a problem with your formatting. Take a close look at the number of rows and columns you have created, making sure that they are even.
Just like there is an option to Convert Text to Table, it is useful to note that there is also one to Convert Tables to Text.
Importing Tables
So what if you have a Table already, but it isn’t on InDesign?
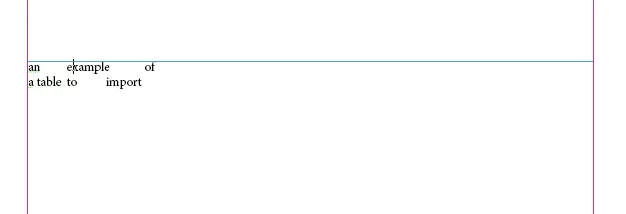
Adobe was ready for such a possibility, and that’s why InDesign comes with a feature to import Tables from other programs. You can place, for example, entire Word Documents (that include tables) into your InDesign document, or you can just copy the data and paste it directly into InDesign.
“Placing” Documents into InDesign
Want to import a document with Tabled data into InDesign? Here are the steps:
-
- Drag an Excel file, or a Microsoft Word file that includes a Table, directly onto your InDesign document

-
- Click on your document to place the imported document onto InDesign.
-
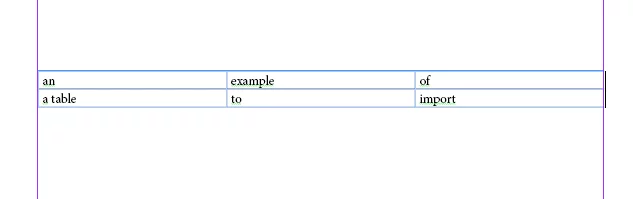
- Convert the text into tables.
Pasting Tables into InDesign
You don’t necessarily have to import an entire document just to get a table that is in the document. You can also copy the table you want and paste it into InDesign. Here’s how it’s done.
-
- Select the text in a Table. The Table can be from anywhere where multiple cells can be selected at once: Microsoft Word, Google Docs, Online… the list goes on. Copy the selected text.
-
- Paste the text into InDesign.
- Convert the Text into a Table.

Theoretically, there is an option to preserve Table formatting immediately upon pasting it into InDesign. I’ve found it to produce mixed results, but for those who want the option, here it is.
To preserve Table Formatting, click Edit > Preferences > Clipboard Handling. Select the “All Information” Option, and click OK to leave the dialogue. If the format is not preserved when pasting tables, you always have the option of Converting the Text into a Table.
It’s good to note also that it becomes very easy afterwards to overwrite data from Tables in InDesign with new data from outside of InDesign. Your Table format will remain unchanged.
Tables are featured in all sorts of publications, even if you don’t realize they are there. Indexes, Tables of Contents, Recipes… all of these and more may in fact have been created on InDesign using Tables. That’s why it is useful to know how to use them effectively.
You may be familiar with the terms “Header” and “Footer” from word-processing applications.
Typically, a header may include such things as a Title, or a page number and you would have the option of having it present on each page of your document, or alternatively, only the first page.
Table Headers/Footers in InDesign work much the same way. Imagine you have a table that extends over multiple pages of your InDesign Document. Having a Header would be useful in keeping the same information at the top of the Table for each page that the Table is on. This is a great time-saving trick similar to using master pages and spell check.
When creating a new table, we see an option for the addition of Header and Footer rows.

Create a Table, adding one Header Row and One Footer Row to the Table.
As you can see, the Header and Footer rows are not stylistically different from the other rows of the Table. However, they ARE functionally different. We’ll hear more about that later.
It’s possible that you’ve already created your Table, and now you want to go back and add a Header or Footer Row. It’s very easy to do. You highlight the Rows you want to convert, and then go to Table, Convert Rows, and then Click To Header/Footer.
So to summarize:
- Select the Row(s) you want to convert. If you want to convert row(s) to a Header, select row(s) from the top. If you want to convert row(s) to a Footer, select row(s) from the bottom.
- Go to Table > Convert Rows > To Header (or To Footer)
You will notice there is also an option to convert cells “To Body”. Just like we can convert rows into Headers or Footers, we can convert them back.
When it comes to Table Header and Footers in InDesign, there are a number of options to play around with. We’ll go over some of them here. The bulk of them can be found in the Headers and Footers Tab of the Table Options dialogue. To access it, have your Header (or Footer) rows selected, click Table, go to Table Options, and then click on Headers and Footers.
First and foremost, we see options to change the number of Headers and Footers. If you’ve made any mistakes when creating your Headers/Footers, or if you’ve changed your mind, this is the place to go.
Repeat Header/ Footer
This is where a Header’s functionality comes in. If your Table extends to multiple pages, or perhaps is present in multiple text frames, it would be tedious to manually add the Header (or Footer) contents every time the Table is present. For this reason, we have the option of Repeating Headers and Footers.
There are 3 options:
-
- Every Text Column
- Once per Frame
- Once per Page
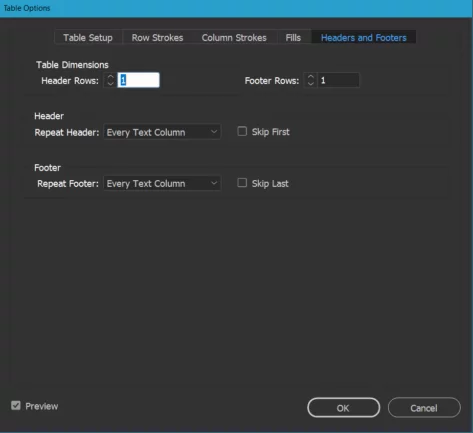
Every Text Column is relevant in the event that the Text Frame that your Table is in has more than one column. In this case, your Header (or Footer) will appear once per column.
Once per Frame applies to Tables that extend across multiple Text Frames.
Once per Page is for a Table that spans multiple pages and allows you to retain Header and Footer information for each page.
Skip First/ Skip Last
If you want the first instance of your Header to not be included, you can select Skip First. Only subsequent instances of the Header will be shown.
If you would like the Footer to be visible in every instance except its final once, select Skip Last.
Inserting A Row Or Columns
To Insert a Row or Column, make sure you select a Row or Column near where you want the new one inserted, and then go to Table > Insert > Row or Column. You’re given the option to choose a number of Rows or Columns and then to decide if you want them added either above your selection or below it.
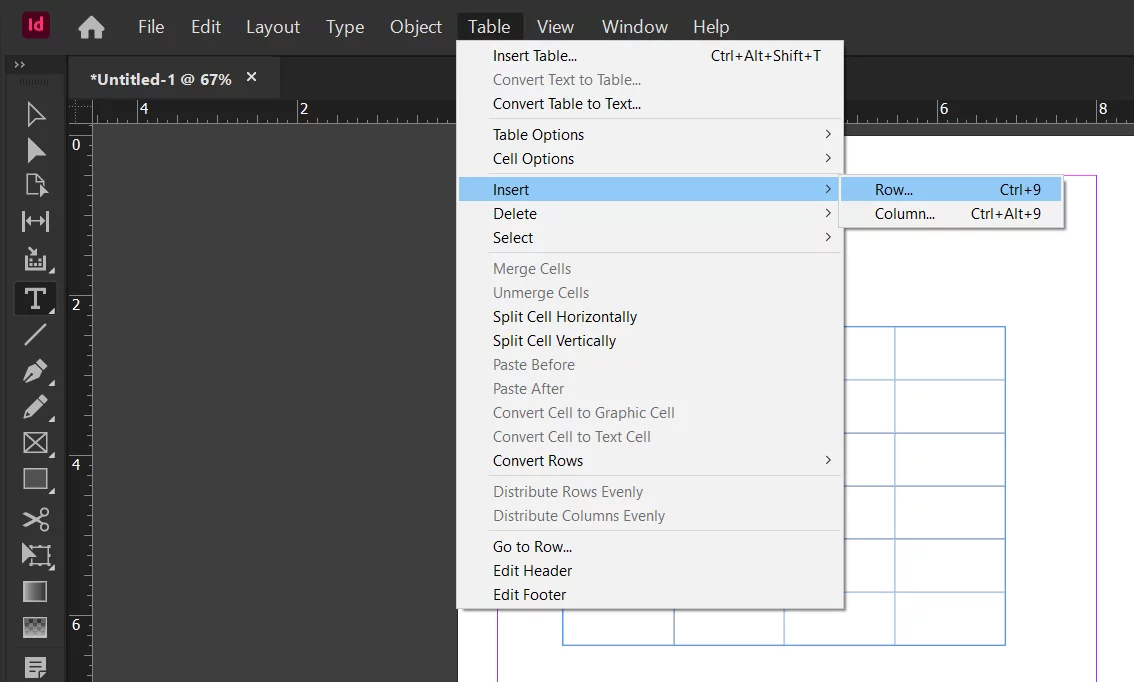
There’s also a quicker way. With a Row or Column selected, right-click. In the Right-Click Menu, go to Insert, and then you’ll see both options: Row and Column.
It is interesting to note that if you click on a Column border while holding Alt, and drag to the right, InDesign will create a LOT of additional columns for you.
Deleting Rows / Columns
For Removing Rows, you have the exact same options as inserting them. Just go to Table > Delete > Row or Column.
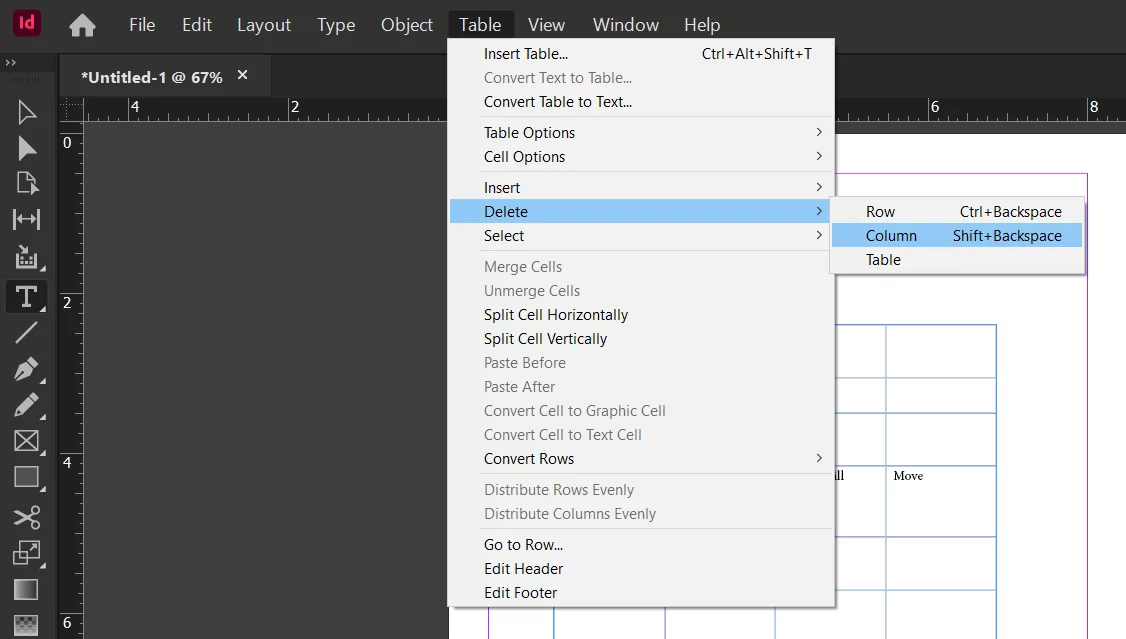
For convenience, while you are in any given cell, you can press Ctrl+Backspace to delete that Row, or Shift+Backspace to delete that column.
Of course, you can also use the Right-Click Menu as previously mentioned.
Resizing Columns and Rows
Resizing Columns and Rows is super easy. You can click a cell’s border and drag it to resize. However, this will push all adjacent Rows or Columns to the side. To avoid this, hold Shift while Resizing.

It is also good to note that rows enlarge automatically to accommodate text as you type.
Merging / Splitting Rows / Columns
Multiple cells can be merged together. Here’s how to do it:
-
- Select Multiple cells

-
- Right-Click
- Click Merge Cells

An individual cell can also be split (into two). Here’s how to do it
-
- Select a cell
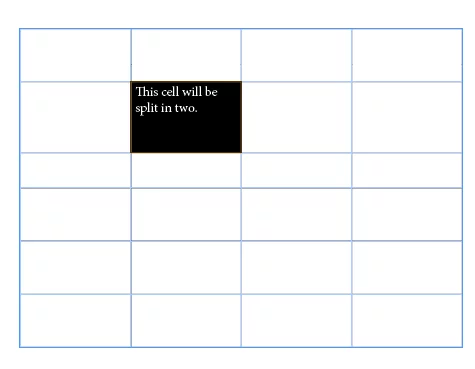
-
- Right-Click
- Click either Split Cell Horizontally or Split Cell Vertically.

Moving Rows / Columns
Entire Rows and Columns can be dragged elsewhere, as long they are selected in their entirety. Here’s how to do it.
-
- Select an entire Row or Column.
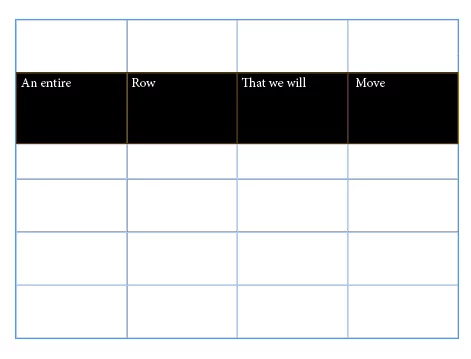
-
- Click on it and drag it to where you would like it.
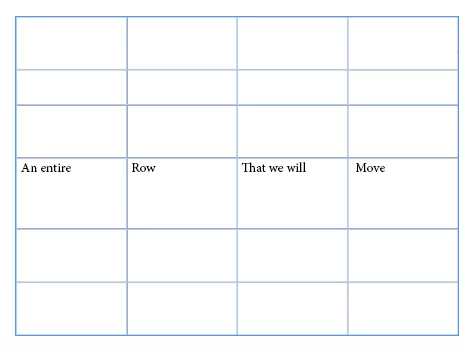
You can duplicate Rows or Columns in the same manner, by holding Alt while dragging.
Conclusion
There you have it. The complete guide to tables in InDesign.
Once you know how they’re pretty easy to deal with so good luck!
Other Useful InDesign Tutorials
Using The Frames And Shapes Tool In InDesign
How To Number Pages In InDesign
How To Change The Bullet Character In InDesign


- Facebook: https://www.facebook.com/profile.php?id=100066814899655
- X (Twitter): https://twitter.com/AcuityTraining
- LinkedIn: https://www.linkedin.com/company/acuity-training/