Adobe InDesign: Understanding The Workspace
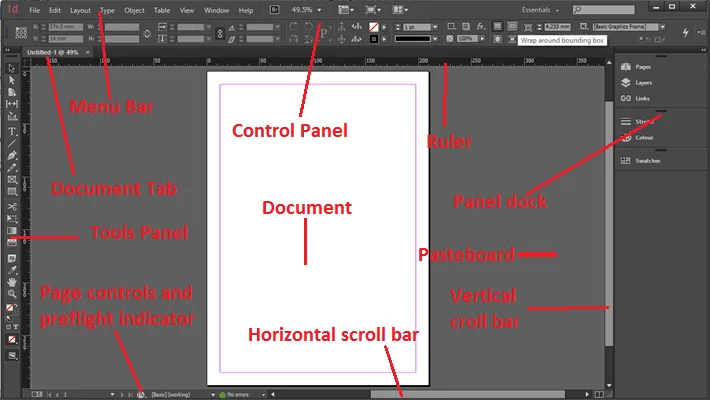
Initally the InDesign interface can be a little overwhelming. Navigating its menus to find the specific tool that you need can be frustrating. However, with time it becomes far simpler. For complete beginners, we’ve created the ‘map’ below to help them find the tool that they need quickly. We cover navigating InDesign’s menus and interface in our Indesign training course for complete beginners.
| Feature | Description |
|---|---|
| Menu Bar | The Menu Bar provides you with a series of options from which you can select commands. Next to the Menu Bar you will see a series of buttons that allow you to adjust the view of the workspace and/or document without having to look for the same options in the Menu Bar. |
| Document Tab | This is where you find the name of your document and it is also followed by the percentage the document is being viewed at. This is important because documents in InDesign can vary enormously in size. |
| Tools Panel | The Tools Panel is where you will find all of the tools in InDesign. The selection, drawing and control tools used to work with objects in your document can all be found here. By default, it set to be on the left-hand side. |
| Page Controls and Prefight indicator | The Page controls show the page number of the currently displayed page and provide buttons to move to the next, previous, first and last spread. A spread is a collection of pages that are shown at the same time, for example, a two page spread normally found in magazines. You can also type in a specific page number into the page number box and hit enter and you will be taken to that page. Within the Page controls you will find the Error button. This allows you to see at a glance if there are any errors in your document. For example if you had some Text or image which went past the side of the document the Error button will display as red. |
| Control Panel | The Control Panel displays a series of controls that can be used to modify the contents and objects in your document. The controls in the panel will vary depending on what tool you have got selected from the Tools Panel. |
| Document | The Documents displayed in the InDesign Workspace and is the area that will be printed. Objects and text can be placed on the page to create the document. |
| Horizontal scroll bar | The Horizontal scroll bar lets you move left or right to view different parts of the document. |
| Vertical scroll bar | The Vertical scroll bar lets you move up or down to view different parts of the document. |
| Pasteboard | The Pasteboard area is where you can put text or images before you know where they are going to go. |
| Panel Dock | This is an area where available panels can be stored on the screen, making them easily accessible. By default, the Panel Dock is displayed in tiled icons. You can drag out individual panels or groups and make them float over the document window. |
| Ruler | These show the position and size of the objects on the page. If you click and drag on a ruler you can create a guide that can help with placing text and objects. |
For a bit more insight into some Indesign tricks you can pick up more quickly check out our short guide on how to remove a white background, it is a basic skill that pro designers use a lot! We also have a guide on how you can create interactive buttons which is definitely something of use when designing for web.


