[How To Use] Adobe InDesign Spell Check
Contents
InDesign spell check works differently from the other spell checkers.
InDesign is primarily a publishing tool.
InDesign assumes that by the time text hits it, the text has been proofread and that it won’t contain misspelt words.
Of course, this isn’t how the world works.
Last-minute changes and edits are asked for and need to be correct.
InDesign can spell check your text, but as standard, InDesign doesn’t have it enabled.
Let’s take a look at the options that InDesign offers:
Adding Word Lists To Your User Dictionary
Dynamic Spelling
Dynamic spelling is the InDesign term for spell check as we are used to in Microsoft Word or our email.
Dynamic Spelling will add the red squiggly line under any words that it believes are misspelt. It will add a green squiggly line under words where it believes there is a grammar problem.
The default option in InDesign is for it to be turned off, but getting it on is super simple.
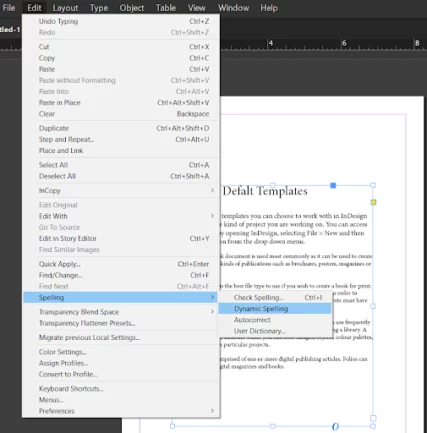
- Click Edit on the Ribbon at the top of the page.
- Go down to Spelling.
- Click Dynamic Spelling.
That’s it.
If you right-click on a misspelt word, you get a list of suggestions for how InDesign thinks that you should spell the word, as well as the standard options that you will be used to seeing from Microsoft Word or Google Docs.
If you would like to learn more, dynamic spelling is covered in our InDesign courses for begnners.
Spell Check
Spell check in InDesign is a one time check through your document.
You can do a spell check whether Dynamic Spelling is on or off.
To run a spell check:
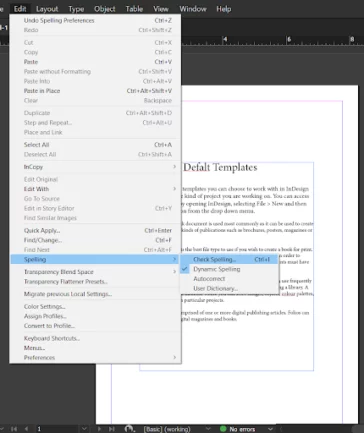
- Go to Edit at the top of InDesign,
- Go down to Spelling
- Click on Check Spelling….
Alternatively, you can press CTRL + i on your computer, and it will bring up the same dialogue.
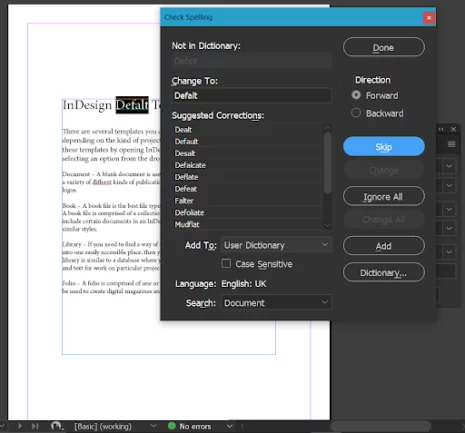
Looking at the Check Spelling dialogue box, you will notice all the options you generally see in any Spell checker.
You’ll see a list of words that InDesign believes are misspelt, along with suggested options for what the word might be.
To change a word, click on the suggestion that you believe is correct.
If you are using an unusual word that InDesign doesn’t recognise, there are three slightly different options.
- There is a blue button that contains “Skip”. Pressing this skips you to the next word leaving it unchanged.
- There is the ‘Ignore All’ button. Clicking this tells spell check to skip this word until the next time you perform a spell check. If that word repeatedly appears in your document, it won’t be flagged up by InDesign again.
- Finally, there is a ‘Dictionary…’ button. Click this to add the word to your dictionary so that it won’t get flagged up in the future.
When you’ve finished, click “Done” to close the dialogue.
Changing Language
InDesign allows you to set the language that it uses for spell checking.
It will be “colour” or “color”, depending on if you are writing for a UK or a US audience.
There are many other linguistic differences across the world between countries and between different professions ( for example, medical dictionaries).
For example, imagine writing for a UK audience, but as a one-off, you are asked to prepare something for a US audience.
You can change the language of your document very quickly.
-
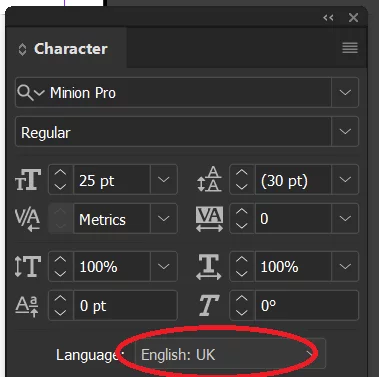
- Press CTRL + T on your keyboard. This brings up the Character Dialogue.
- At the bottom of the Character Dialogue, you will see a drop-down option to change the language to whichever language you prefer. There are options for Medical (US) English, British, Canadian, and American options, and other languages from all over the globe.
- Simply select the correct one, and the language used for your document will be changed.
- Press CTRL + T on your keyboard. This brings up the Character Dialogue.
Adding Wordlists To The User Dictionary
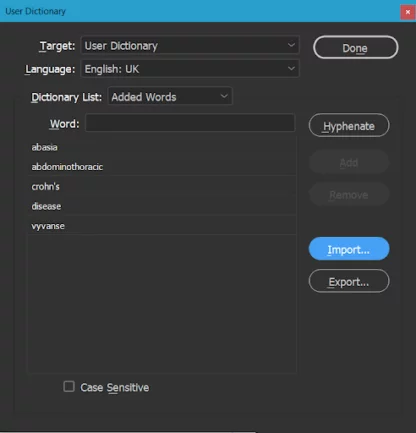
InDesign includes a feature called User Dictionary, where you can import .txt files of Word Lists into InDesign as a dictionary.
For example, you can import lists of specialist engineering or medical words to the dictionary.
If you’re doing this, you start by opening a text file on NotePad.
-
- Copy and paste the term or terms you want into a .txt file.
- Add your terms to the text file.
-
- Save the text file to your computer.
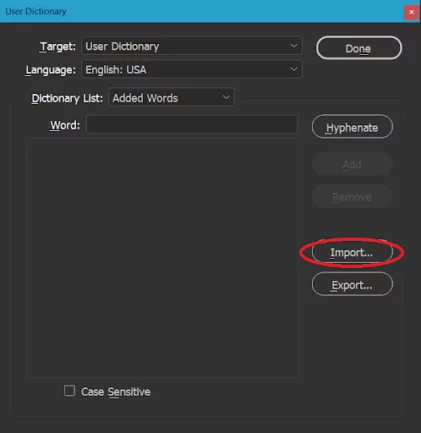
- In InDesign, Click Edit > Spelling > User Dictionary. The User Dictionary window will come up.
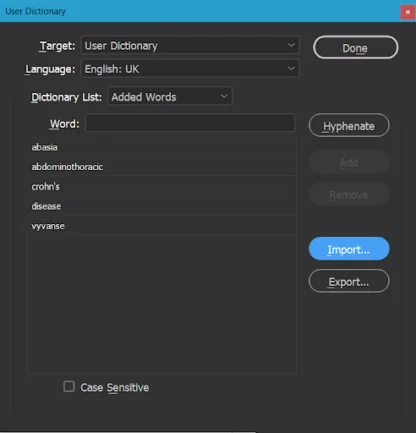
- If you are importing proper pronouns to your dictionary, make sure that you check the Case Sensitive box at the bottom. This will ensure that the dictionary only recognises these words when they are capitalised. For example, Vyvanse is a medicine in the picture above, so we want to make sure the dictionary only recognises it when it’s capitalised.
- Click Import to import a text file.
- In the Windows Explorer panel that comes up, Navigate to your text file and select it.
- Other than that, you can click Done, and that’s it! You’re done.
There are many pre-existing word lists (such as this one of medical terms: https://www.sgu.edu/blog/medical/medical-terms-abbreviations-and-acronyms/) you can use as a start for a word list.
Creating a company user dictionary that can then be distributed to everyone for companies that use specific terms can save a considerable amount of everyone’s time.
Finally, remember that UK English and US English are two different dictionaries in InDesign. If you use both, you will need to upload your word list to both. A Wordlist won’t automatically upload to both.
Autocorrect
InDesign also contains an autocorrect feature.
Autocorrect works the same way as spelling correction on your mobile phone.
It will alter words to what it believes is the correct spelling automatically without reference to you.
Some people find this helpful, others very frustrating.
Click EDIT > SPELLING or press CTRL + I to bring up the spelling dialogue box to access this option.
Final Thoughts
Don’t let basic mistakes spoil your presentation.
Spell checking, ensuring images are clean and clear, that boxes are well-formatted and that pages are numbered are all fundamental to your design.
Spell checking in Adobe InDesign is incredibly quick so make sure you spend 5 minutes double-checking your next document.
