
How to Share Your Files And Folders With SharePoint!
Contents
You may wish to share particular files or folders with users who do not usually have access to the site.
The files you save on your SharePoint site are typically accessible to anybody with site rights.
You may choose to allow editing or merely viewing of files and folders when sharing them.
In addition, SharePoint files and folders can be shared, stopped from being shared, or have their rights changed at any moment.
This information is covered in our SharePoint Courses! Come along to go from beginner to experience in just a day!
A shared folder is a unique kind of workspace that enables you to invite other users and share a folder’s contents across all the computers you have access to under your account.
People choose a folder on their computers to share when you ask them to join a shared folder.
The contents of a shared folder are available to all users (files and subfolders).
Some businesses implement file sharing, which allows numerous employees to access the same data.
However, the user environment does affect how the files are accessed.
For example, the files may be shared across two computers, where one person views them from their workstation while the files are saved on the second machine.
You must assess the possible advantages and hazards of file sharing as part of your organization’s secure data solutions.
You may then decide what kind of data loss prevention solution will most effectively prevent data loss and data breaches.
So what is the difference between sharing folders and files with someone?
When sharing a folder with someone, they will automatically have access to all of the files in the folder.
They will also have the same permissions for the files that you created for the folder.
This means if they have “Can Edit” access in the folder, they can also edit the files inside the folder!
Not sure if you should use SharePoint or One Drive? Read this article!
Sharing Folders With A Specific Person
If you wish to share folders, invite people or groups by email while keeping track of who you invited.
Additionally, if necessary, you may subsequently revoke authorization for particular people or groups using this method.
Let’s look at the steps in order to share folders with a specific person on SharePoint:
1. First, you want to log into your SharePoint account and go to the site that contains the files and folders you want to share.
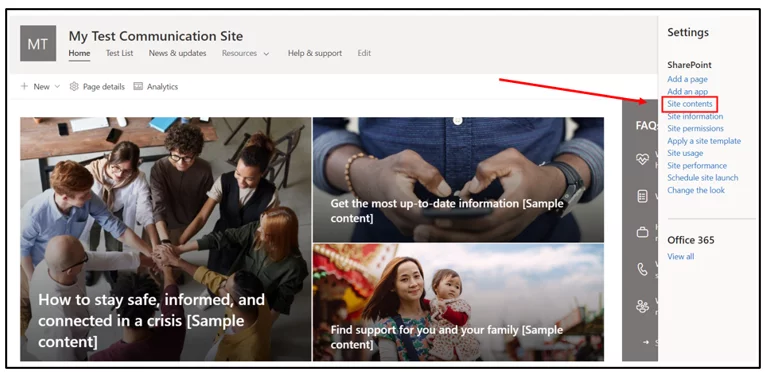
2. When you are in your site contents folder, navigate to the folder you want to share with a person or group of people. For example, let’s say I want to share a folder inside the documents folder. The first step would be to click on the folder.

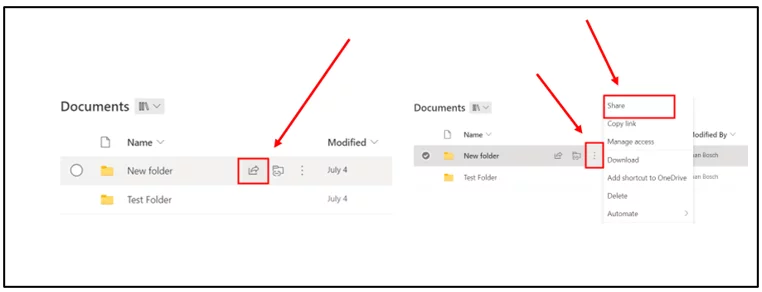
3. Next, you will see all of the folders and files inside that folder. In order to share that folder, you can hover over it and click on the share icon, or you can click on the three dots and select share.
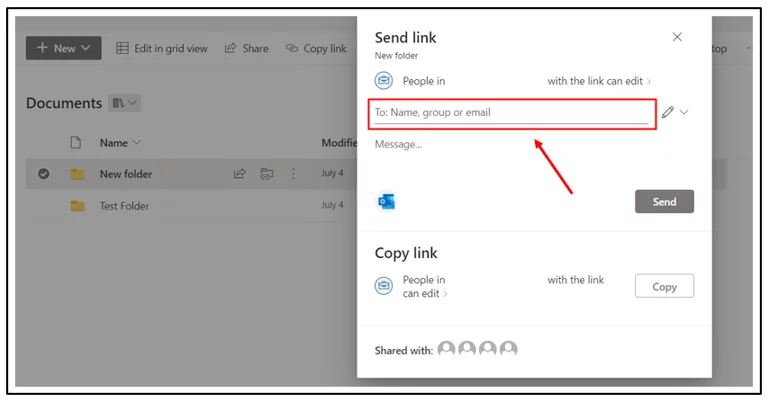
4. Now, just add the emails of all the people you want to share the folder with. Before you click the send button, we first have to look at the permissions you want to give the people you share it with.
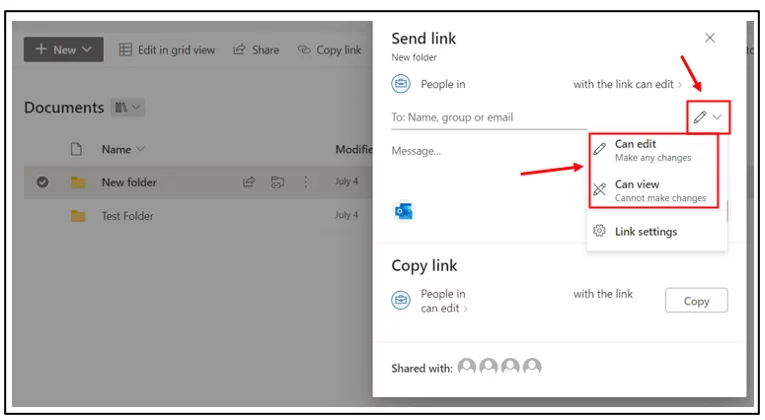
5. In terms of permissions, you have 2 options. You can either select “Can View” or “Can Edit.”
It is pretty self-explanatory what they both do.
With the can view option, the person you share the folder with can only view the folder.
With the can edit option, the person you share the folder with can edit the folder and all files in the folder!
6. You also have the option to copy the “Share Link.” This is a little different from sharing with people’s emails because anyone with the link can then open and view the folder. However, this is usually the best option if you want to share the folder with a large number of people or if you don’t have the email(s) of the person(s) you wish to share it with.
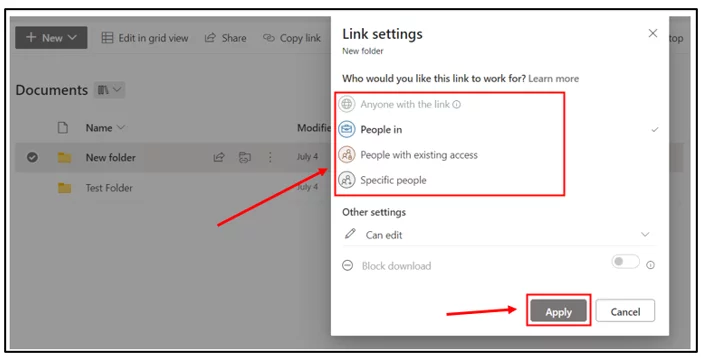
You have 3 options when it comes to sharing the link.
You can share the link with anyone, with your organization, people with existing access, or specific people.
Then again, you have the option to select their permissions as well (Can Edit or Can View).
Lastly, you can block them from downloading the folder as well as the content inside if you wish to do so!
Finally, when you’re happy with all of the settings, click apply!
Want to make sure your Site is top quality before sending it over? Read our complete guide to creating a sharepoint site here!
Sharing Files With A Specific Person
Now we will look at the steps in order to share files with a person or group of people! The process of sharing a folder and a file is very similar, so some of the steps will be repeated in this tutorial.
1. Once again, you want to start by logging into your Microsoft SharePoint account and navigating to your site with all of your folders and files.
2. Next, you want to go to your “site contents” and then select the folder which has all of the files you want to share.
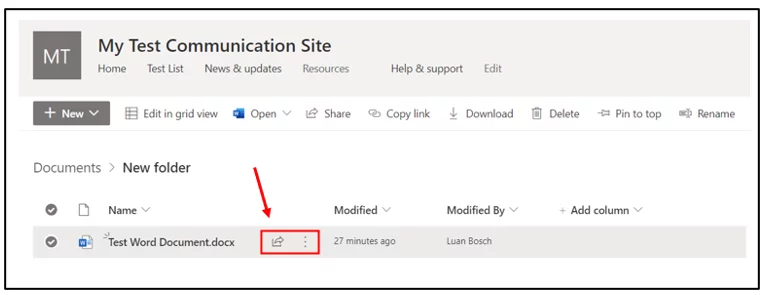
3. Open the folder which contains the file or files you want to share with someone, and from there, you want to hover over the file and either click on the share icon or click on the three dots and select the share option (Both do the same thing).
4. Next, you will have the same options available as with folder sharing. You can enter the email of the person or persons you want to share the file with, as well as the permissions they will have for the file (Can View or Can Edit).
5. The rest of the process is precisely the same as with folder sharing. You can follow the exact same process from step 4 in the “Sharing Folders with a specific person” section.
Sharing Using “Copy Link”
As mentioned earlier, you can also share files and folders using the “Copy Link” function!
Let’s look at the ”Copy Link” process in more detail:
Once you’re at the copy link settings (You can check step 6 in the folder sharing for more details), you will have 4 types of sharing options:
-
- Anyone with the link
- People in “your organization” with the link
- People with existing access
- Specific people
If you select the specific people option, you have to enter the name, group, or email of the particular person you want to share the folder or file with.
When that is done, there are 3 “Other Settings,” which are basically just your permissions:
-
- Can Edit: The shared person can make any changes to the file or folder.
- Can View: The shared person can only view the file or folder.
- Can Review: The shared person can view and make suggestions.
Finally, the last thing you have to select is whether you want to block the download or not. However, this option is only available when the shared person has viewed access. If the shared user has edit or review access, this option can’t be selected.
When you’re happy with all of the settings, go ahead and click the apply button, and then you’re all set! Just like that, you’re done with Sharing using copy link!
This will even send across the SharePoint Site Templates you are using!
File Sharing Troubleshooting
The many issues that might occur while sharing files or folders from SharePoint are covered in this section.
Be aware that altering these settings affects the kinds of external sharing that are permitted in your company.
For example, a member of your company may have occasionally chosen these settings for operational purposes.
Always ask your administrator first before making any changes!
OSE201 Error
This error means external sharing is disabled for all of your SharePoint and OneDrive sites.
To fix it you need to modify your organization’s external sharing settings.
You can do this by going to the SharePoint admin center and signing in with an admin account.
Next, under external sharing, select new and existing guests or anyone. Finally, click save when you’re done.
OSE202 Error
This error means only visitors who are already in your directory are eligible for sharing.
To fix it, you need to change the sharing options to allow anyone to view the site, or invite the relevant person.
OSE204 Error
This error means the website from which you’re attempting to share has sharing disabled.
To fix it, contact the owner and ask them to invite you to view it.
OSE205 Error
This error means only visitors who are listed in your directory may access the website.
To fix it, invite the relevant people or change the sharing access on the site.
OSE207 Error
This error means for OneDrive, external sharing is not enabled.
You can change this in your OneDrive settings!
OSE303 Error
This error means by employing “Anyone links,” the individual sharing the file or folder isn’t a part of the security groups permitted to share with visitors.
To fix this, navigate to the SharePoint admin center and sign in with an admin account. Now select the option that says “Limit external sharing to specific security groups.” Make sure to add the new or existing user to one of the listed security groups.
OSE304 Error
This error means the individual who is sharing the file or folder isn’t a part of the security groups that permit sharing with visitors.
To fix this, the individual will have to contact their admin to be added into the security groups they need.
OSE401 Error
This error means your organization’s option allows you to restrict sharing to users on particular domains. As a result, you are attempting to share with someone who is not on one of the specified domains.
To fix this, navigate to the SharePoint admin center and sign in with an admin account. Now select the option that says “Advanced settings for external sharing.” Next, you want to add domains and click okay. Remember to also save at the end.
OSE402 Error
This error means your organization’s settings prevent sharing with users on particular domains. As a result, you are attempting to share with someone who is on one of the specified domains.
You can contact your organization admin to fix this.
OSE403 Error
This error means you can only share content with users inside certain domains from the site you’re using. You are attempting to share with someone who is not on one of the specified domains.
You can change this in the site settings if appropriate!
OSE404 Error
This error means the website you’re sharing from forbids sharing with users on some domains. This is because you are attempting to share with someone who is on one of the specified domains.
Do not try and solve this issue! If someone is specifically banned it is for a good reason.
Conclusion:
Now you should have a better understanding of how to share your files and folders with SharePoint!
If you encounter any issues, make sure to revise back to the File Sharing Troubleshooting section to resolve your issue!
Looking for more top tips for SharePoint? Read our guide to SharePoint Lists here for more!
- Facebook: https://www.facebook.com/profile.php?id=100066814899655
- X (Twitter): https://twitter.com/AcuityTraining
- LinkedIn: https://www.linkedin.com/company/acuity-training/