
Critical Path Analysis And You! Microsoft Project
Contents
Without critical path analysis, you can’t identify which tasks need to be completed first in order to meet a project deadline.
Imagine if you were working on a project and didn’t know which tasks needed to be completed first.
You might start with the wrong task and then spend time redoing your work because you missed the original deadline.
This is where critical path analysis comes in.
Critical path analysis is a tool that:
Helps you identify the order of tasks in a project so that you can create a schedule for the project and meet deadlines.
All other tasks in the project are dependent on the critical path tasks and must be completed after them.
For more information on how to make the most of this tool, check out our courses in London here.

What Is A Critical Path Analysis?
Project managers use critical path analysis to ensure that all critical tasks are on schedule and to identify any potential delays in the project.
Critical path analysis can also be used to determine which tasks can be delayed without affecting the overall project timeline.
The critical path is a sequence of linked activities that directly influence the completion date of the project.
These activities are so essential that if any of the critical path tasks are delayed, the entire project will be delayed.
When you’re working with a software development project that has multiple tasks, the amount of slack assigned to each is determined by its priority.
Tasks on the critical path have no slack; tasks not on the critical path do.
Slack refers to how much time a task may be delayed without affecting the project’s overall completion date.
Microsoft Project is commonly used by project managers to create schedules and track task progress.
Microsoft Project includes a critical path tool that can be used to create a critical path diagram.
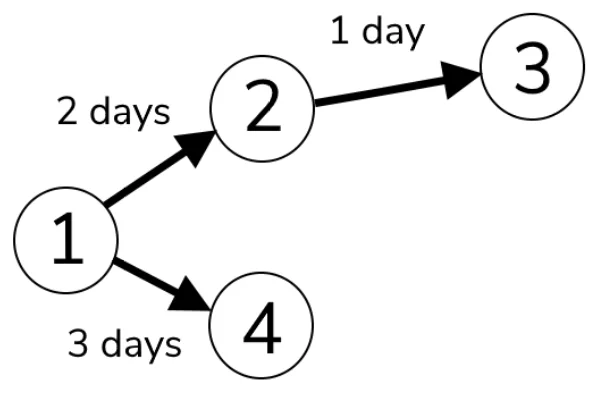
A critical path diagram is a visual representation of the critical path in a project.
The diagram shows all of the tasks in the project and their dependencies.
The length of each task’s bar corresponds to its duration.
Check out our other post to learn how to handle activities that have dependencies and lead times!
Show Critical Path In Task Views
All projects are automatically assigned the critical path. However, in order to be able to see the critical path and the processes within, it is also important to know how to identify them.
Want to make a Critical Path Analaysis but havent set up project yet? Check out our Microsoft Project beginner guide for a complete guide to setting up.
After submitting the tasks name, start and finish date, late start and finish date, and predecessors, you will get the above-displayed scenario.
- Open your project in Microsoft Project.
- Now, Click on the File tab.
- Then Go to Options.

- Select the Advanced option.
- Scroll to the bottom and make sure the ” Tasks are critical if slack time is less than or equal to ” 0 days.

- Now, Click on the View tab.
- Select Tables.
- From the dropdown menu, choose the schedule.
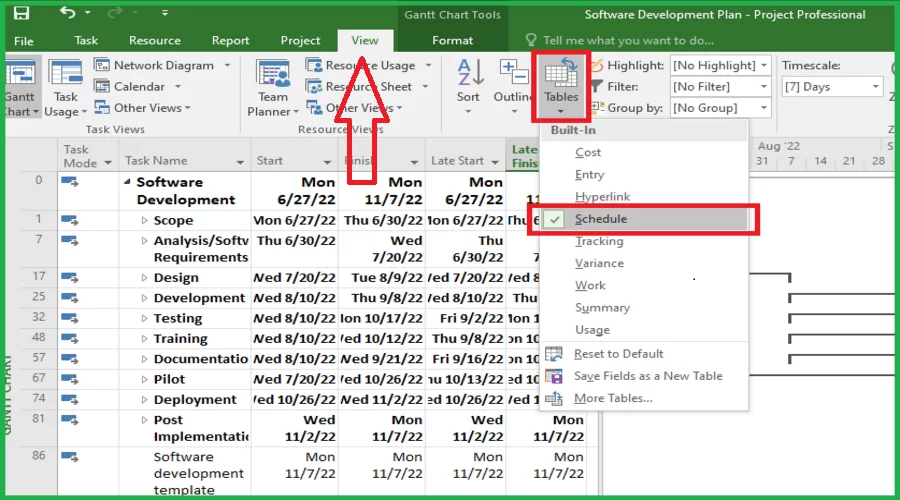
- Now, you will see Add New Column corresponding to the late finish column.
- Click on the arrow next to Add New Column.

- From the dropdown list, select Free Slack.
The free slack of an activity is the time that the proceeding activity may be delayed without affecting the following activity.

- Repeat the process and add another column, i.e Total Slack.
The amount of time a task may be delayed without affecting the project’s completion date or any future tasks is known as slack.
For additional information on Microsoft Project, see here for a complete guide on Cost-Benefit Analysis!
Show The Critical Path In Gantt Chart View
In order to view Critical Path tasks in Microsoft Project, follow these steps:
- Open your project in Microsoft Project.
- Click on the Task.
- Click on the Gantt Chart.
- Now, go to the Format.
- In the Bars Style section, check the Critical Tasks option.
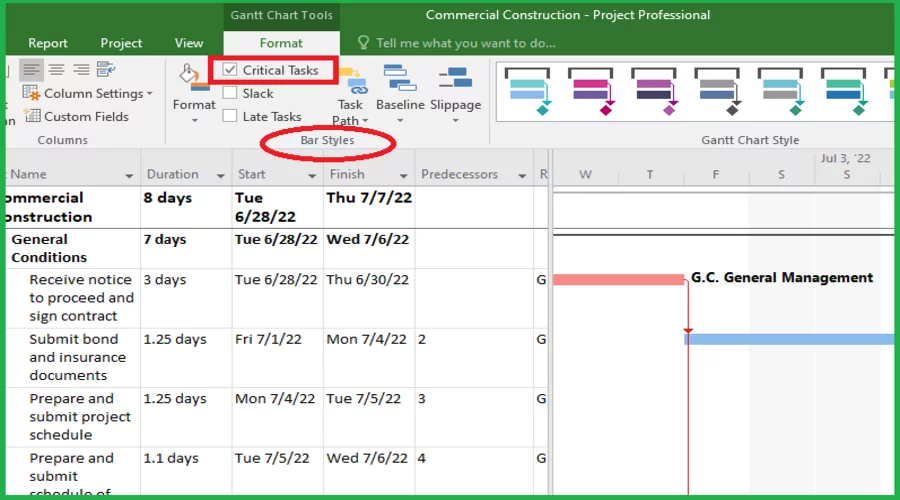
6. Critical Path tasks will be highlighted in red.
When you are managing a project, it is helpful to have a clear overview of all the tasks that need to be completed.
The Gantt chart view is an excellent way to see all the tasks in your project, as well as the dependencies between them.
In the Gantt chart view, critical path tasks are represented by red bars.
This allows you to quickly identify which tasks are on the critical path and see how they relate to other tasks in the project.
Additionally, the Gantt chart view can help you spot potential problems with your project schedule.
For example, if you see that a task on the critical path has a large number of dependencies, you may want to consider breaking it down into smaller tasks to make it easier to manage.
Overall, the Gantt chart view is a valuable tool for project managers, and it is especially helpful for managing the critical path.
Do you want to discover a technique to better manage your activities visually?
Take a look at our article Microsoft Project vs Planner – Which to use!
View The Critical Path In A Master Project
If you are working on a large project that contains multiple sub-projects, you may want to view the critical path for the entire project.
This can be done using the Master Project feature in Microsoft Project.
To view the critical path for a master project, follow these steps:
- Open your project in Microsoft Project.
- Click on the File tab.
- Click on the Options button.
- Click on the Schedule
- Now, Scroll down to the bottom and check Inserted projects are calculated like summary tasks.

This feature can be helpful when trying to get an overview of a complex project.
When this feature is enabled, Microsoft Project will automatically create summary tasks for each subproject.
These summary tasks will show up in the project outline, making it easy to see what needs to be done.
Change What Tasks Show Up On The Critical Path
The Critical Path is determined by the tasks that have the least amount of slack.
By default, Microsoft Project only shows tasks that have zero slack in the Critical Path view.
However, you can change this setting so that tasks with positive slack are also shown.
To show tasks with positive slack in the Critical Path view, follow these steps:
-
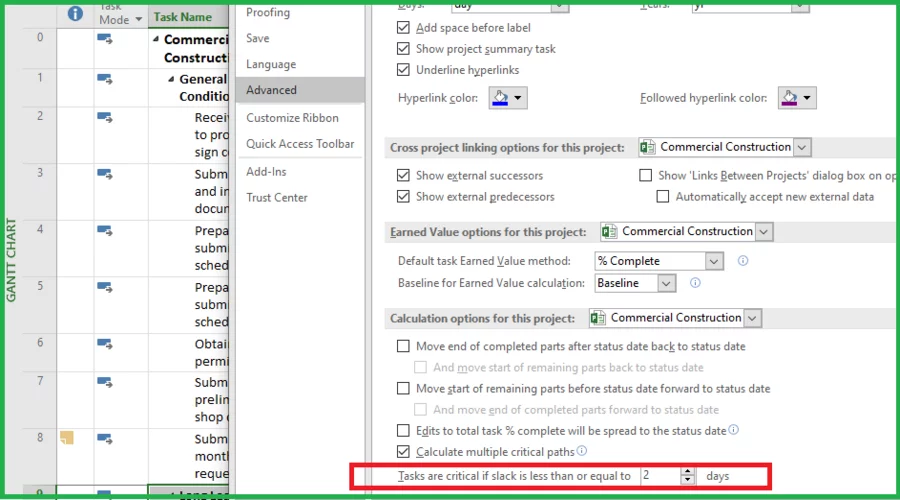
- Open your project in Microsoft Project.
- Click on the File tab.
- Click on the Options button.
- Select the Advanced button.
- Scroll down to the bottom and enter the number to Tasks are critical if slack is less than or equal to.
-
- Now click on the OK button.
This setting will help you to see all the tasks that are on the critical path, even if they have some slack.
Working with the critical path can help you to better understand your project and plan accordingly.
Consider using a budgeting and planning approach to show the activities in your project. Waterfall Methodology.
Show Multiple Critical Paths!
There are some projects where there is more than one critical path.
This can happen when there are parallel tasks or when there are multiple dependencies between tasks.
In these cases, it can be helpful to view all of the critical paths in your project.
To view all critical paths in your project, follow these steps:
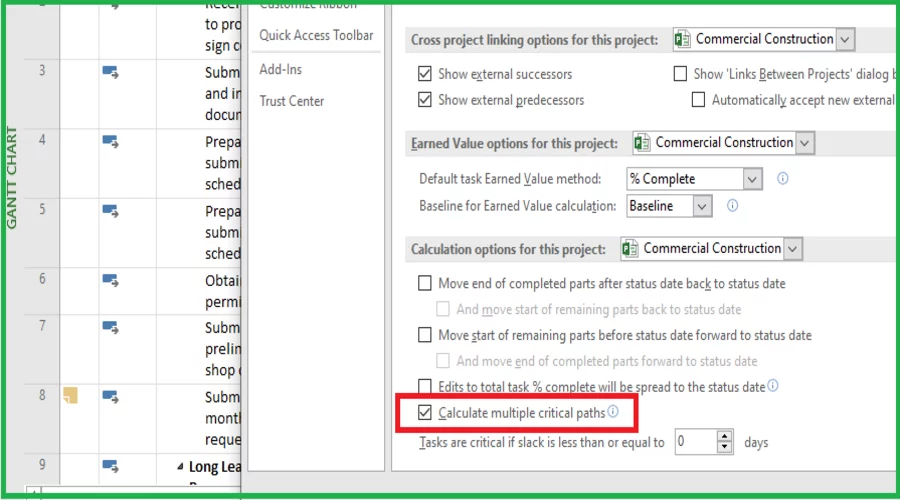
- Open your project in Microsoft Project.
- Click on the File tab.
- Click on the Options.
- Now go to Advanced.
- Scroll down to check to Calculate multiple critical paths
As you can see, there are multiple critical paths in this project.
By default, Microsoft Project only shows the first critical path in the Critical Path view.
However, you can change this setting so that all critical paths are shown.
Critical Path Troubleshooting
There are a few common problems that can occur with the Critical Path. Here are some tips for troubleshooting these problems:
Critical tasks are not being identified
If this problem occurs, it’s because the “Tasks are critical if slack time is less than or equal to” option has not been changed to 0 days in the Microsoft Project settings.
To resolve this, go to the File tab, choose Options, then Advanced.
Look for and change the “Tasks are critical if slack time is less than or equal to” option and make sure it is set to 0 days.
Critical tasks are not being displayed in the Gantt chart view
If the Critical Path button isn’t selected in the Format tab, you’ll not be able to have a look at the critical task in the Gantt chart view.
correct this, select the Critical Path option from the Bar Style section, which is available on the Format tab.
Critical tasks are not being displayed in the Critical Path report
This can happen if the “Critical Tasks” option is not selected in the Critical Path report.
To fix this, go to the Reports tab, select In Progress, then click on Critical Tasks.
Critical Path Analysis is a powerful tool that can help you manage your projects more effectively.
By understanding the Critical Path and using the tools available in Microsoft Project, you can ensure that your projects are completed on time and within budget.
Conclusion
Critical path analysis is an important project management tool. It allows you to see which activities are necessary for the project’s success and to plan accordingly.
Tasks on the Critical Path are those that cannot be put off without causing a delay in the project.
The Critical Path is determined by determining which sequence of activities has the longest length and must be completed to complete the project.
Looking for a way to set hard dates and see how your project will flow? Read our guide to Microsoft project schedules here!

- Facebook: https://www.facebook.com/profile.php?id=100066814899655
- X (Twitter): https://twitter.com/AcuityTraining
- LinkedIn: https://www.linkedin.com/company/acuity-training/