
Using The Dynamic Countdown Timer in Power BI
Contents
Do you want to track project deadlines, sales targets, or any time-sensitive metrics using Power BI?
Or are you looking for a visually appealing way to track days, hours, or minutes in a dashboard until a big project or event?
A dynamic countdown timer is exactly what you are looking for.
It tracks deadlines, event launches, project milestones, and monitors KPIs.
It can even be used to enhance user engagement with real-time updates.
By “Dynamic”, it means the displayed timer updates automatically in real-time or at intervals without a manual refresh!
Power BI does not natively support real-time sub-seconds updates (like a live digital clock), but in this article, we’ll build a workaround.

What Is A Countdown Timer?
A countdown timer is a simple dynamic visual element that automatically displays the remaining time until a predefined event or deadline.
Using a dynamic countdown timer is super useful for tracking time-sensitive metrics in business scenarios such as:
- Time until next product launch: to build anticipation and track progress towards a product launch date.
- Time left in a sales campaign: to encourage the sales team by showing the remaining time for promotions.
- Deadlines reminders in project dashboards keep project teams aligned with deliverables.
Key Concepts & Requirements
What are the requirements for creating and using a dynamic countdown timer in Power BI?
- A target datetime: a fixed future datetime (e.g., event start time).
- The current datetime: dynamically fetched using DAX functions (e.g., NOW(), which returns the current datetime.
- Time remaining calculation: A DAX measure to calculate the difference between the target and current time.
Key DAX Functions
To calculate, display, and use a dynamic countdown timer, you’ll need to use these DAX functions below:
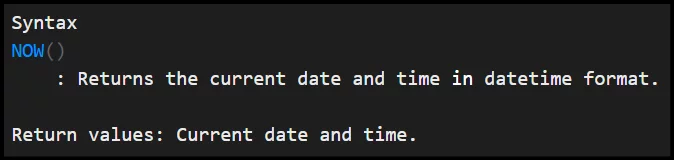
NOW(): returns the current date and time including hours, minutes, and seconds.
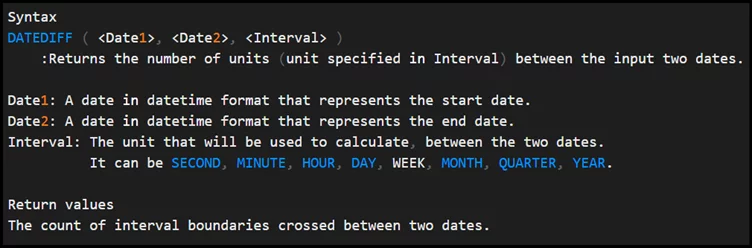
DATEDIFF(): computes the difference between two datetimes in specified units like seconds, minutes, or days.
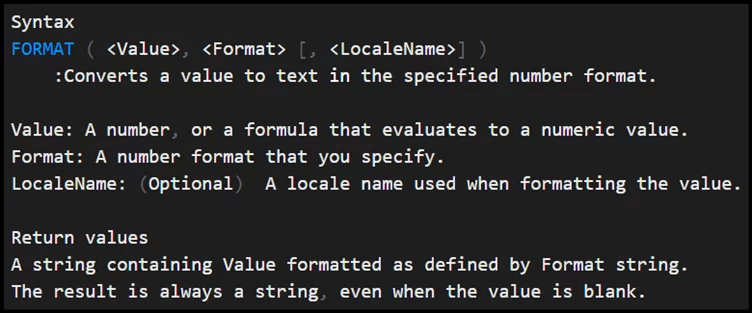
FORMAT(): converts the calculated time difference between the two datetimes into human-readable formats.
Using a dynamic countdown timer in Power BI has limitations for real-time updates, as discussed above.
Below are solutions and workarounds to keep your countdown timer as dynamic as possible:
Power BI Desktop vs. Power BI Service
Power BI Desktop has no auto-refresh capability, measures only updates on manual data refresh (clicking refresh) or interactions (filtering, slicing).
Power BI services supports schedule refreshes (hourly, daily).
For more details, check out our Power BI version comparison to help you pick the right one!
Auto Page Refresh (Premium)
This requires Power BI Premium or Premium Per User (PPU), and it allows automatic visual updates at set intervals (e.g., every 1 min, not seconds).
This only works in Power BI Service, not desktop.
Manual Refresh Workaround
Creating a bookmark that refreshes visuals and adding a button to trigger the bookmark.
Users click the button periodically to update the timer.
Power Automate (Advanced Workaround)
Use Power Automate for near real-time updates (every few seconds) to trigger a dataset refresh.
However this requires Power BI API setup, and it may hit refresh limits based on Power Automate license.
Building A Simple Countdown Timer
This is how to create a basic countdown timer that calculates and displays the time remaining until a target date.
1 – Add a Fixed Target Date to the Model
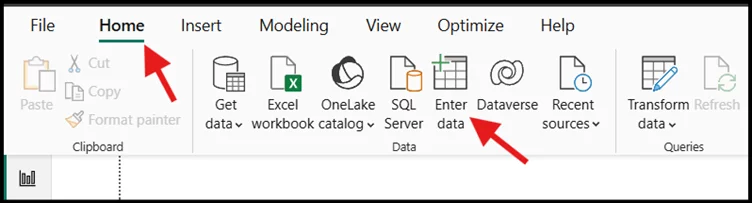
Create a new table for a static date. Go to Home > Enter Data under data options.
Add a single row with your future target date (e.g., 2025-12-31) following the example below.

2 – Create a Measure for Time Remaining.
Use these DAX functions below to calculate the time remaining towards the target date and time.
- NOW(): fetches the current time.
- SELECTEDVALUE(): ensures a single target date is used.
- SECOND(): calculates the difference in seconds.
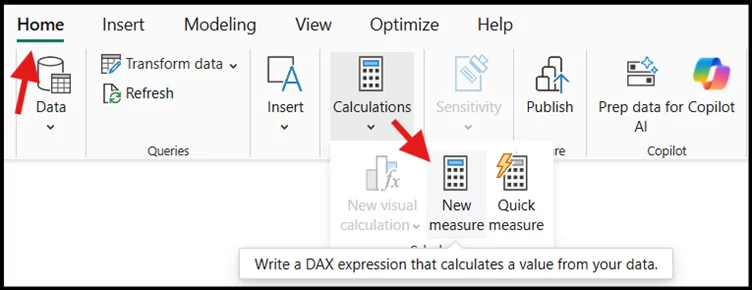
Create a new a New Measure. Go to Home > New Measure in the calculations group.
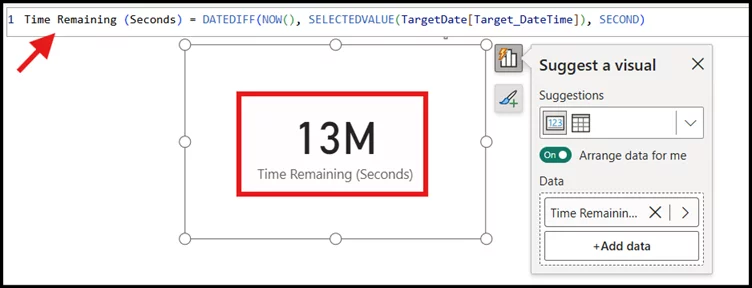
Type in the DAX formula below to calculate and compute the time remaining in seconds.


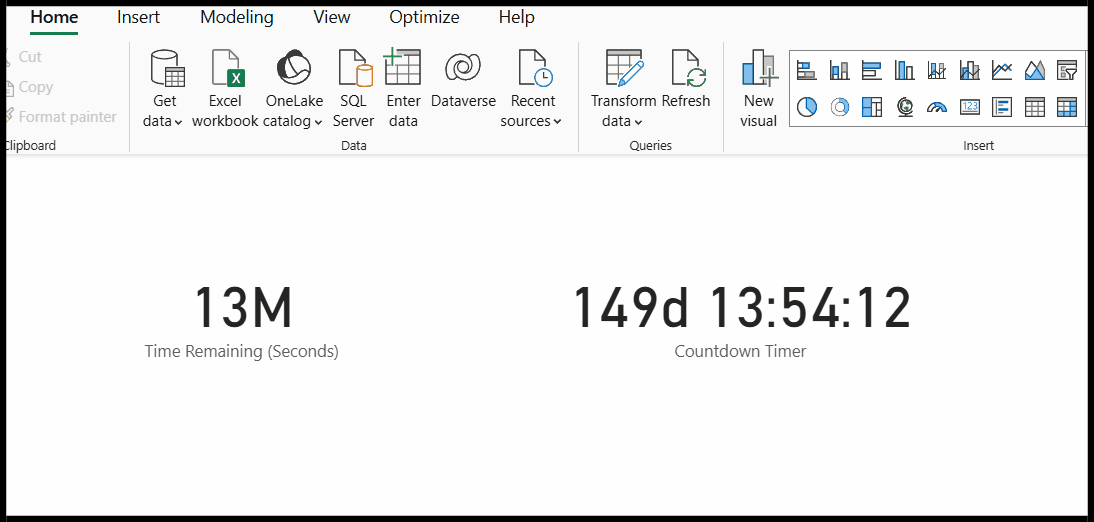
Visualize the New Measure on the Power BI canvas with a card visual. It shows the total remaining seconds.
Next is to format the countdown time to a much more readable format.
3 – Format the Countdown Timer (Days, Hours, Minutes)
Next is to refine and format the countdown timer (Time Remaining measure) to display in a human-readable format, digital style countdown.
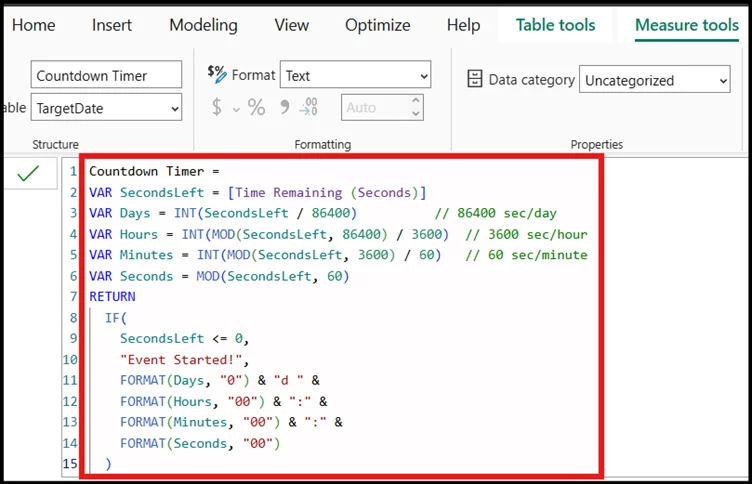
Create a new a New Measure again. Go to Home > New Measure in the calculations group.
Type in the DAX formula below to Format the original Time Remaining measure above into a digital countdown.
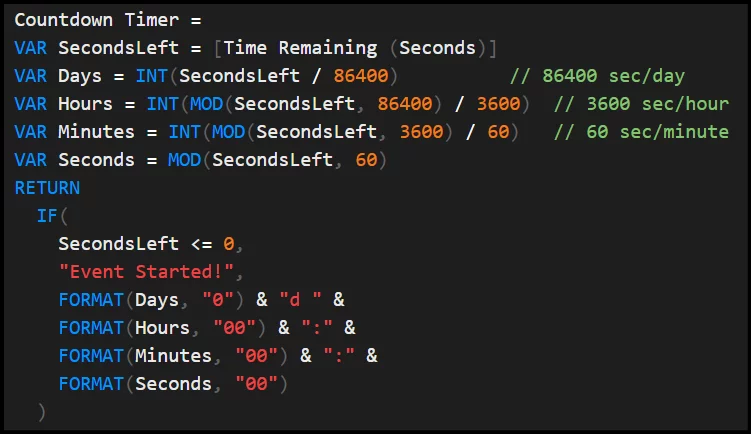
The DAX formula below should return a digital countdown style to a card visual.
Add the new Countdown Timer measure onto a card visual and click the refresh button to see it update in real time as you click Refresh.
Making It Dynamic
Making it “Dynamic” makes the countdown timer periodically and automatically update without requiring manual refreshes or user interaction, as you can see above.
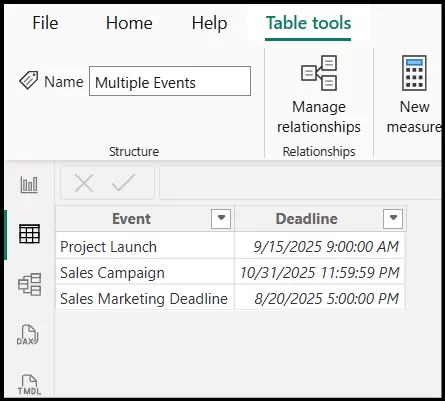
Dynamic inputs per row or event make the countdown timer work for multiple events instead of a single fixed date.
For this to work, you’ll need a table with two columns, Event Name and End Date, with each row showing its countdown.
How To Make It Dynamic
Auto Page Refresh
Available in Power BI Premium or Premium Per user (not Power BI Pro or Free).
It’s great for dashboards as Power BI automatically refreshes visuals at a set interval.
To set it up, publish and open your reports in Power BI Service. Go to Format > Page Refresh. Set interval (e.g., 5 minutes).
Trainer Insight: We find that the most successful dashboards combine multiple refresh methods.
Use Auto Page Refresh for regular updates and manual refresh for instant updates on demand.
This hybrid approach gives flexibility and keeps both casual viewers and power users happy.
Power Automate
A Power Automate flow triggers a dataset refresh at set intervals but uses the Power BI API to push the updates.
It’s best for reports needing second-level precision, it requires knowledge of API setup, and pro users are limited to 48 refreshes per day.
Direct Query
Direct Query connects to a live database (SQL Server, Azure). The timer updates whenever the source data changes.
It’s best for Dashboards linked to real-time operational data and performance, depending on database speed.
Advanced Use Case Example
You can track multiple deadlines using a dynamic countdown timer along with conditional formatting for color coding to highlight urgency.
Create or connect to a table with multiple rows for different events and deadlines.
Next, we need to create a Measure to calculate the Time Remaining (as done earlier above).
Or we can incorporate it into the Format Measure as seen below.
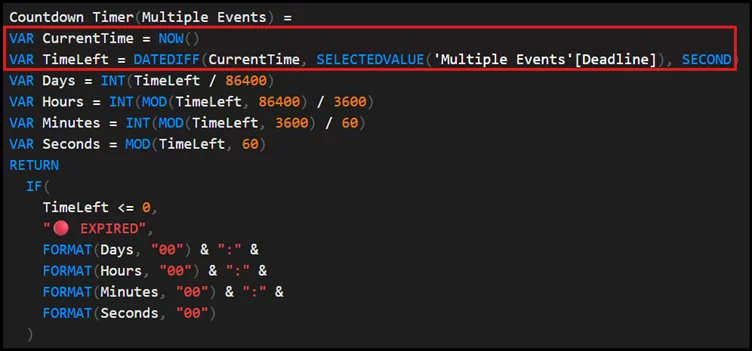
The first two VAR DAX formulas calculate the current time (using NOW()) and time remaining (using DATEDIFF()).
Just as we’ve used in building a simple countdown timer above.

The measure above formats the countdown timer to show in dd:hh:mm:ss as displayed in the table visual below.
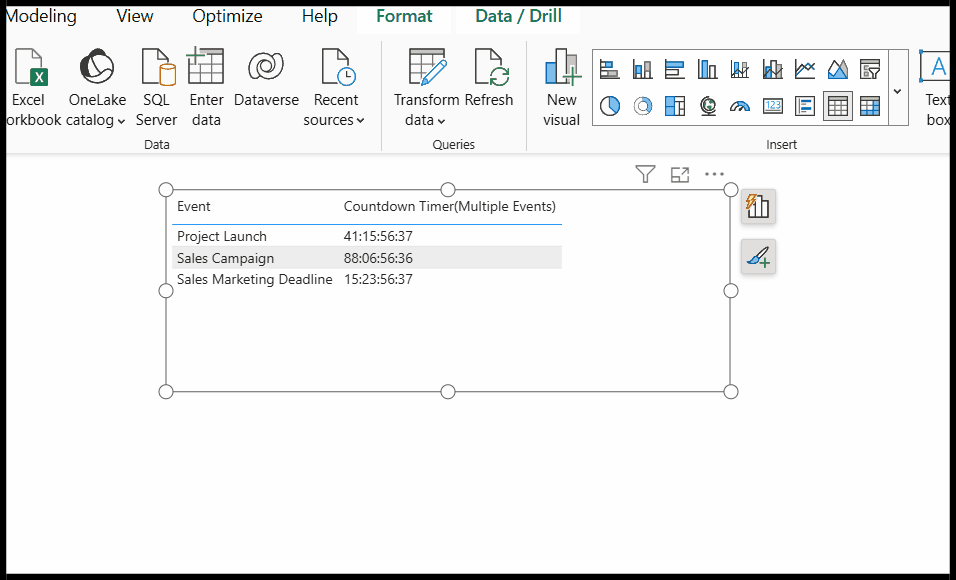
Conditional formatting can also be used to highlight urgency and alerts.
In this scenario, conditional formatting can be applied to the Countdown Time (Multiple Events) column as shown above.
In Conditional formatting (Quick Conditional Formatting, without measures).
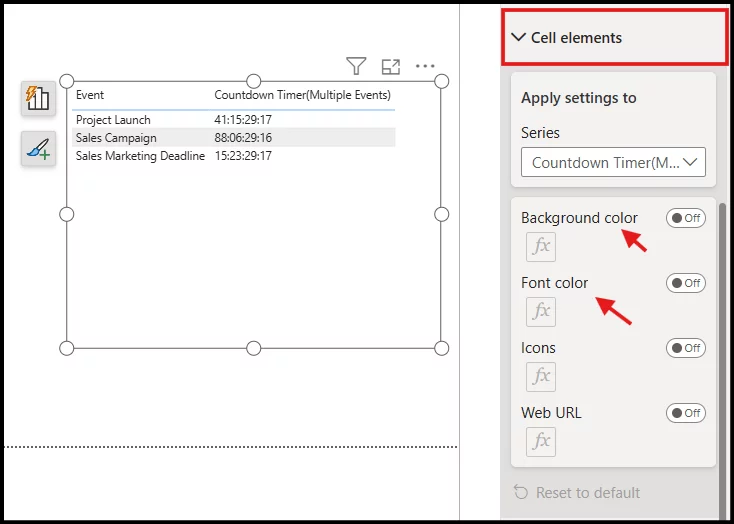
Conditional formatting can be applied to either the Background color or the Font color under Cell elements.
Select either Background or Font color. Pick Rules. Add the following rules.
- If value contains 🔴 EXPIRED, then Red.
- If value starts with 00: then Orange (less than 1 day remaining on the timer)
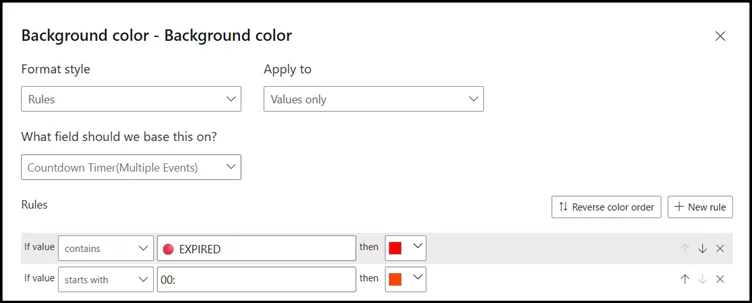
Feel free to add RULES based on your own countdown timer, calculations, and urgency needs.

Troubleshooting – Common Errors
There are multiple common issues with using a dynamic countdown timer in Power BI.
Common issues include:
Error 1 – NOW() is not updating as it only recalculates during interactions and when you click the Refresh button.
Error 2 – Timers freezing in Power BI Service are caused by browser caching or auto refresh disabled.
Error 3 – Format Errors when subtracting datetimes are caused by incorrect DAX syntax, especially using DATE() or DATETIME() functions.
Error 4 – Auto refresh is not supported in some environments as it requires Premium subscriptions to Power BI.
Troubleshooting – Solutions
Solution 1 – Enable Auto Page Refresh (Premium) in Power BI Service.
Solution 2 – You can also enable Auto Page Refresh (minimum 1 min) and add a Refresh button with bookmarks.
Solution 3 – Use DATEDIFF() for accurate calculations, then convert to dd:hh:mm:ss.
Solution 4 – Use Direct Query to connect to datasets, especially live data.
It’s important to use Measures and not Calculated Columns to ensure the dynamic behavior of the countdown timer.
For non-premium users, create a Bookmark in Power BI desktop, insert a Button, tied to the bookmark, to create a clickable Refresh button.

Best Practices & Tips
To ensure a seamless use of the dynamic countdown timer in Power BI, ensure that to adhere to the following practices and tips.
1 – Use Measures, Not Calculated Columns
Measures always overcalculate columns, as measures recalculate dynamically while calculated columns are static.
2 – Auto-Refresh Test, Early in Power BI Service
Power BI Desktop doesn’t support auto-refresh, test in service to avoid premium license requirements or API limit errors.
3 – Isolate Countdown Logic
Keep the countdown timer logic in a separate table as it’s easier to maintain and reuse across reports.
4 – Balance Refresh Rate and Performance
Frequent refresh (e.g., every 1 sec) can crash reports. Set refresh rate to hourly or daily.
Trainer Insight: On our Power BI courses, people often underestimate the impact of refresh rates.
Setting them too aggressively can slow reports to a crawl.
Setting them too infrequently makes the timer feel unresponsive.
Aim for a balance – typically between 1 and 15 minutes depending on the urgency of your metric.
Conclusion
Using countdown timers enhances time awareness while tracking deadlines or events visually to drive action.
It adds urgency and interactivity to your dashboards, and live countdowns help teams react faster to time-sensitive events, deadlines, and metrics.
Key limitations include NOW() functions not auto-updating within Power BI desktop, but auto page refresh in Power BI Service (Premium feature) allows for near real-time automatic updates.
The workaround helps maintain the dynamic countdown feature and functionality and avoids Power BI constraints.
The next step is to start with a simple countdown timer, add dynamic features, and test auto page refresh in Power BI Service or integrate with Power Automate for near real-time updates.
- Facebook: https://www.facebook.com/profile.php?id=100066814899655
- X (Twitter): https://twitter.com/AcuityTraining
- LinkedIn: https://www.linkedin.com/company/acuity-training/