
Mastering The Focus Cell In Excel
Contents
In recent updates to Excel for Microsoft 365, a subtle but powerful feature has been rolled out — the Focus Cell.
This tool helps you instantly identify where you’re working by visually highlighting:
- The active cell
- It’s entire row and column
- The row and column headers that intersect with the cell
While it may sound simple, this visual guidance greatly improves how you navigate and edit large spreadsheets.
The focus cell makes it easy to spot your position, reducing errors and boosting speed.
This feature is especially helpful for professionals working with wide sheets, complex forms, or rapid data entry.

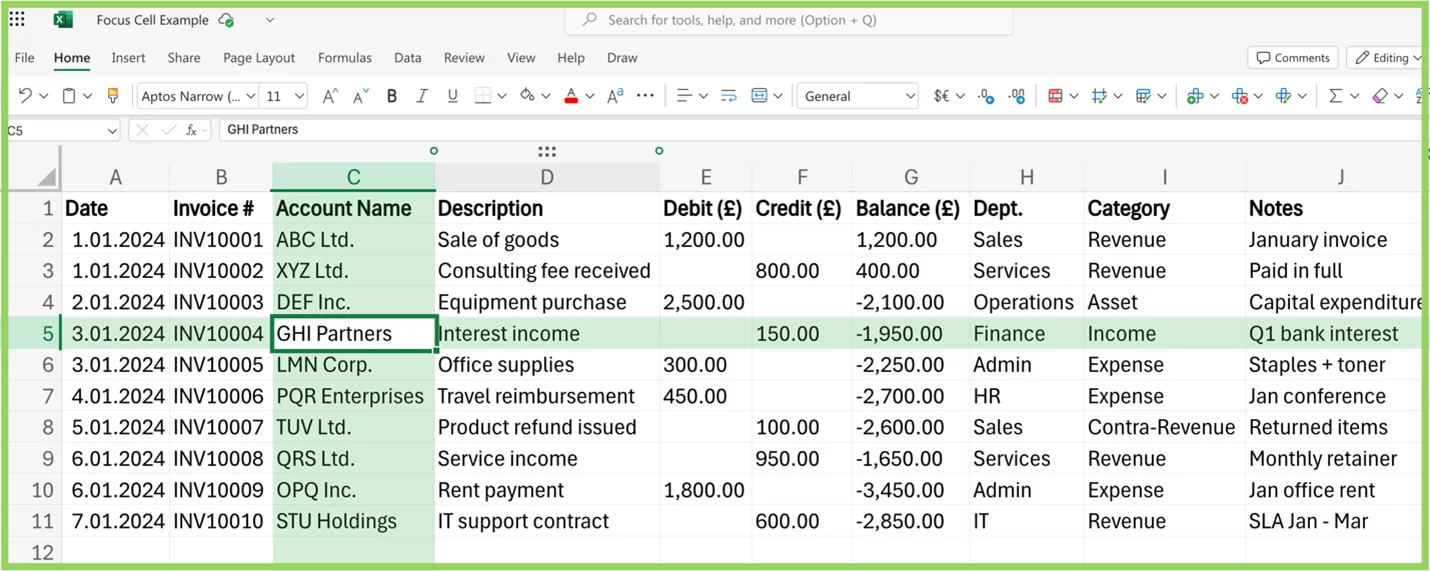
What Is The Focus Cell?
In Excel, the Focus Cell is the cell currently selected — and it’s now part of a visual system that helps you track it instantly.
What gets highlighted:
- The focus cell itself (outlined with a bold border)
- The entire row and column that intersect with it
- The corresponding row and column headers
This makes it easier to know exactly where you are, especially when scrolling through large datasets or working across multiple panes.
When practicing Excel in London, our delegates find this to be a really handy tool, as it helps them orient themselves.
Focus Cell vs. Active Cell vs. Selected Range
In earlier versions of Excel, the active cell simply had a bold outline – the only clue to where you were working.
The Focus Cell builds on that idea by adding visual cues like row and column highlights, helping you orient more quickly.
Meanwhile, a selected range can include multiple cells, but only one is the true focus: that’s where the data is entered, and where formulas are applied.
This subtle difference is especially important when navigating or entering data in large spreadsheets, where keeping track of your current cell position matters most.
Activating the Focus Cell
By default, the Focus Cell feature is turned off in Excel. To enable it:
- Go to the View tab on the ribbon
- Click the Focus Cell checkbox

Alternatively, use the keyboard shortcut Alt + W + E + F to activate Focus Cell (Windows only).
Once activated, Excel will automatically highlight the selected cell along with its entire row and column – making it much easier to track where you are in large sheets.
This feature works on Excel for Web, Windows, and Mac for Microsoft 365 users.
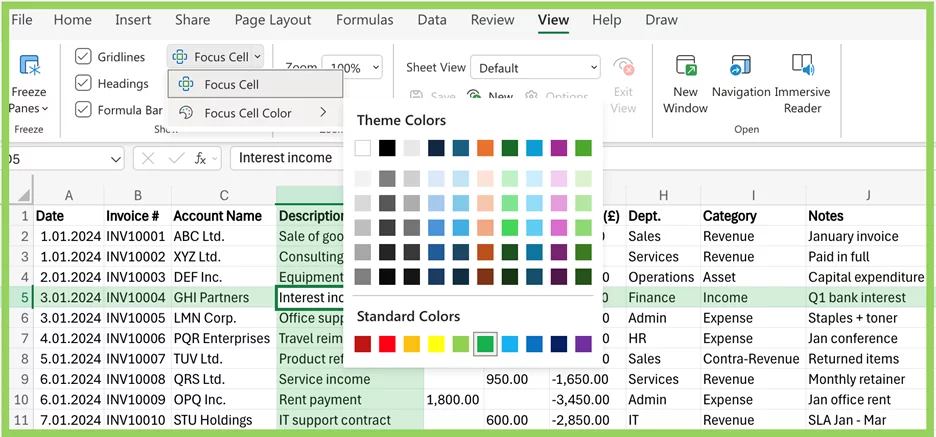
Customising The Focus Cell Highlights
You can customise both the row and column highlight shades by selecting:
View tab > Focus Cell ▼ > Focus Cell Colour
From here, choose from any theme colour or standard colours to match your preferences or improve visibility.
This is especially helpful for users with visual sensitivities or when presenting data on projectors.
Recommended Format Tip: When customizing Focus Cell highlights, choose a colour that contrasts well with your existing sheet formatting. For example, if your workbook uses light gray alternating rows or green conditional formatting for data validation, avoid using those same shades for the focus cell.
Instead, opt for a distinct accent colour – like soft blue or muted orange – that makes the focus stand out without clashing.
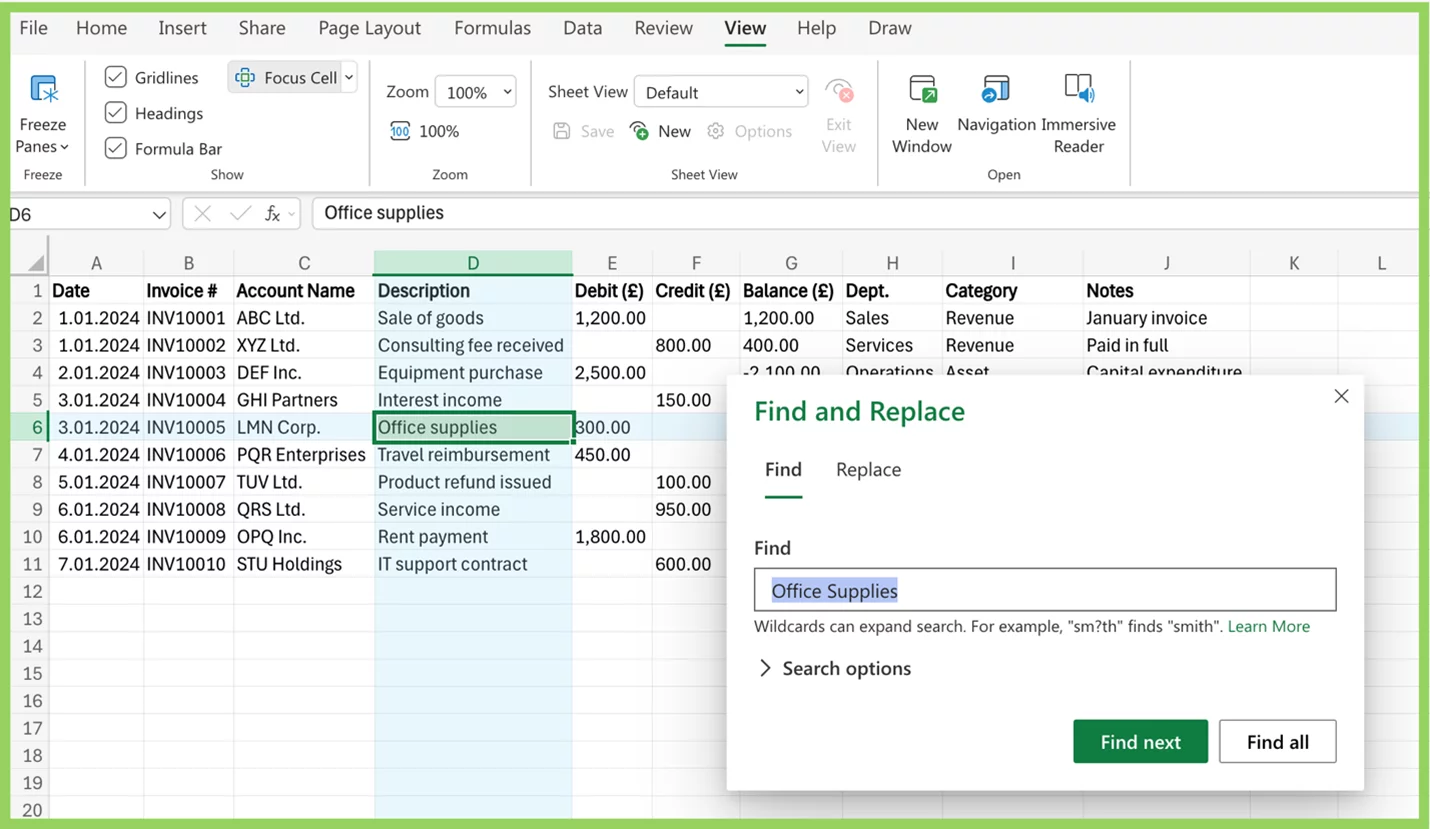
Auto-Highlight During Find & Replace
By default, Excel automatically enables the Focus Cell when you use Find & Replace. As it jumps to each match, the active cell gets highlighted along with its row and column – making it much easier to spot results, especially in large datasets.
You can control this behaviour by navigating to:
View tab > Focus Cell ▼ > Show Auto-Highlight
This setting toggles whether Excel highlights the active cell during search actions.
Keyboard Shortcuts (Windows & Mac)
Mastering Excel navigation begins with your keyboard, and the focus cell responds instantly to these built-in shortcuts.
Here’s a side-by-side view of the most useful focus-cell-related shortcuts on both Windows and Mac:
| Action | Windows Shortcut | Mac Shortcut |
| Move between cells | Arrow keys | Arrow keys |
| Move right/left | Tab / Shift + Tab | Tab / Shift + Tab |
| Move down/up | Enter / Shift + Enter | Return / Shift + Return |
| Cycle through corners of a selection | Ctrl + . | Cmd + . |
| Scroll to bring the focus cell back in view | Ctrl + Backspace | Cmd + Delete |
| Edit the focus cell | F2 | Ctrl + U |
| Go to a specific cell | Ctrl + G or F5 | Fn + Cmd + G |
These shortcuts not only keep your workflow smooth; they reinforce the value of staying aware of your focus cell, especially in large or fast-paced sheets.
How It Can Enhance Productivity
Understanding how the Focus Cell works – and using it strategically – helps you work faster, cleaner, and with fewer mistakes.
Here’s how it delivers real-world results:
- Faster Navigation: Spot your current location instantly, without hunting across rows and columns.
- Fewer Mistakes: The bolded cell and highlight guides reduce accidental data entry in the wrong spot.
- Formula Accuracy: Knowing exactly where you are helps ensure you’re referencing from the right cell every time.
- Data Entry: With clear visual cues, entering repetitive data becomes far more efficient
Pro Tip: Pair the Focus Cell with Excel’s built-in tools like Conditional Formatting or Data Cleaning to further minimize human error and increase reliability.
Conclusion
The Focus Cell may seem like a small visual aid, but its impact on productivity is anything but minor.
Whether you’re entering data, auditing formulas, or navigating large sheets, this feature gives you an instant sense of where you are and what you’re affecting — minimizing mistakes and streamlining your workflow.
For users working with large datasets, automated forms, or complex formulas, keeping track of your active cell is essential.
The Focus Cell’s row and column highlights help you stay visually grounded, even across frozen panes, multiple tabs, or shared workbooks.
Pro tip: Make a habit of enabling the Focus Cell, especially when working on detailed spreadsheets or training new Excel users. It reinforces spatial awareness, enhances accuracy, and simply makes Excel feel more responsive.
- Facebook: https://www.facebook.com/profile.php?id=100066814899655
- X (Twitter): https://twitter.com/AcuityTraining
- LinkedIn: https://www.linkedin.com/company/acuity-training/